Резервное копирование данных в Google Диск
Функция резервного копирования и синхронизации данных с устройств Windows в качестве преимущества облачного хранилища Google Drive. Инструкции по установке клиента облачного хранилища в среде Windows. Описание оптимальных настроек клиента предназначено для использования исключительно в качестве средства резервного копирования пользовательских файлов (без загрузки содержимого с Google Диска на компьютер).
Google Диск — одно из самых популярных облачных хранилищ в мире. Его популярность, конечно же, обусловлена силой его создателя, Google, но во многих отношениях это также выгодное предложение для пользователей Интернета.
Каждый зарегистрированный пользователь может:
- Храните до 15 ГБ информации в облаке совершенно бесплатно с самого начала;
- Работайте с файлами в веб-интерфейсе хранилища с помощью определенных сервисов, а также с помощью веб-приложений, созданных для Chrome OS и браузера Chrome;
- Используйте хранилище для резервного копирования данных в мобильных и настольных операционных системах, которые предоставляют это время;
- Синхронизируйте резервные копии файлов с устройствами Windows.
О последней особенности сервиса хотелось бы рассказать подробнее.
Видимо, что такого сложного в том, чтобы загрузить в облако папку с фотографиями, документами или другими важными файлами, а потом регулярно обновлять их отзывы? Ничего сложного, если бы это было главной проблемой в жизни. Google Диск может избавить нас от ручной работы по загрузке обновленных резервных копий в репозиторий. И синхронизируйте наши данные с любым устройством Windows. В любое время мы можем получить доступ к текущим версиям наших папок и файлов как на локальном диске устройства, так и в веб-интерфейсе хранилища.
Как использовать Google Диск для резервного копирования и синхронизации отдельных данных в Windows?
1. Клиентское ПО Google Диска
Ссылку для загрузки клиентского программного обеспечения Google Диска, которое интегрируется в среду Windows, можно найти в одном из пунктов меню вашего веб-интерфейса.
По ссылке нам предлагаются две клиентские программы. Один из них, «Клиент Google Диска», представляет собой программу, которая реализует программную оболочку в Windows для отображения данных хранилища. И позволяя при необходимости загружать их. Им могут пользоваться только корпоративные пользователи сервиса. Для обычных пользователей это не большая потеря, так как этот тип доступа к облачным данным может быть реализован другими способами. Например, настройте соединение WebDAV в системе (с помощью сторонних сервисов) или используйте универсальную программу для доступа к более чем 20 различным облачным хранилищам CloudBuckit.
Нас больше интересует другая программа: Google Backup and Sync («Пуск и синхронизация»).
Он предназначен для полного доступа к облачному хранилищу: программа загружает содержимое хранилища на локальный диск компьютера в свою специальную папку и синхронизирует эту папку с Интернетом. Однако от этой функции можно полностью или частично отказаться. И используйте программу только частично из-за ее другой примечательной функции: с точки зрения резервного копирования содержимого наших любимых папок в облако. Установите эту программу и запустите ее.
2. Первичная настройка клиента
Первоначальная настройка программы происходит сразу после ее первого запуска. Пользователи устройств Windows с SSD-накопителями, которые меньше всего хотели бы перетаскивать мусор, хранящийся в облаке, в систему, должны тщательно выполнить первоначальную настройку, чтобы отключить работу программы в плане загрузки и синхронизации содержимого хранилища.
После авторизации через аккаунт Google в окне клиента мы перейдем в окно настроек резервного копирования данных. Здесь вы должны снять галочки с ненужных папок, выбранных программой по умолчанию, и с помощью опции «Выбрать папку» указать путь к нашим любимым папкам. Другими важными настройками на этом этапе являются параметр «Параметры сети», расположенный внизу. В частности, в настройках сети можно сократить трафик для загрузки и выгрузки данных в программу.
Следующий этап — самый важный момент для настройки загрузки контента из онлайн-хранилища. Здесь вам понадобятся:
- Или измените путь к папке в облаке и укажите, например, папку на жестком диске;
- Или назначьте для загрузки и синхронизации только отдельные папки;
- Или полностью отключите эту функцию, сняв флажок.
В нашем случае был выбран последний вариант, поскольку нас интересует только резервное копирование данных на устройстве Windows.
Далее мы увидим, как клиент свернется в системный трей и уведомит о начале копирования содержимого указанных папок в облако.
3. Настройка клиента в любое время
Вы можете изменить настройки, которые были изначально заданы, позже.
И в любой момент установите одинаковую синхронизацию всего хранилища, добавьте другие наши папки для резервного копирования, откройте доступ к фотографиям и видео, загруженным из сервиса Google Фото, и т.д. Чтобы временно приостановить синхронизацию данных с облаком, например, при ограниченном подключении к Интернету, просто закройте программу Google Backup and Sync. И при необходимости удалите его из автозагрузки Windows.
4. Резервные копии данных с Windows-устройств в облаке
Резервные копии синхронизируемых папок в веб-интерфейсе Google Диска (в окне браузера) будут видны в разделе «Компьютеры». Служба не умеет распознавать тип и имя синхронизируемых устройств Windows, поэтому, если их несколько, чтобы не запутаться, вы можете переименовать их, присвоить каждому другой цвет и добавить марку. Устройства с брендом также будут отображаться в разделе «Помеченные». Все операции с папками и файлами можно выполнять с помощью пунктов контекстного меню веб-интерфейса сервиса.
С папками и файлами, хранящимися в разделе «Компьютеры», вы можете выполнять те же операции, что и с другими данными хранилища, расположенными в разделе «Мой диск»: просматривать, перемещать, скачивать. Единственное различие между первым состоит в том, что они не будут загружены на диск другого компьютера, когда на нем установлен клиент.
Чтобы перенести синхронизированные данные на другой компьютер, вам просто нужно загрузить их на него.
3 способа перенести данные из Google Drive: пошаговая инструкция
Два сервиса Google официально прекратили предоставлять услуги пользователям из России. Когда очередь дойдет до Google Drive, может быть слишком поздно для поиска решения по переносу данных. Аналитики Adventum заранее подготовили пошаговую инструкцию с тремя способами перенести данные с гугл диска.
В прошлом месяце мы наблюдали начало ухода Google из России: Google Ads приостановили работу, YouTube отключил премиум подписку, Google начали тайно вывозить сотрудников за границу. Google Drive пока еще работает с российскими клиентами, но в любой момент может отказать пользователям в доступе. Поэтому лучше уже сейчас сделать бэкап и перенести данные в другое хранилище. Если объем файлов в Google Drive меньше 2 ГБ, то их можно просто скопировать и перенести в нужное хранилище, например, на Яндекс.Диск. Но если ваша компания работает уже несколько лет, а объем рабочих файлов измеряется сотнями гигабайт, то оперативно перенести все данные таким способом не получится.
В этой статье разберем три способа переноса данных:
- перенос небольших объемов данных с помощью Google Takeout;
- бекап на компьютер с помощью InSync;
- синхронизация Google Drive c сервером с помощью InSync.
Google Архиватор, так называется сервис в российской версии, экспортирует данные из продуктов Google в формате архивных файлов.
Этот способ подойдет, если вы хотите однократно выгрузить небольшой объем данных и больше не пользоваться диском.
Ограничения
- Максимум одного экспортного файла — 50 ГБ. Если на диске больше данных, он дробится на файлы по 50 ГБ. То есть если у вас на гугл диске 1 000 ГБ данных, то нужно 20 раз нажать на кнопку «Скачать».
- Выгрузка бэкапа может занимать несколько дней.
- Данные в бэкапе не обновляются. В архиве хранится только та информация, которую вы скачали с диска. Если вы продолжаете работать с диском, то нужно постоянно вручную скачивать бэкап. Иначе когда Google отключит диск, вы потеряете все обновленные данные.
Инструкция по переносу данных на компьютер с помощью Google Takeout
Откройте сервис Google Takeout и авторизуйтесь в аккаунте, с которого нужно перенести информацию. Сервис предложит выбрать данные, которые нужно сохранить: задачи, контакты, диск, календарь и т. д. Чтобы сохранить данные только с диска, отмените дефолтный выбор.
И оставляете галочку выбора только рядом пунктом Google Drive.
Далее выбираете однократный экспорт, тип и размер файлов.
Нажимаете на кнопку «Создать экспорт» и подождите, когда он завершится. Сформированный файл скачайте на компьютер и переносите в новое хранилище.
Эта программа сделает единоразовый бекап вашего гугл диска и выгрузит его на компьютер или любой другой носитель, в том числе облачный.
Этот способ подойдет, если вы хотите однократно выгрузить большой объем данных и не продолжать работу с гугл диском.
Ограничения
- Все данные будут храниться на компьютере. Объема его диска может не хватить для хранения всех данных с Google Drive.
- Google ограничивает скорость синхронизации данных, поэтому процесс скачивания бэкапа может занять несколько дней (но меньше, чем Takeout).
Инструкция по переносу данных на компьютер с помощью InSync
Чтобы перенести данные с диска на компьютер, скачайте программу InSync.
На сайте сервиса выберите вариант For desktop и свою операционную систему — Windows, Linux или Mac, нажимаете «Скачать».
После установки программа предложит выбрать хранилище, с которым нужно синхронизироваться — Google Drive, OneDrive или Dropbox. Выберите Google Drive, подтвердите вход в аккаунт и дайте необходимые разрешения. Затем настройте процесс синхронизации.
На четвертом шаге важно выберите конвертацию в Microsoft Office, иначе файлы Google Docs, Google Sheets и Google Slides в бэкапе сохранятся ссылками. Если диск отключится, то доступа к этим файлам не будет.
На последнем шаге отметьте, какие файлы нужно скачать. Чтобы сохранить все файлы, отметьте «Select all», если хотите перенести часть документов — выберите нужные.
Теперь останется только дождаться экспорта данных на компьютер.
Решение синхронизирует ваш диск Google с любым хранилищем. Это один из самых надежных и удобных способов переноса данных.
Этот способ подойдет, если вы хотите продолжать работу с Google Drive и параллельно иметь постоянно актуальный бекап данных в облаке. Сервер в фоновом режиме скачивает новые файлы, которые появляются на диске, и обновляет старые. Данные с сервера можно скачать на компьютер, на расшаренный сетевой диск или на облачный сервис.
Ограничения
- Внедрение такого решение требует технического специалиста.
- Google ограничивает скорость синхронизации данных, поэтому процесс может занять несколько дней (но меньше, чем Takeout).
Арендуем сервер. Мы в Adventum работаем с Selectel и покажем процесс настройки синхронизации на его примере. Сначала нужно зарегистрироваться на сайте Selectel и войти в личный кабинет. Затем в левом меню выбрать «Облачная платформа» → «Серверы» → «Создать сервер».
Далее нужно оценить мощность созданного сервера. Количество процессоров и мощность оперативной памяти можно взять минимальное, а вот объем жесткого диска выбирайте исходя из объема файлов, которые хранятся на диске Google.
Важно! Google не учитывает объем документов, таблиц и презентаций, которые хранятся на диске, и занижает объем данных. Когда вы конвертируете файлы в Microsoft Office, их объем будет намного больше, поэтому рекомендуем выбирать объем диска на сервере в 2−3 раза больше, чем объем данных на Google Drive.
Если хотите сэкономить, то выберите базовый тип диска — это никак не скажется на скорости его работы, но значительно снизит стоимость сервера.
После настройки параметров нажмите «Создать сервер». Дождитесь, когда новый сервер станет активным и нажмите «Открыть консоль».
Когда консоль полностью загрузится, введите на экране логин и пароль — они указаны над рабочей областью.
Синхронизируем InSync и Google Drive. На сайте InSync нужно выбрать установку на сервер.
Для Selectel по умолчанию устанавливается операционная система Ubuntu версии 20.04. Выберите ее и скопируйте команды, которые появляются в рабочей области, только без знака $.
Первая команда скачивает установочный файл, вторая команда запускает его.
Чтобы запустить программу, в консоли пишете «insync». Введите первые буквы, нажмите Tab и весь остальной текст подставится автоматически. Далее напишите команду «start». Если после этого в рабочей консоли не появятся дополнительные записи, значит, программа запустилась, и ошибок нет.
В следующей строке снова пишете то же самое, но вместо команды «start» добавляете «account add», чтобы добавить аккаунт Google.
После этого в консоли появится справка, которая расскажет, что еще добавить к команде:
После того, как все данные настроены, снова напишите начало команды с «insync-headless», нажмите Tab и добавьте команду «selective-sync». Это позволит выбрать файлы, которые нужно синхронизировать, прямо в консоли. Для перемещения по файлам нажмите стрелки вверх или вниз, для выбора нужного файла — пробел. Чтобы подтвердить выбор, нажмите Tab. Можно нажать Ctrl+x, в открывшемся окне выбрать check all — так вы выделите все файлы.
Чтобы проверить, прошла ли синхронизация, перейдите в папку mnt, в которую передаются данные. Для этого напишите команду «cd /mnt», затем команду «ls».
В консоли можно убедиться, что файлы находятся на сервере в папке «mnt».
В этой статье мы рассказали о трех способах, как перенести данные из Google Drive:
- встроенный инструмент Google Takeout;
- сервис InSync для бэкапа на компьютер;
- и InSync для синхронизации через сервер.
Третий способ позволяет синхронизировать работу диска с сервером, поэтому вы можете продолжать работать с диском, а если его все-таки отключат, то на сервере сохранится последняя обновленная версия данных.
Как сохранить копию облачного диска Google и Apple
Сохранить данные из Google Drive можно несколькими способами. Самый простой — вручную скачать все файлы. Для этого нужно перейти на главную страницу сервиса и зайти в корневой каталог с данными — «Мой диск». Далее нужно выбрать папки и файлы (можно выбрать все при помощи сочетания клавиш Ctrl + A), затем в правом верхнем углу нажать на значок с тремя точками и выбрать пункт «Скачать».
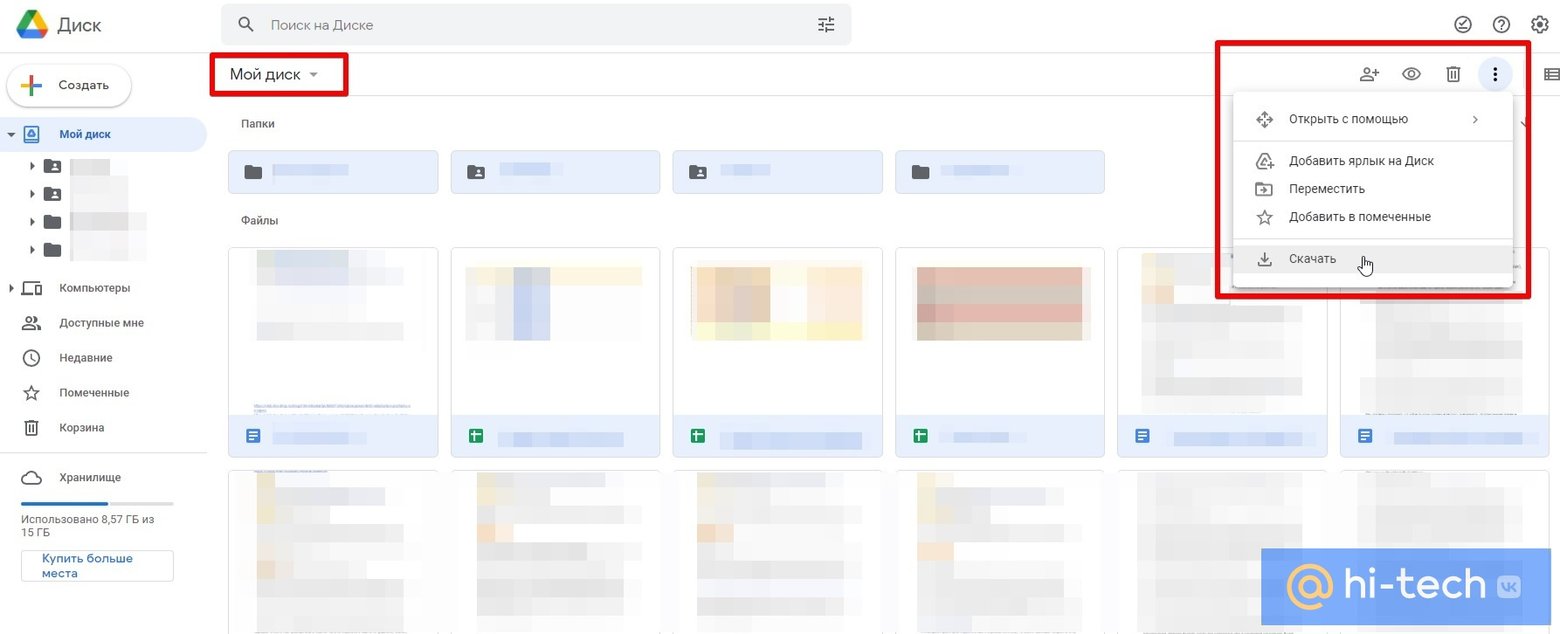
Обратите внимание, файлы должны прогрузиться, прежде чем вы сможете выделить их все. То есть страницу нужно пролистать до конца. В противном случае выделены будут не все файлы. Если их слишком много, то страничка может даже подвисать.
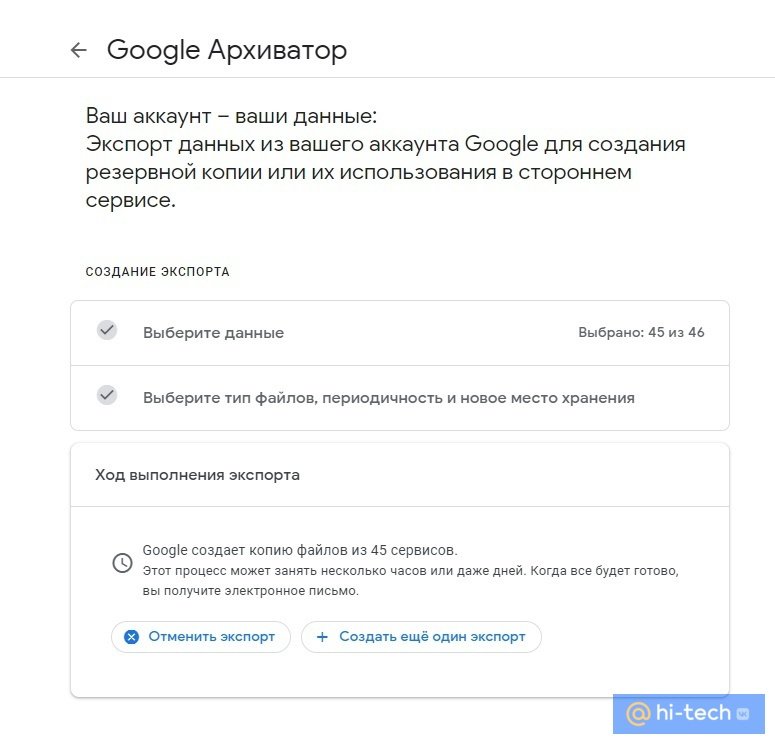
Есть также более удобный способ, который позволит скачать не только файлы с облака, но и другие данные вашего аккаунта Google: письма, историю местоположений, фотографии, закладки браузера и многое другое. Все это доступно в рамках сервиса Google Архиватор. Подробнее о процессе мы писали в статье «Как сделать резервную копию данных Google».
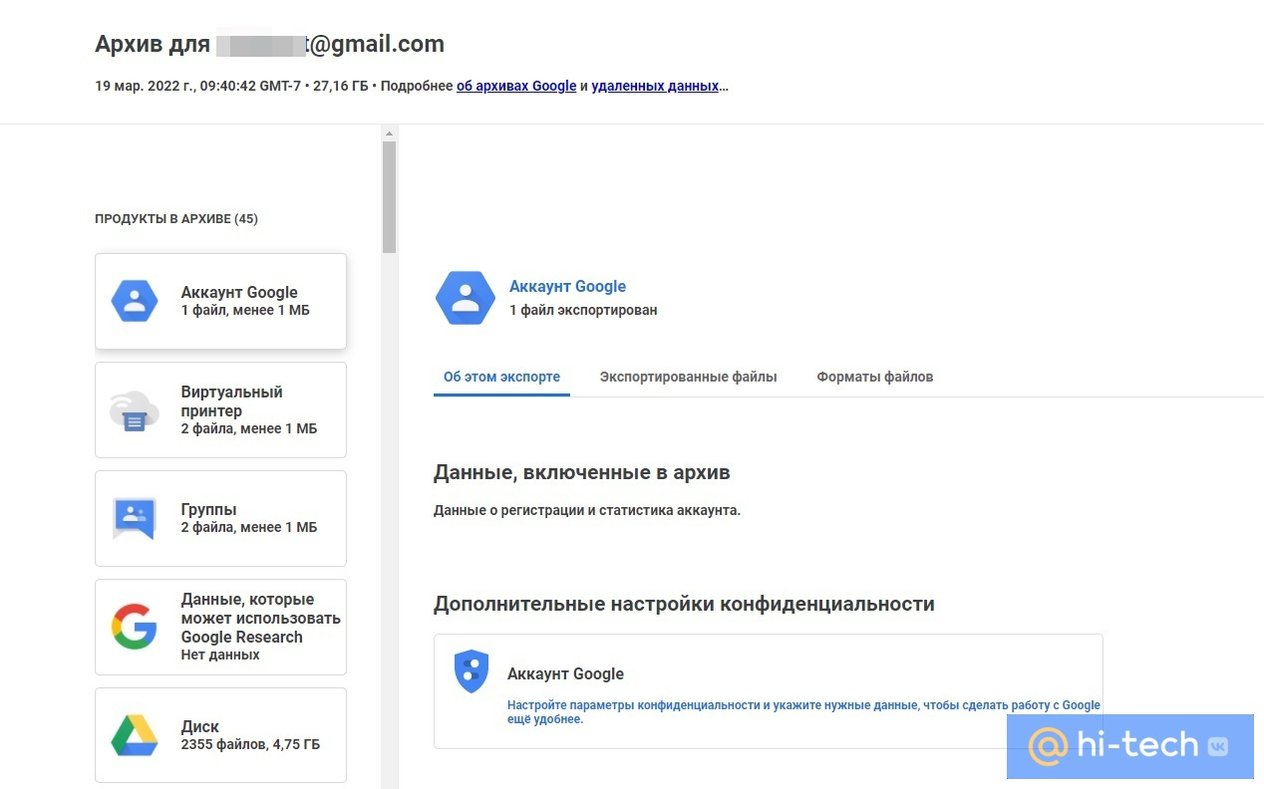
В отличие от скачивания вручную, архив с данными может создаваться продолжительное время: несколько часов или дней. Поэтому перед созданием бэкапа нужно убедиться, что у вас есть время подождать пока архив формируется.
Как сохранить документы Google
Текстовые документы и таблицы на самом деле тоже хранятся на Google Drive, поэтому их можно сохранить вместе с остальными файлами. Если нужно сохранить только некоторые документы, то это можно сделать вручную. Необходимо зайти в документы и в верхней строке меню выбрать «Файл», затем «Скачать». Можно сохранить документ в одном из распространенных форматов: PDF, DOC, ODT и других.
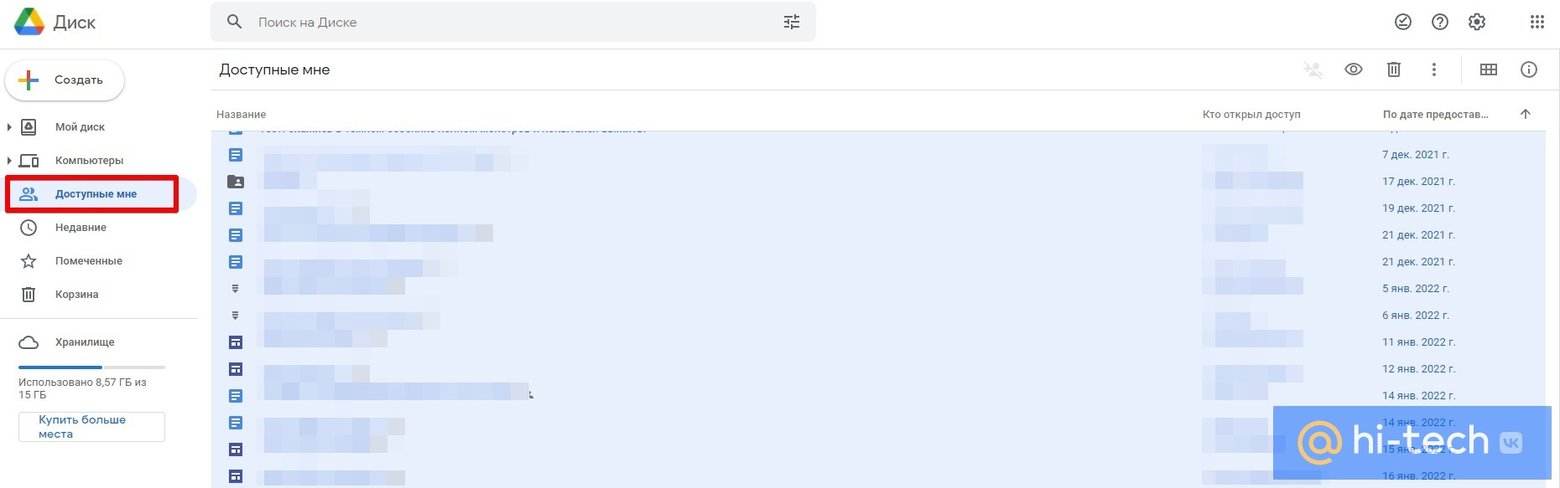
Если нужно сохранить документы, которые принадлежат другим пользователям (то есть документ создан не вами), но доступны вам для просмотра или редактирования, то это тоже можно сделать. На Google Drive есть отдельная папка «Доступные мне», в которой и хранятся все доступные документы. Их все можно выделить и скачать, как и другие облачные файлы.
Как сохранить фотографии Google
Фотографии сервиса Google Фото сохраняются через Google Архиватор. Как вариант, инициировать создание резервной копии можно и через Google Фото. Для этого нужно зайти в настройки и выбрать пункт «Экспорт данных», затем «Сохранить резервную копию».
Как сохранить данные Apple
Скачать необходимые данные можно также и из учетной записи Apple. Для этого нужно перейти по ссылке appleid.apple.com/account/manage, а затем найти пункт «Конфиденциальность». Нажмите на ссылку «Управлять данными». Далее можно либо скачать данные, либо запросить перенос фотографий и видео на другой сервис. В нашем случае актуально именно получение копии данных. Нажмите на ссылку «Запросить получение копии данных» и выберите, что именно нужно сохранить.
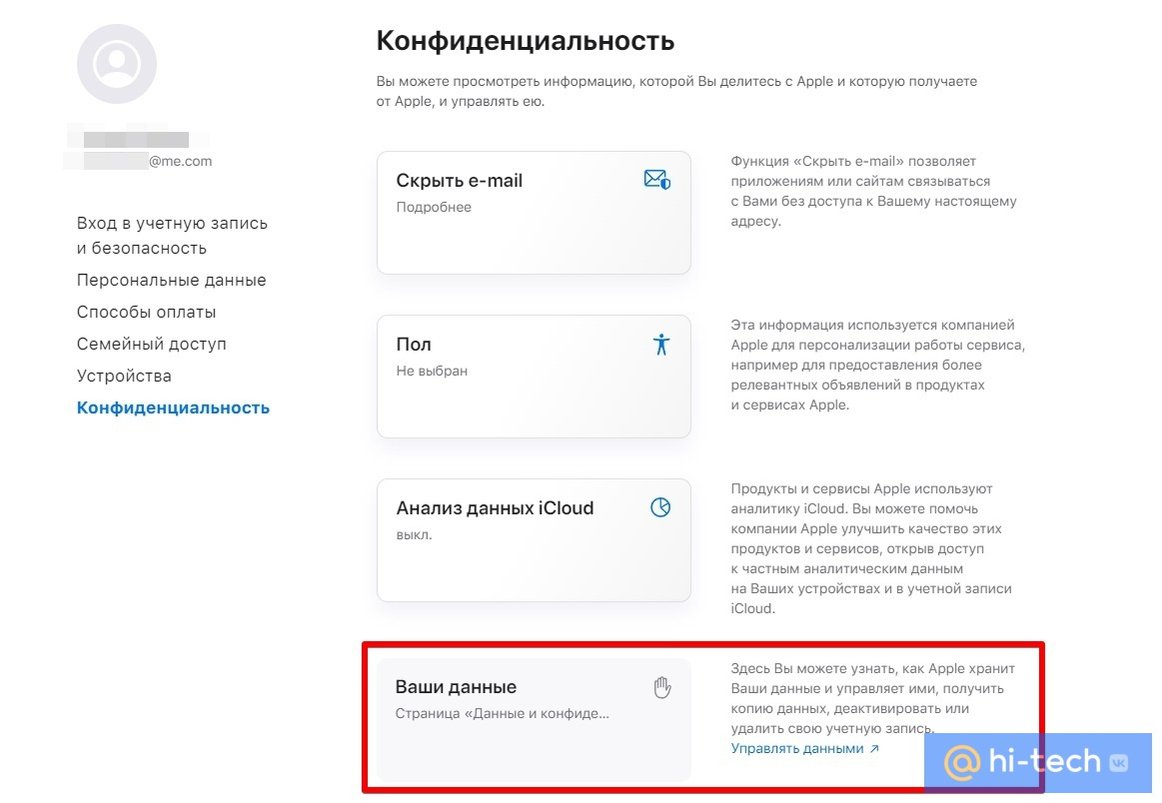
Как и в случае с аккаунтом Google, доступны облачные файлы, закладки из браузера и т. п. Также можно выбрать максимальный размер файла. Будет полезно, если вы захотите перенести архивы на облако, где есть ограничение на максимальный размер файла.
How to Back Up to Google Drive: Protecting Your Data in 2023
Google Drive is one of the easiest cloud services to use, which makes it a good choice for cloud newbies looking to back up their data. This guide will show you how to back up to Google Drive so you never lose your data again.
With more than a billion users, Google Drive is the biggest cloud storage service on the planet. In fact, whenever you create a personal Google account, a Drive account is automatically created for you. Because of that, you probably already have an account with the cloud service, and you might want to take advantage of that by saving your backup to Google Drive.
Key Takeaways:
- If you’re not keen on getting a dedicated online backup app, using Google Drive to back up your computer is easy to do.
- Although uploading to Google Drive is as simple as dragging and dropping files into the Google Drive website, we don’t recommend moving files manually.
- You can automate the backup process by letting Google Drive sync your existing folders to the cloud. Every change you make to the folders you sync will be reflected in the cloud versions of the folders as well.
Cloud storage services aren’t created with hard drive backups in mind; that’s what online backup services are for. However, there are ways to do a Google Drive backup of your computer’s hard drive.
You can also use Google Drive to back up Android, in case you’re switching phones and want to keep all your data (Google Photos can help with that, too). However, this Google Drive backup guide will focus on creating backups and restoring Google Drive files to your computer.
There are several ways to do this, but the most reliable way is to use the Google Drive for Desktop app. This lets you use your Drive folder to back up any files you choose, but it will take additional steps to back up your entire computer. Read on to find out how to back up your hard drive to the cloud using Google Drive.
Google replaced the Backup and Sync app with Google Drive for Desktop. The guide has been updated to reflect that change.
- Is Google Drive Good for Backup?
Drive will do a decent job of backing up your files, while keeping them readily accessible. However, a true online backup solution, like IDrive, will give you many more options to customize your backup.
Yes, every Android phone lets you back up your apps, settings and data to Drive, so when you get a new phone you have all your stuff there without having to download it manually.
Google Drive for Desktop replaced Backup and Sync as the default app for Drive. It’s functionally the same thing with a few added features, like the virtual drive, as well as simplified settings.
How to Back Up to Google Drive: The Drag-and-Drop Method
Sometimes the best thing for productivity is to have all of your important files and folders in one place. If you need quick access to those files, you can back up your data to the “My Drive” folder. To do that, you have to install the Google Drive for Desktop app on your computer. This will create a “My Drive” folder, which you can use to back up data.
To back up files to Drive, simply copy them to your “My Drive” folder. You can also do the same via the Google Drive website. Just log in with your Google account and open Drive. Next, drag and drop whatever files and folders you need to back up. It really is that easy, but it comes with some drawbacks.
Problems With the Drag-and-Drop Method
One problem is that syncing files this way doesn’t preserve your folder structure, and you can easily forget to copy some files or folders. Another downside of using the “My Drive” folder to back up your files is that you create a copy of each file, so if you want to back up your hard drive, you’re going to need twice the space that your data already takes up.
If you choose this method to back your data up, you will need to reupload files manually every time you edit them. You will also need to manually upload any new files you create, plus it’s easy to forget which ones you’ve already uploaded (read our guide on how to upload to Google Drive).
Using Google’s Virtual Drive
A virtual drive solves many of the issues that sync folders have. A virtual drive attaches to your computer just like a hardware drive would but uses your cloud storage instead. In Windows Explorer, it will look similar to Local Disk (C:), as you can see in the image below. Files you upload to this virtual drive don’t take up any additional hard drive space.
If you want to, you can just drag and drop files into the drive to upload them, but the inconvenience of manually uploading still remains.
The next way to back up files remedies these issues, so keep reading to find out the best way to automatically back up files with Google Drive. Of course, a better option would be to use a dedicated backup service instead, like Backblaze backup.
Back Up Your Computer to Google Drive Automatically
Google Drive for Desktop gives you several options during installation, which you can change anytime you like. One of these choices is which computer folders to back up to Drive. This option creates a continuous link between your computer and the cloud, plus you don’t have to create two copies of every file.
If you’ve ever used a backup service like IDrive, the next step will be familiar (and if you haven’t, you can read our IDrive review). Like IDrive, Drive will automatically find folders to back up, such as “desktop,” “documents” and “pictures.” From this menu, you can also click the “choose folder” button to back up any folder you like.
The most useful thing about this method is that you can back up an entire partition. This means that if you have a separate partition (those “local drive” folders on your computer) with all your important files, you can just select it with the “choose folder” option, and it will keep your folder trees as they are. Here’s how to do this step by step.
-
Open the “Preferences” Menu
You’ll find Google Drive’s app in the taskbar. Click on the app’s icon and then click the gear icon in the top-right corner. You should see the “preferences” menu there.
You’ll be greeted with Google’s “preferences” menu. Make sure you’re on the “my computer” tab and click on “add folder.”
Once you click on the big blue button, you’ll get a pop-up window that lets you choose a folder to back up.
Next you need to choose whether to sync all your files to the cloud, or just your photos and videos. The option “sync with Google Drive” will upload everything, while the “back up to Google Photos” option will only back up the photos and videos the software detects in that folder.
Finally, just click “save” to start the backup process.
Can Google Drive Automatically Back Up?
One of the biggest benefits of the automatic backup method is that every file you create or work on is automatically updated as you go. This means you can work as you always do, without having to change your habits or folder structure. The automatic backup method also helps save space because the files don’t get duplicated to your “My Drive” folder.
However, Google Drive’s free plan is only 15GB, so to back up more than that you will need to upgrade to a paid storage plan. If you’re on a tight budget, Carbonite is a backup service that offers unlimited storage at a very low price (read our full Carbonite review).
Google Drive Automatic Backup Settings
If you use Drive to back up your computer, you may have to change some network settings. Backing up many files means lots of data is being transferred to the cloud continuously and slowing down your connection. By default, Drive doesn’t limit your bandwidth. This is the best option if you have an unlimited data plan and you only care about fast uploads.
How to Limit Bandwidth With Google Drive Data Backup
There will be situations where you need to limit the bandwidth that Google Drive uses. To do this, go into the “preferences” menu and click the gear icon in the top-right corner. This is the “settings” menu that houses options for startup behavior and bandwidth management. Clicking the “download rate” or “upload rate” buttons will let you throttle Drive’s bandwidth.
How to Adjust Google Photos Backup Options
The “settings” menu also hosts settings for Google Photos backups. You will see the option to upload photos in “storage saver” mode or “original quality.”
“Original quality” means your photos are uploaded as they are, and “storage saver” means they are uploaded as compressed files. You can also choose to upload screenshots and camera RAW files.
How to Restore a Backup From Google Drive Storage
Restoring your backed-up Drive files is very easy and simple. Because your data is stored in the cloud, it’s always available to download via the Google Drive website. If you’ve deleted the files from your Drive, you can still try to restore them using data recovery software.
How Do I Access My Google Drive Backup?
Google Drive Website
The easiest way to access your Drive files is via the Drive website. Its interface is easy to use. If you want to download a file or folder from the website, just right-click on the file or folder and select “download.”
However, Drive doesn’t let you download all of your data at once. Luckily, Google has a service called Google Takeout that does just that. You can download all of the data Google has on you using Google Takeout, and that includes your Google Drive files.
Backup and Sync App
The next way to download your Google Drive backup is with the Backup and Sync desktop app. You can choose to sync the backup folders on your Google account, and they will be downloaded to your Drive folder.
There are also Google Drive apps for iPhone and Android that let you access your Drive files. These apps can back up text messages to Google Drive, plus they can automatically back up photos to Drive. If you’re on Android, you can back up your entire phone, including settings and apps.
Final Thoughts
To recap, there are several methods for using Drive to back up your data. All of them have some advantages and drawbacks, but if you follow this Google Drive backup guide, you shouldn’t have any trouble.
The first method is to drag and drop files into the “My Drive” folder or the Google Drive website. This method will create duplicates of your Drive files, plus you have to back up your data manually (we have a guide on how to remove Google Photos duplicates in case you need it).
A much better way to back up your files to Drive is to use the Google Drive for Desktop app to select which folders to back up to the cloud. You can set up Google to automatically sync existing folders on your computer, which lets you work on files and have them continuously uploaded to the cloud.
We hope this Google Drive backup guide was helpful to you. If you have any questions about using Drive to back up your data, feel free to drop a comment below. Also, check out our guides on how to transfer ownership of a Google Drive folder or move files from Google Drive to Google Photos if that’s something you need to do. Thank you for reading.
33 thoughts on “How to Back Up to Google Drive: Protecting Your Data in 2023”
Hi Ritika,
First, thanks for featuring CloudBerry here. My 2 cents, Google Drive is not really designed for backups. As you mentioned it’s more a sync storage then backup storage, thus it comes with weak load-bearing capacity. Google limits very frequent requests to reduce excessive load on their servers. When you try to access it too often you will see a error message – “Please, reduce your request rate”. If you want to backup you sensitive or business data better use Google Cloud Storage. We have compared Google Drive to Google Cloud Storage from the backup perspective on our blog – http://www.cloudberrylab.com/blog/choosing-online-backup-storage-google-cloud-storage-vs-google-drive/. Check it out!
Just came across your post while looking at various ways to utilize Google Drive for backup. I actually use Google Drive combined with SyncBackPro and it works excellent for me. You can use one Google Drive and backup important individual files and folders to the specified folder on your drive. I installed it in couple locations to backup company data and is running without any problems so far. All locations backed up to a single 100GB Google Drive.
Well google drive is good idea but,to use this you need a google Id.There is much better option available,Cloudberry, which is more user friendly and can be used with any email account.
not real sure about google drive an how to use it to the best of my knoledge
What would happen if your computer was hit with ransomware and you are syncing. I would think that all of your files on Google Drive would be infected as well upon synchronization, rendering them useless. Unless there is some way to restore from a different date, this seems a problem.
The ransomware shouldn’t be able to lock up the storage/backup provider, so you could roll back to a previous version and then continue like nothing ever happened.
I’m probably using Google Drive in an inappropriate way, that is, as an external virtual hard disk. My need arose from needing more disk space on my PC, keeping my files safe and being able to access them from any device. I then moved all my photos, organized into folders, and a series of additional folders to Drive. What puzzles me is that so I do not find on the hard disck of the PC all the free space that I expect, but only a part. And also, while I can access files copied or moved from Drive to my PC, to access other devices, I need to start syncing. In short, I do not understand how everything works.
Can I change something using Drive to get the “minimum” result I had set myself?
It’s not the best way to use Google Drive, but if it works for you… By what you’re telling us here, I have a feeling you’re not deleting the content once you’ve moved it to Drive. So move it all over, check it’s there, then delete it on your own HD, I guess. Good luck!
I have been uploading my Data Folder to Google Drive. I did indicate to overwrite previous data, however, it seems that the storage space available still decreases. Will this procedure use up all the Google Drive storage, and secondly, do you have a better option? Thanks!
I would like to ask for a clarification before subscribing to a cloud, I am contemplating on which cloud server to use. My usb ports on my macbook are broken and needs fixing but I think I would prefer to purchase a cloud storage for my datas and photos at the time being.
If I would like to transfer my files (photos,videos etc) to OneDrive and then delete them off of my mac. will the files in OneDrive be deleted as well? or it will remained in the drive?
Great review, thanks. Can you let me know if Backup & Sync changes the file size on the computer (mac) when in HQ mode. I understand the files change size in google drive but is does the original remain the original file size on the hard drive? I see the word sync and am curious?
I’m utterly confused! I have purchased extra storage and yet I cannot EVER get to screen that looks like any of the ones in this article! It’s 12/20/2018, and I’m using Win 10, Chrome, and everything Google there is! �� BUT, when I click on the 3 dots, I NEVER see a preferences, and I’ve never been given an option of “my laptop” … what gives? I am using Drive, but it’s not letting me use it as a network backup. HOW do use I use this stuff??
You specifically need to download the backup and sync program here https://www.google.com/drive/download/backup-and-sync/. From there on out, just follow the instructions.
Is Google Drive safe for backing up private documents? (I’m talking about hackers)
Hi I am android developer , how can I synch my custom app with my own google drive synch data option, just like whatsapp? Thanks in advance.
Hello, great post. Ive synced from my laptop but the folders don’t show in ‘my drive’ (and therefore don’t show on explorer). I can only download them from google drive on the web! How do I get them into the my drive folder?
After reading all this I think I’ll stick with drop box. If it works for me why confuse myself with drive again. I thought it might be better in 2019 I’ll just use drive to dump stuff in but for every day business on multiple devices I just want simple folders in windows explorer and that’s how I use drop box.
I bought 2 TB on Google drive however I am not sure it serves my need. I am looking for an extra space where I can copy some folders and keep them in syncy with my PC. I also would like to be able to acess them from any other device
I am also looking for a synch tool that can automatically identify any photo and video, and copy is to the cloud. while removing duplicates.
any idea what can work for me?
That’s exactly what the Google Drive Sync app does – you can select whatever folder you want to keep in sync with your PC. I’m currently doing this exclusively for all of the photos on my PC, and it works great.
I accidentally deleted a long SMS thread from my messaging app message+ version
6.8.5 from my Samsung Galaxy S8 plus running Android 9. I have my whole phone backup to Google Drive. I have a backup that contains the SMS messages that were deleted that has that thread in those SMS messages and I’d like to be able to restore them to my phone. That’s backup is not the current backup on the Google drive but it is the backup before that one so it is the last backup possible . But I can’t find any instructions anywhere on how to restore anything from a backup from Google drive on Google Cloud. All I can find is how to use it to set up a new phone if you’re going from an old phone to a new phone. I don’t want to restore anything else just the SMS messages I don’t care about any of the other threads they can be written over, they can be deleted, they can be saved as they are, it doesn’t matter all I really want is the thread I accidentally deleted and one more thread if it’s possible. But that one that I deleted is the most important one to me. The other one I currently have, if there’s a way to export it without going to each and every message in it I would be happy to do that, it would be great. But I’m at a loss of what to do because I can’t find any instructions or help anywhere with this. I can find on Google forums people asking the same thing and then that question being marked as closed and locked so that you can’t get any information from it. So I submitted this same information to that Google forum. Anybody have any idea how I can do this? I’ve not been allowing my phone to use Wi-Fi or data because I don’t want a new backup over writing this backup that has the SMS messages in it. If I turn off Backup it says it’s going to delete all backups that are existing. And then it says that if you haven’t used your phone in X number of days it’s going to tell you you have X number of days before your backups going to expire and be deleted. I made this mistake I’ve deleting. SMS message thread on the 4th of July. Can anyone help me please please please
I can’t see three dots at top right giving me options to choose what I sync?
Google Backup & Sync is a great program, but it doesn’t dance nicely with QuickBooks all the time… I use QuickBooks Desktop Pro 2019, and saving my active QuickBooks files in a folder monitored by GB&S results in error -6189 -816 when I try to open my files. Pausing GB&S before I open them solves the problem, but the more elegant solution is to save your active QuickBooks files in a folder that is NOT MONITORED by GB&S and then configure QB to automatically save a backup to a MONITORED folder at exit.
If i sync my folders to google drive and a hacker breaks into Google and deletes my files on google, will it delete my files on my laptop?
Nope, though if you only access your files via Gdrive using a laptop then the files will be gone. But if you have them natively on your hard drive, they should be sound even if Gdrive is hacked.
Are you sure about that? As far as I understand synching usually works both ways! So if I delete something on the local hard drive, it wil also be deleted from the Google cloud drive. If I delete something in the Google Cloud Drive, it will most likely affect the local hard drive also? Isn’t that what synching usually means?
Google Drive should not in any way be considered as a backup. It is a file syncing and sharing environment. Yes you have versioning, but this will not restore current files. Files encrypted with Ransomware will sync back to google drive unless syncing is turned off. But if you do that, what’s the point of Google Drive. Always invest time in a proper backup solution to another cloud provider or external device that way you can recover your files quickly and easily.
Today my Backup & Sync app has been replaced by the new Google Drive for desktop app and it seems that the new app has not the backup feature anymore. I can only find the sync option but not the backup. Anyone has noticed this? Have you found any viable solution?
Same here, This is a huge problem for all Google backup and sync current users.
I’ve been doing personal backups online for 5-8 years. Not a long time. Yes in this time I had to switch from one I don’t recall the name of, because it went bankrupt, to Crashplan, then to Spideroak in 2017 because Crashplan ditched their consumer business. Now, Spideroak’s web interface has remained the same for many years now, is very slow, and also my local folder structure does not match the one online, leaving me to wonder whether it has really backed up all my files… All this time I never relied on Google because it was too expensive. Now with the 5TB storage of Google Drive, I am inclined to rely on Google because I am very tired of the “new kid on the block” approach for Backup. Backups are sensitive. They are meant to be with a company that is there and hopefully will stick around for some time.
“Today my Backup & Sync app has been replaced by the new Google Drive for desktop app.” – I have the same experience and I can not sync my files. How do I do this with Google Dr
In my case, Google Drive Preferences does not have the “My Computer” tab. How do I fix that?