Как подключить видеокамеры Hikvision к видеорегистратору Dahua?
Как подключить видеокамеры Hikvision к видеорегистратору Dahua?
Как правило видеокамеры и видеорегистратор для системы видеонаблюдения устанавливаются одного и того же бренда. Тогда гарантируется полная их совместимость. Однако случается так, что IP камеры и цифровой регистратор от разных производителей. Что делать в этом случае?
В этой статье мы расскажем, как подключить видеокамеры Hikvision к видеорегистратору Dahua.
Первый способ
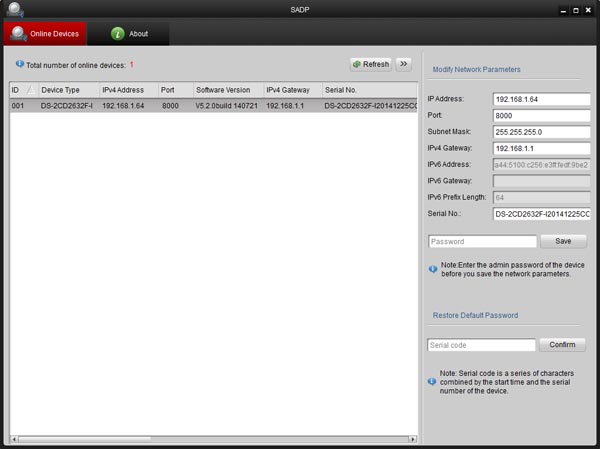
Для начала IP-камеры Hikvision нужно настроить с помощью инструмента SADP (который поставляется с камерой или вы можете скачать его для Windows здесь, для Mac OS — здесь).
После этого подключите IP-камеру к сети через маршрутизатор или коммутатор и убедитесь, что она получает питание с помощью коммутатора PoE, блока питания и т.д.
После того, как вы установили и открыли инструмент SADP, используйте его для изменения сетевых учетных данных вашей IP-камеры, чтобы они соответствовали вашей собственной сети в том числе и вашему Dahua NVR видеорегистратору. Инструмент автоматически обнаружит вашу IP-камеру Hikvision.
Вам нужно выбрать его из списка, а затем, при необходимости, изменить параметры сети камер, используя те, что находятся в правой части экрана. Все остальные IP-камеры Onvif будут иметь аналогичный инструмент IP-конфигурации или программное обеспечение, которое вы будете использовать для выполнения той же задачи.
Программное обеспечение попросит вас сначала активировать камеру, то есть создать пароль. Это пароль для камеры, он нам понадобится позже.
Если у вас Tribrid (или гибридный) DVR, придется выполнить дополнительные действия. Если вы еще не открыли страницу типа канала в меню, вам нужно это сделать сейчас. Его можно найти в разделе «Настройки» главного меню, а затем в разделе « Камера».
На следующей странице выберите Тип канала (вариант с левой стороны экрана). Трибриды совместимы с аналоговыми камерами стандартной четкости, аналоговыми HD (HD) и IP-камерами. Это возможно благодаря тому, что конечный пользователь может настроить эти камеры для любого из этих трех типов сигналов.
На Tribrid вам нужно добавить IP-камеры в обратном порядке. Например, используя 8-канальный DVR Tribrid, установите флажок в столбце IP для канала 8.
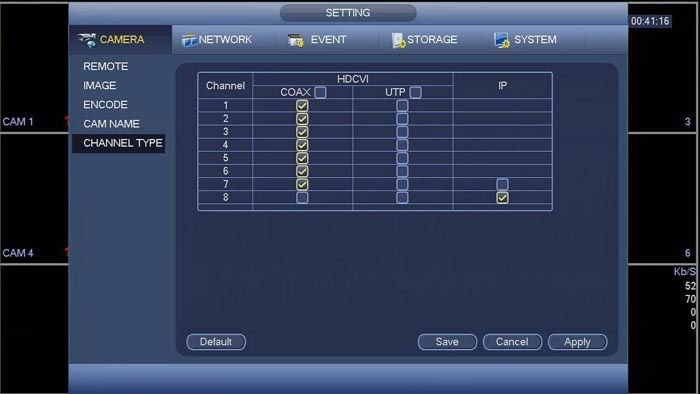
Если впоследствии нужно будет добавить дополнительную IP-камеру, достаточно изменить канал 7 на IP (и так далее).
После того как вы изменили соответствующие каналы на IP, нажмите кнопку «Сохранить», а затем кнопку «Применить». Ваш DVR сообщит, что необходимо перезапустить. После завершения перезагрузки изменения, внесенные вами в тип канала, будут установлены, и вы можете продолжить настройку.
Для этого нужноиспользовать функцию удаленного доступа на Dahua NVR. После выбора этой опции в главном меню вы можете увидеть IP-адреса ваших IP-камер, отображаемые в списке устройств. Выберите камеру, установив флажок, а затем нажмите кнопку добавления.
Скорее всего потребуется использовать функцию редактирования, чтобы ввести правильные учетные данные для вашей камеры. Если ваша камера не отображается, вам нужно будет добавить камеру вручную, нажав кнопку « Добавить вручную» , расположенную на той же странице.
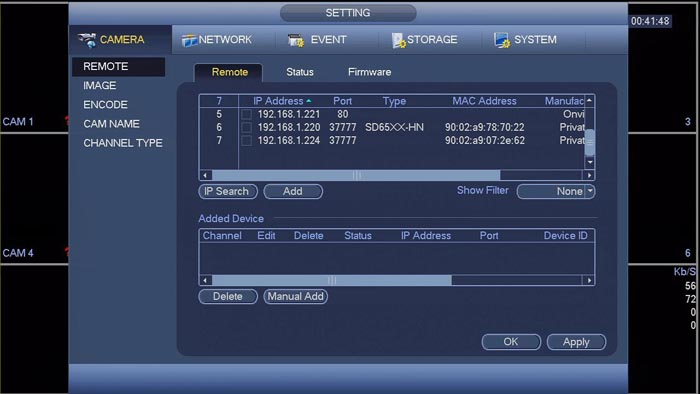
Чтобы добавить IP-камеру Hikvision, вам обязательно нужно использовать функцию добавления вручную.
После нажатия кнопки вы попадете во всплывающее окно (рисунок ниже). Экран, который вы видите ниже, — это тот же экран, который открывается при использовании опции редактирования.
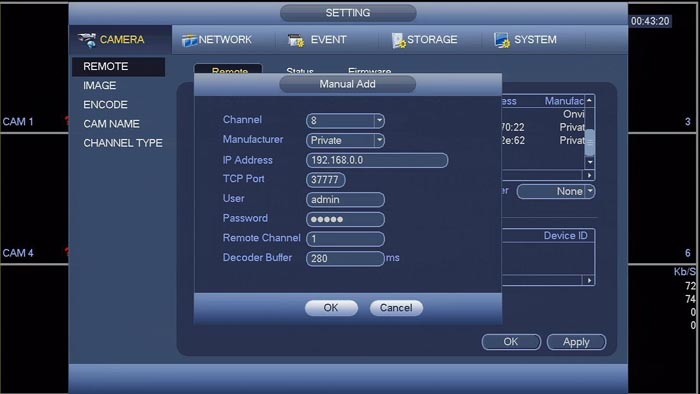
Сразу после выбора канала, с которым вы хотите связать IP-камеру, измените параметр «Производитель» на Onvif. После изменения этого параметра в раскрывающемся меню вы заметите небольшое изменение макета экрана.
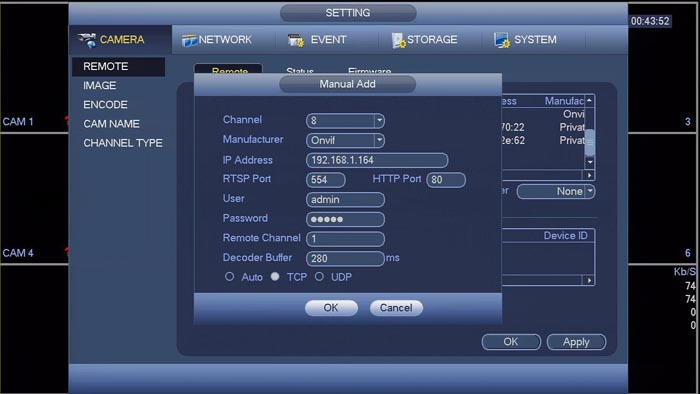
После того, как это изменение произошло, проверьте остальные настройки и при необходимости измените их. Ваш IP-адрес нужно будет изменить на тот, который вы указали раньше.
Затем нужно изменить имя пользователя и пароль, чтобы они совпадали с паролем камеры. Последнее, что вам нужно будет изменить, — это вариант с вкладками внизу экрана. Вам просто нужно сделать так, чтобы вместо Auto проверялся TCP.
После этого нажимаем «ОК» и возвращаемся на предыдущую страницу. Здесь вы увидите, что ваша IP-камера добавлена к NVR. Убедитесь, что в столбце «Состояние» отображается точка зеленого цвета, а не красная.
Зеленый цвет означает, что ваша камера правильно настроена и подключена к сетевому видеорегистратору, а красный цвет означает, что что-то не так с настройкой IP-камеры. Если вы обнаружите красную точку, ошибку ищите либо в сетевых параметрах камеры, либо в способе, которым вы пытались добавить камеру.
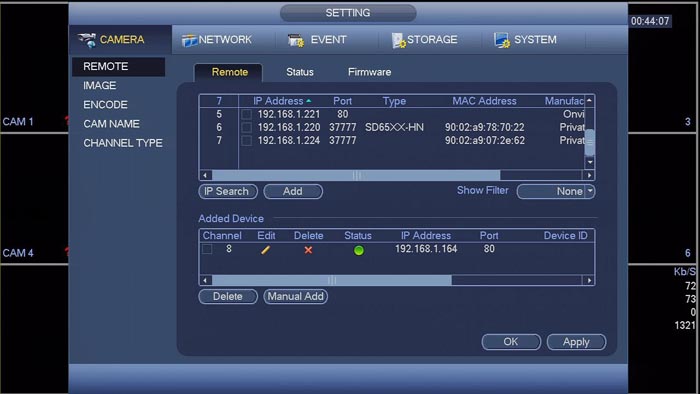
Как только камера окажется в списке добавленных устройств и ее статус станет зеленым, нажмите OK, чтобы сохранить настройки. Вернувшись на главный экран, вы должны увидеть, как видео с ваших IP-камер Hikvision отображается на указанном вами канале.
Нужно отметить, что данная настройка работает для Dahua и их OEM-производителей, продаваемых под следующими брендами: Activecam, Advidia, Amcrest, Ameta, Ascendent, Backstreet Surveillance, BV Security, CCTV Security Pros, CCTV Star, CP Plus (Orange Line), Dax Networks, eLine, ENS (ранее Eastern CCTV и SavvyTech), Expose, Lorex, GSS, Honeywell, IC Realtime, Ikegami, Impath Networks, Inaxsys, IndigoVision, Infinity CCTV, Innekt, Intelbras, KBVision, Lumixen, Maxron, Montavue, Oco, Optiview, Rhodium, RVI, Saxco, Security Camera King (Elite), Space Technology, Speco, ToughDog, Tyco Holis, Tyco Illustra Essentials, Unisight, VIP Vision, Watchnet, Winic, Zuum.
Второй спсоб
Во втором способе подключения IP-камер Hikvision к цифровому NVR видеорегистратору Dahua нужно внести несколько изменений в настройках камеры. Для этого зайдите в веб интерфейс камеры, используя браузер Internet Explorer.
В настройках “Система” найдите пункт “безопасность” и снимите галочку с – Включение блокировки нелегального входа и нажмите “Сохранить”.
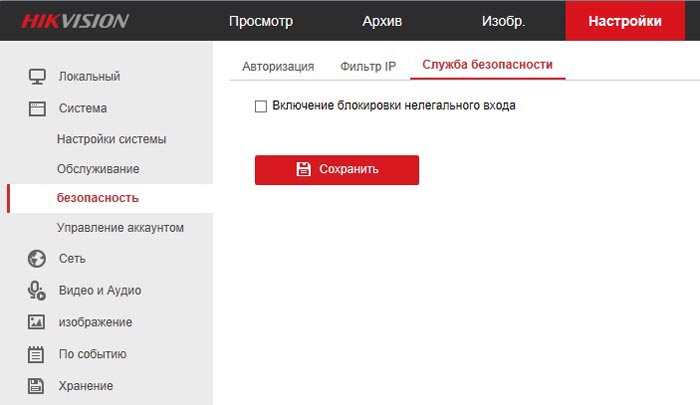
Затем найдите в настройках Сети пункт доп. настройки и включите ONVIF.
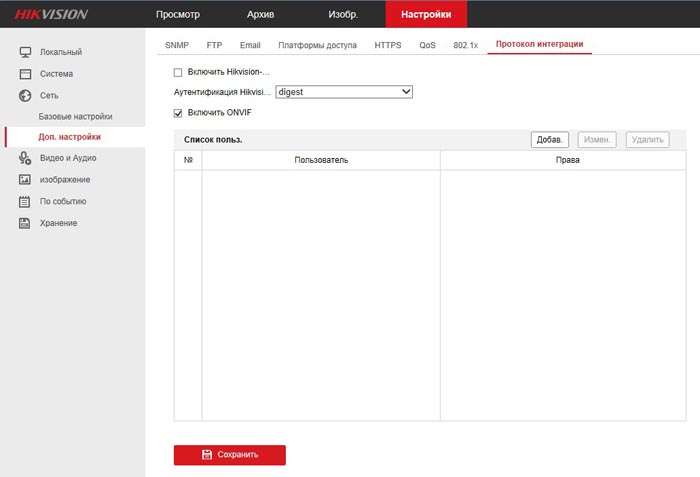
После этого задайте имя пользователя и пароль, который должен содержать не менее 8 символов (одна заглавная буква и цифры). После внесения пользователя и включения ONVIF нажмите “Сохранить”.
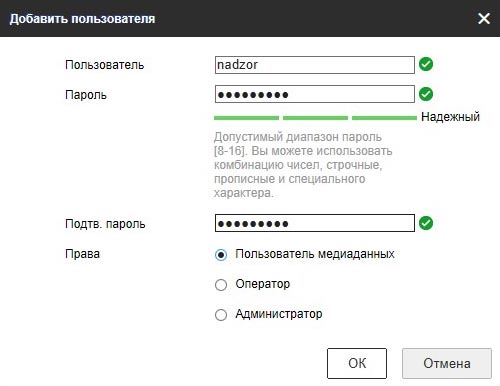
Теперь заходим в веб интерфейс видеорегистратора Dahua.
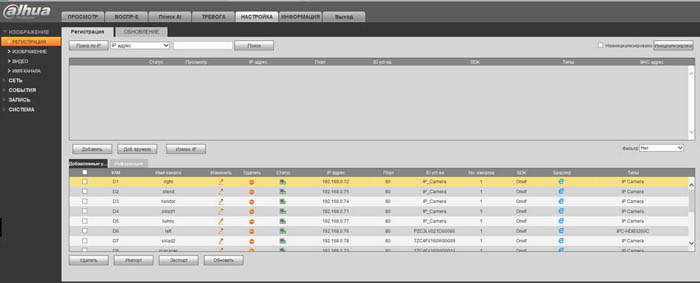
В меню добавления камер (Настройка — Регистрация) нажимаем добавить вручную и вводим следующие данные:
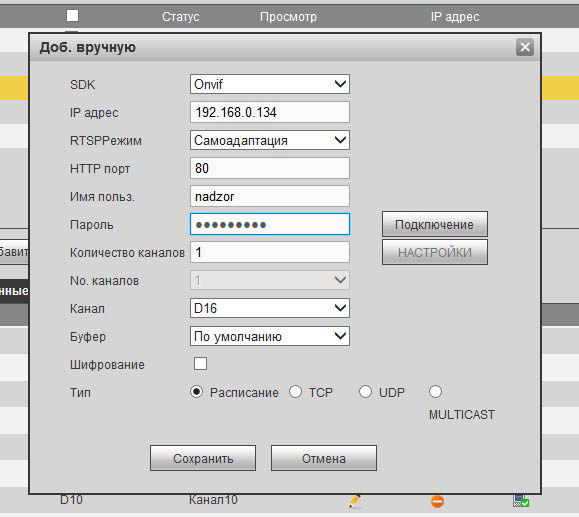
SDK – выбираем ONVIF
IP адрес – IP адрес нашей камеры Hikvision
RTSP Режим – Само адаптация
Имя пользователя и пароль – такие, как создавали в камере.
Остальные настройки по умолчанию.
После нажатия на кнопку “Сохранить” камера должна успешно подключиться.
Надеемся эта статья вам помогла. Ну а мы напоминаем, что наша компания «Запишем всё» с 2010 года занимается проектированием, монтажом, обслуживанием и ремонтом систем видеонаблюдения и видеодомофонов в Москве и Подмосковье.
Мы работаем быстро, качественно и по доступным ценам. Перечень услуг и цены на их вы можете посмотреть здесь.
Звоните +7 (499) 390-28-45 с 8-00 до 22-00 в любой день недели, в том числе и в выходные. Мы будем рады Вам помочь!
Подключение камер Dahua к регистратору hikvision — ошибка параметра.
При подключении к регистратору камер dahua по onvif он выдает: Ошибка параметра. Но есть камера dahua, которая подключается нормально и без проблем —
Тип устройстваDH-IPC-HFW2221RP-ZS-IRE6Прошивка2.600.0006.0.R, Build Date: 2017-05-26WEB модуль3.2.1.455441ONVIF версия2.42PTZ v.Версия прошивки камеры
Другие камеры не хотят подключаться:
Тип устройстваDH-IPC-HFW1230SP-0280B -S2System Version2.622.0000000.9.R, Build Date: 2018-01-31Found New Versionsys.RfidVersionISP VersionWEB модуль3.2.1.546287ONVIF версия16.12(V2.4.1.513183)
ТипIPC-HFW1230SВерсия системыV2.680.0000000.2.R, Build Date: 2019-04-10Найдена новая версияВерсия RFIDВерсия ISPWEB модульV3.2.1.716966ONVIF версия16.12(V2.4.3.686345)
How to connect a Dahua IP Camera to a Hikvision NVR
Here we will explain how to connect a Dahua IP camera to a Hikvision NVR . These two brands are very popular and cost-effective so in certain cases you may need to add a Dahua IP camera to a Hikvision NVR, for a numerous about of reasons.
Hikvision has a strong reputation for manufacturing standalone Digital Video Recorders (DVR) and Network Video Recorders (NVR) that live up to people’s expectations. Not only do they possess all of the features people have come to expect, although they sometimes dont play nice with other vendors when it comes to integration into their systems.
Benefits of NVR Camera Systems
High-Resolution Image Quality: Different models of IP cameras offer varying degrees of resolution.
Increased Flexibility
Power Over Ethernet
Step 1: Connect Dahua IP Camera to NVR
For a Dahua IP Camera, you’re going to be configuring your camera using the Config tool (you can download it here). Connect your IP camera to your network (router/switch) and ensure that it’s getting powered (PoE switch, power supply, etc).
Once you have the Config tool installed and open, use it to modify the network credentials of your IP camera to comply (match) with your NVR IP Setup. The tool will automatically detects your Dahua IP camera. Default Dahua IP camera address 192.168.1.108. This needs to be changed e.g. Default Hikvision NVR addresses for cameras (192.168.254.x)
*Ensure that you place an IP of (192.168.254.10-253). (192.168.254.1-9 are reserved by Hikvision).
Also change the Camera gateway for that of the Hikvision NVR which has a default of 192.168.254.1
You’ll only need to select it from the list and then, if necessary, modify the cameras network parameters using the options located on the right side of the screen. All other Onvif IP cameras will have a similar IP configuration tool or software that you’ll use to accomplish the same task.
The software will ask you to activate the camera first, meaning it will ask to create a password. This is the password for the camera and we will need it later.

Step 2: Configure your Dahua IP Camera
Now that camera connect is complete, it is time to connect it the Hikvision NVR. Once connected, head over to Configuration -> Camera -> Locate the location of the camera you have connected -> Operation and then Edit.
1) Adding Method – Change from Plug & Play to Manual.
2) IP Camera Address – Change to IP Address of the Dahua Camera you set up.
3) Protocol – Change from HIKVISION to ONVIF.
3) Camera Password – Enter password created for the Dahua IP Camera in initialization.

You’re now ready to click OK and be brought back to the previous page. Once back on this page, you’ll see that your IP camera has now been added to the NVR. Verify that the Status column displays a green and not red.
Green indicates your camera is properly configured and connected to the NVR while red will indicate that something is incorrect with the way you setup the IP camera. If you find a red, the mistake is either in the configured network parameters within the camera, or with the way in which you attempted to add the camera.
Once green navigate back to the live view, you should now see your IP cameras video feed being displayed on the channel you designated.
A journey of setting up Dahua cameras with Hikvision NVR
The previous owner of my home had already installed surveillance cameras with power-over-ethernet support. There were the cameras and the wiring in place, but nothing connected to them.
As I have a Raspberry PI already constantly running Node-RED for my home automation, I had thought of buying a PoE switch, hooking the cameras to the Raspberry, and enabling the system with some kind of recording software. I knew this would require quite a lot of DIY work and maintenance, so recently went in the other supposedly simpler direction: bought a Hikvision DS-7600 Network Video Recorder. I thought that must be an easy way to get the cameras running, just plug in the devices, and should be ready to go.
Oh boy, I could not have been more wrong! Those cameras did not just plug-and-play.
A hint from Youtube
As it turned out, the Dahua HFW-1300SP cameras were unable to connect to Hikvision NVR, no matter how I tried to configure them from the NVR.
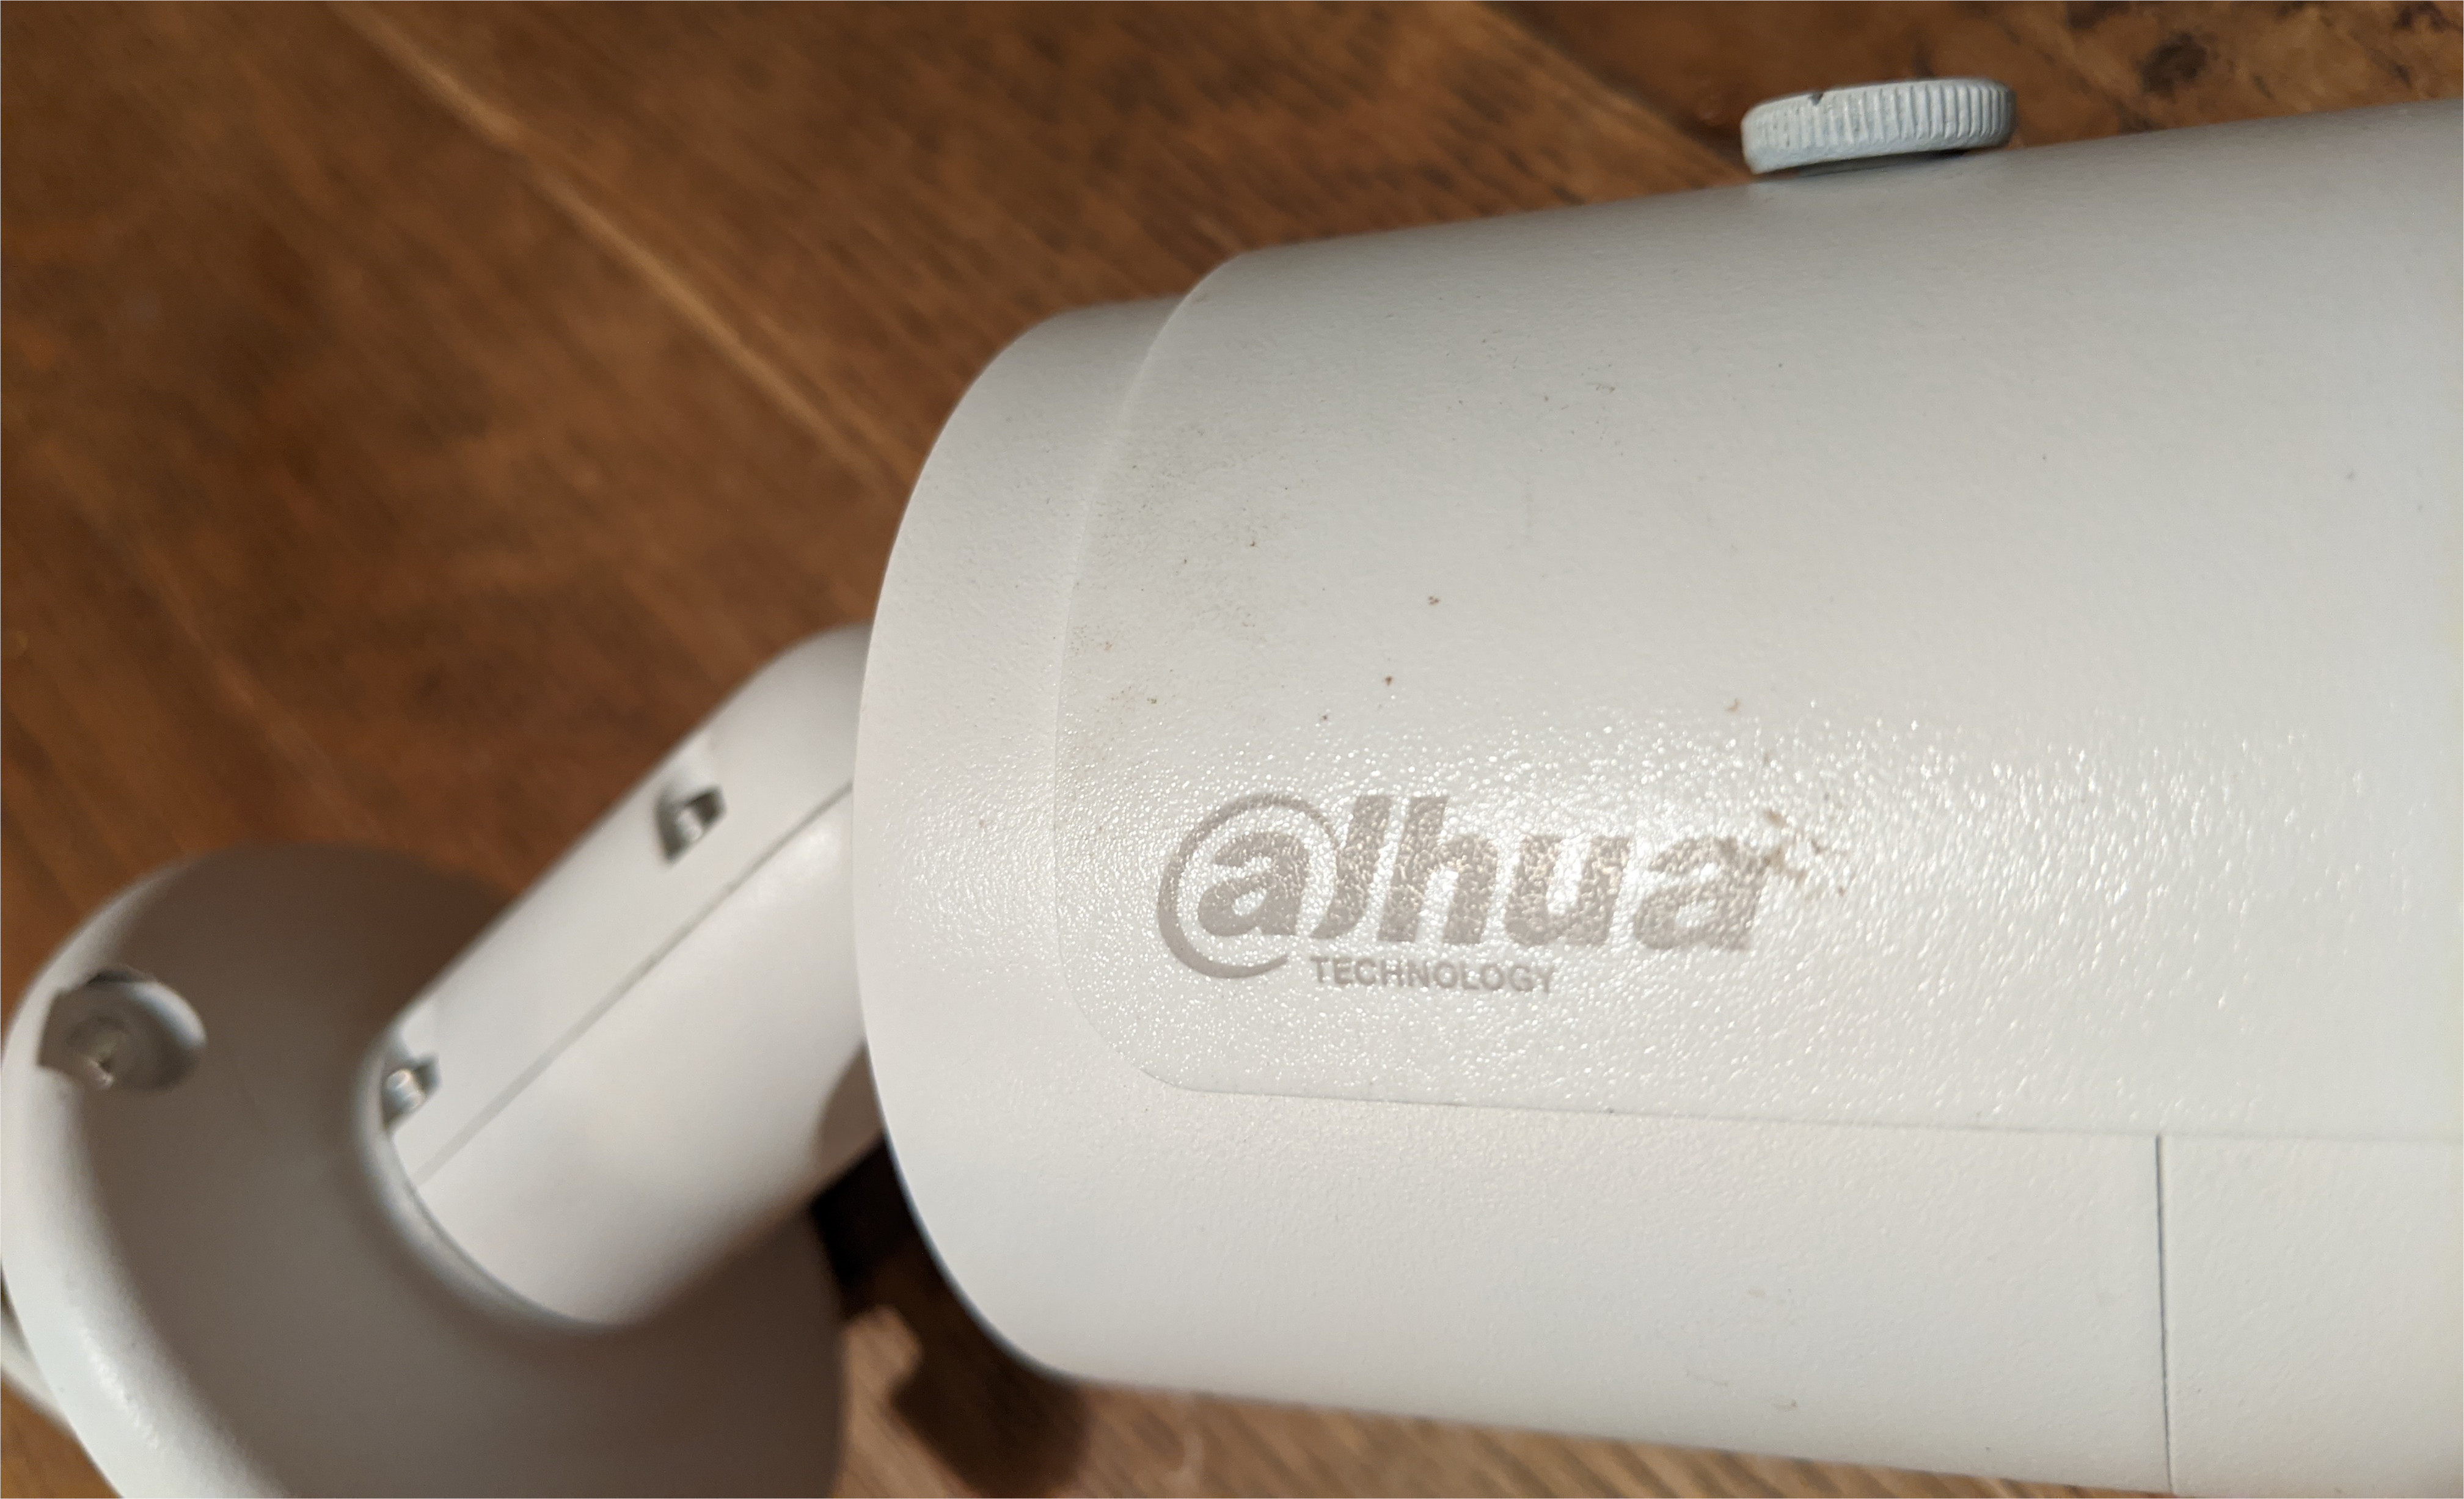
Even though I figured out the name of the cameras after some googling — at first I thought the manufacturer was called «Alhua» �� —, I failed to find much help from the internet, almost every bit of information said I cannot connect the devices of those two manufacturers ��.
The only promising hint I found was from a Youtube video that suggested Dahua camera to be configured with the following parameters that would make them connect the Hikvision network:
Exit fullscreen mode
No PoE switch? DIY!
As I did not have a regular PoE switch at hand, took my ladder and screwdriver, unscrewed the cameras and had them on the table trying to figure out how to power them up.
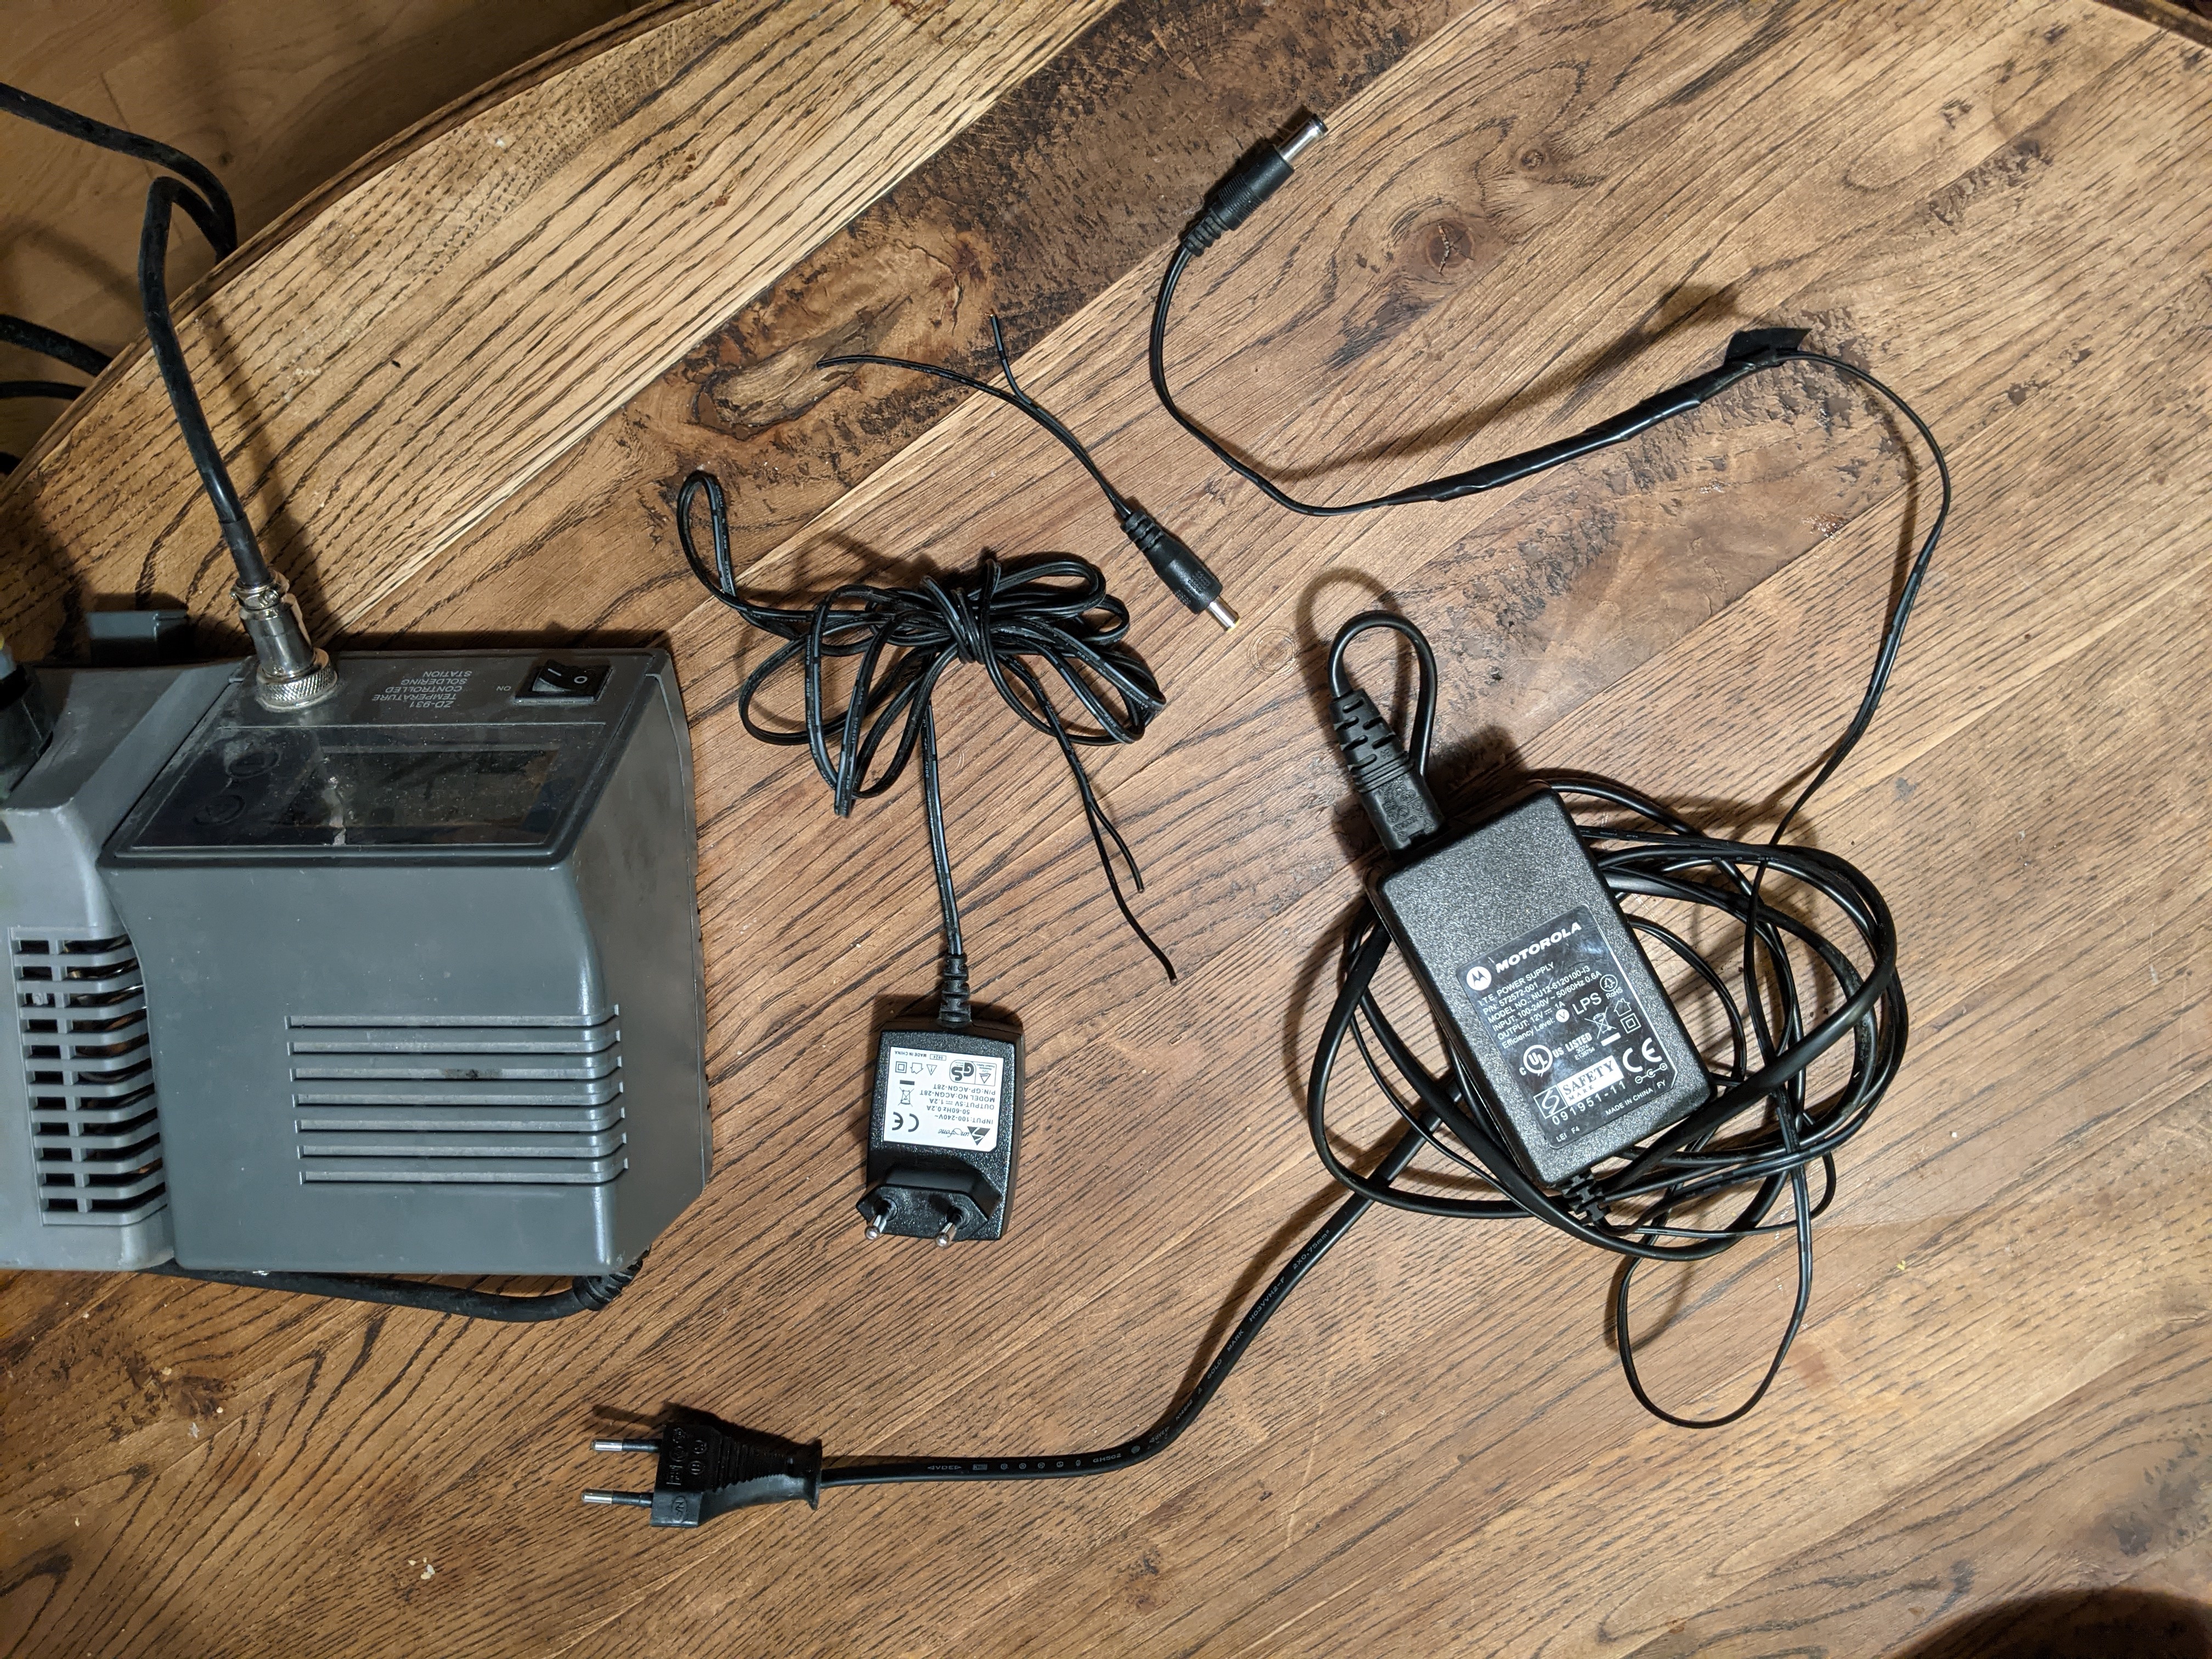
I looked into my graveyard of old electronics, found an ancient Nokia phone charger which plug matched the 12V extra input the cameras have — only that one gave out 5V instead of 12V. I almost cut in half the 15V charger of an old IBM laptop to test frying the cameras with higher voltage, but luckily found another power adapter for some old Motorola device, which had 12V output. After a little cutting and soldering, the new power adapter for the cameras was ready to roll.
Resetting the cameras
The cameras did boot up with my newly made adapter ��, and I got the Dahua configuration tool running in a Windows virtual machine, but there was another problem: the configuration tool was unable to connect to the cameras, probably because someone had changed the default passwords. That can usually be fixed with a simple «hold down the reset», but when I opened up the case of the camera, there was nothing marked as «reset» nor any buttons on the board ��
I was almost giving up at that point, but there was a forum post in Russian, which I understood only with the help from Google translate, that helped me a step forward towards the goal. 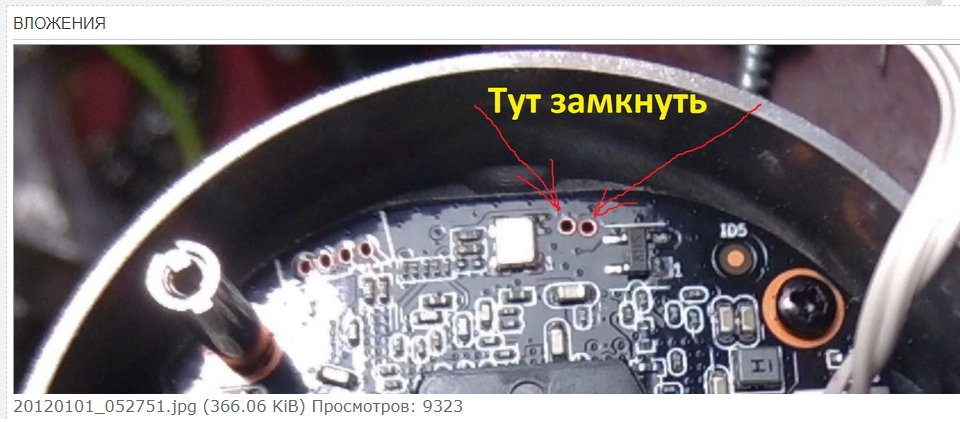
Connected the holes marked in the picture for 30+s, and after some fiddling with the network settings of my computer, the Dahua configuration tool was able to connect the device ��. 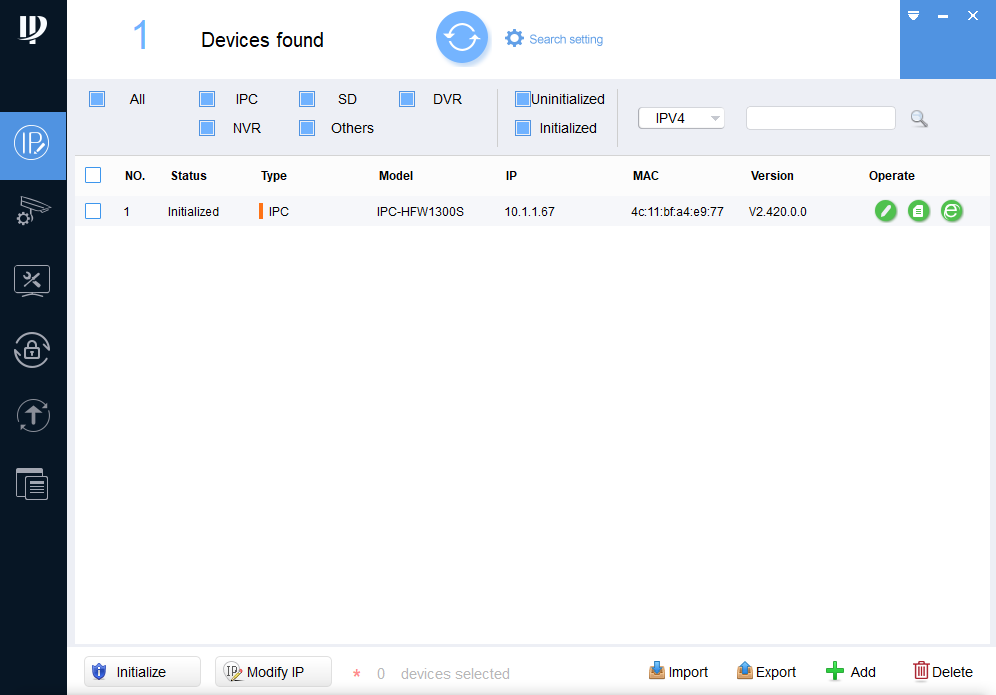
Configuring the cameras
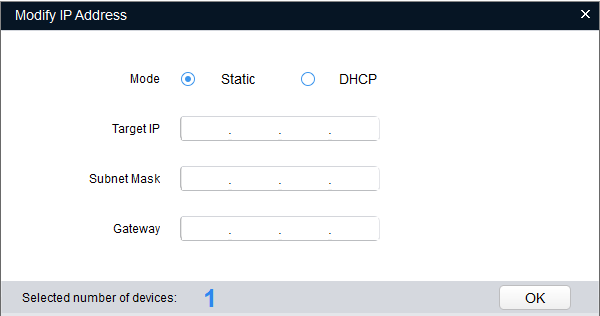
Now it was just the matter of getting the right configuration persisted within the cameras, but for whatever the reason, that did not work with the configuration tool ��. The cameras still did not connect to Hikvision, and loading the IP configuration from the camera revealed that it was not saved:
The web configuration tool
I thought I had found a solution to the configuration tool not working when I just opened up the camera’s IP address and discovered the cameras serve a web-based configuration interface, but there turned out to be one more obstacle on my way: the login screen had a nasty bug which cleared the form after every keystroke or moment, making me unable to insert «admin:admin» to the form ��.
Tried turning off Javascript, but the web-based tool functionality is written using Mootools and does not work with Javascript turned off. Also tried other browsers, even tested out with Internet Explorer, still no luck.
Professionally, I am a web developer ��
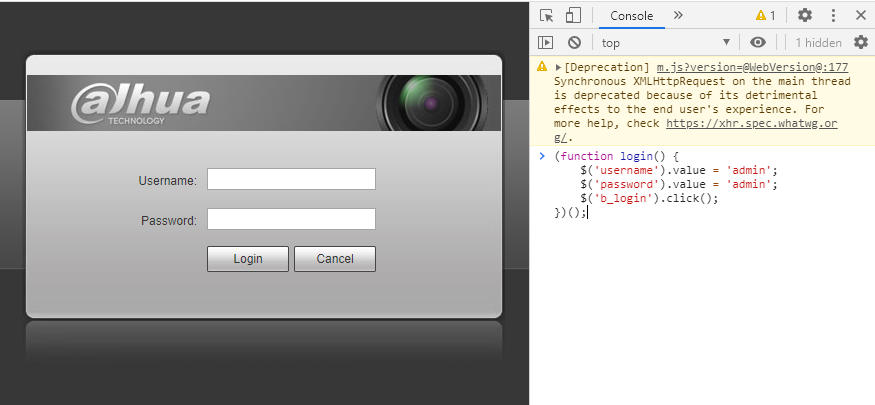
It took me some time, but I did find a way to submit the form! I wrote Javascript functions to submit the forms in one shot without letting some buggy callback to clear the form meanwhile ��.
The same bug was present within the web tool itself, once logged in, but now I already knew how to tackle this problem. This is the call to get the configuration saved to the device when navigated to the right page:
Exit fullscreen mode
You might be thinking the CSS selectors within the jQuery function are not correct, but this is not jQuery, this is Mootools ��
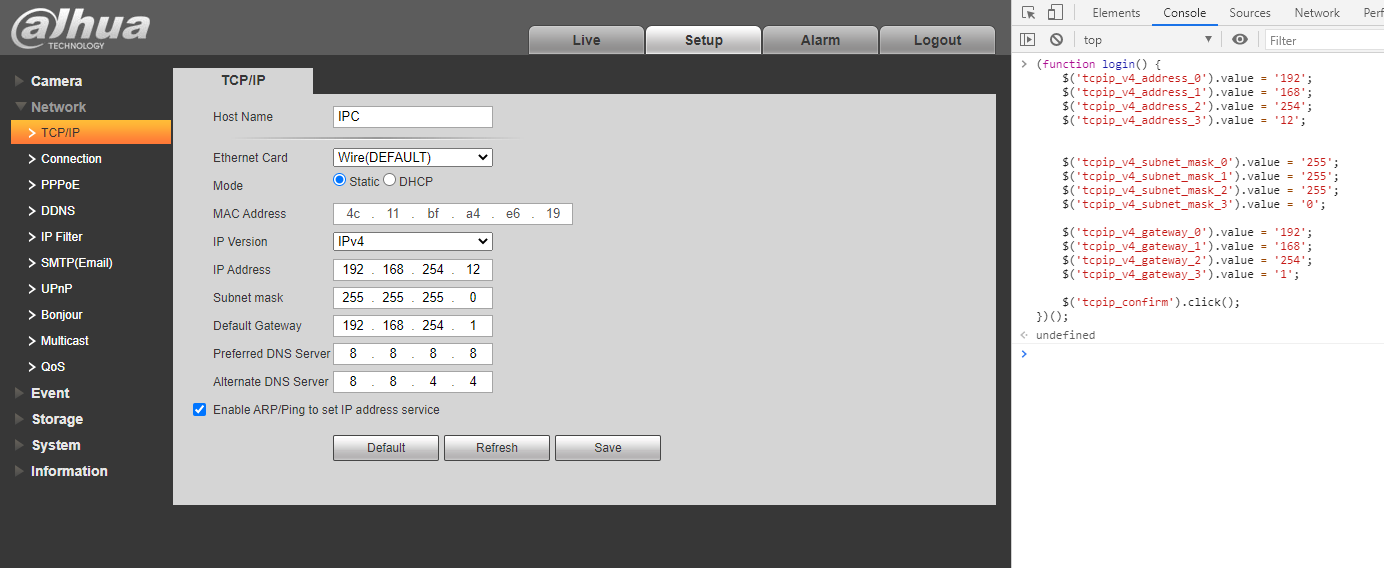
Hikvision setup
From there it was just the matter of plugging the cameras to the Hikvision NVR and configuring them as needed ��. 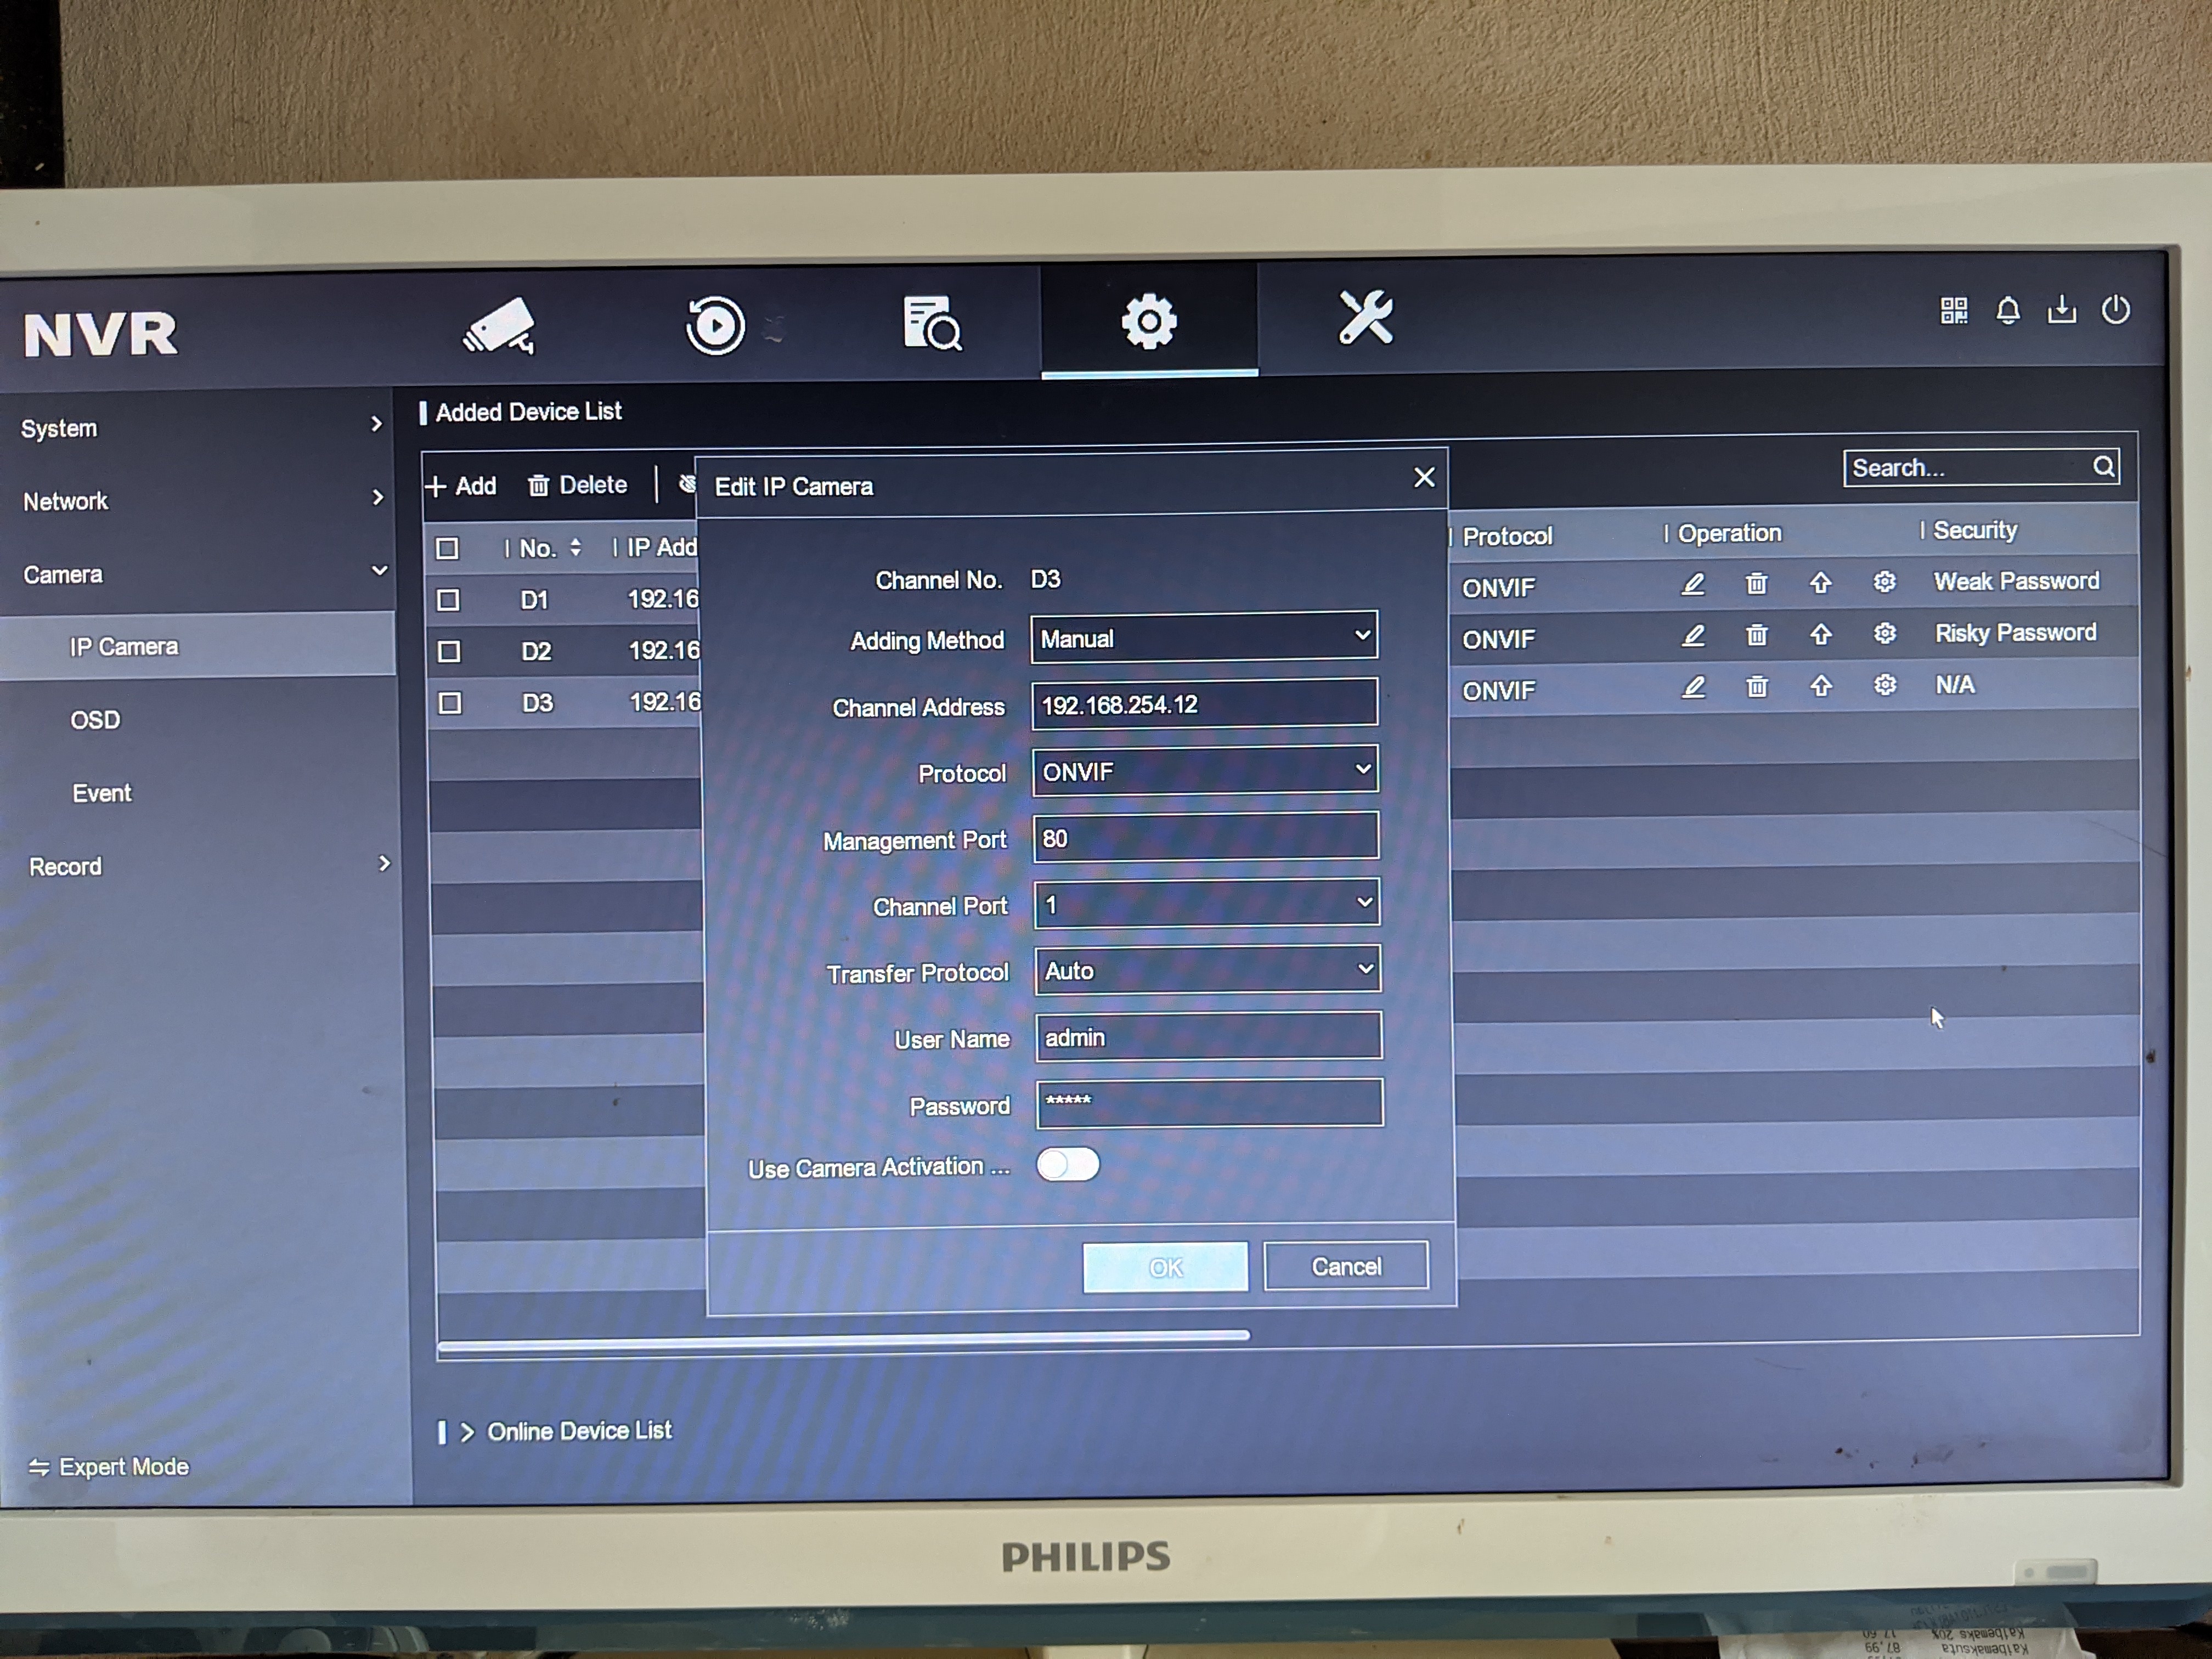
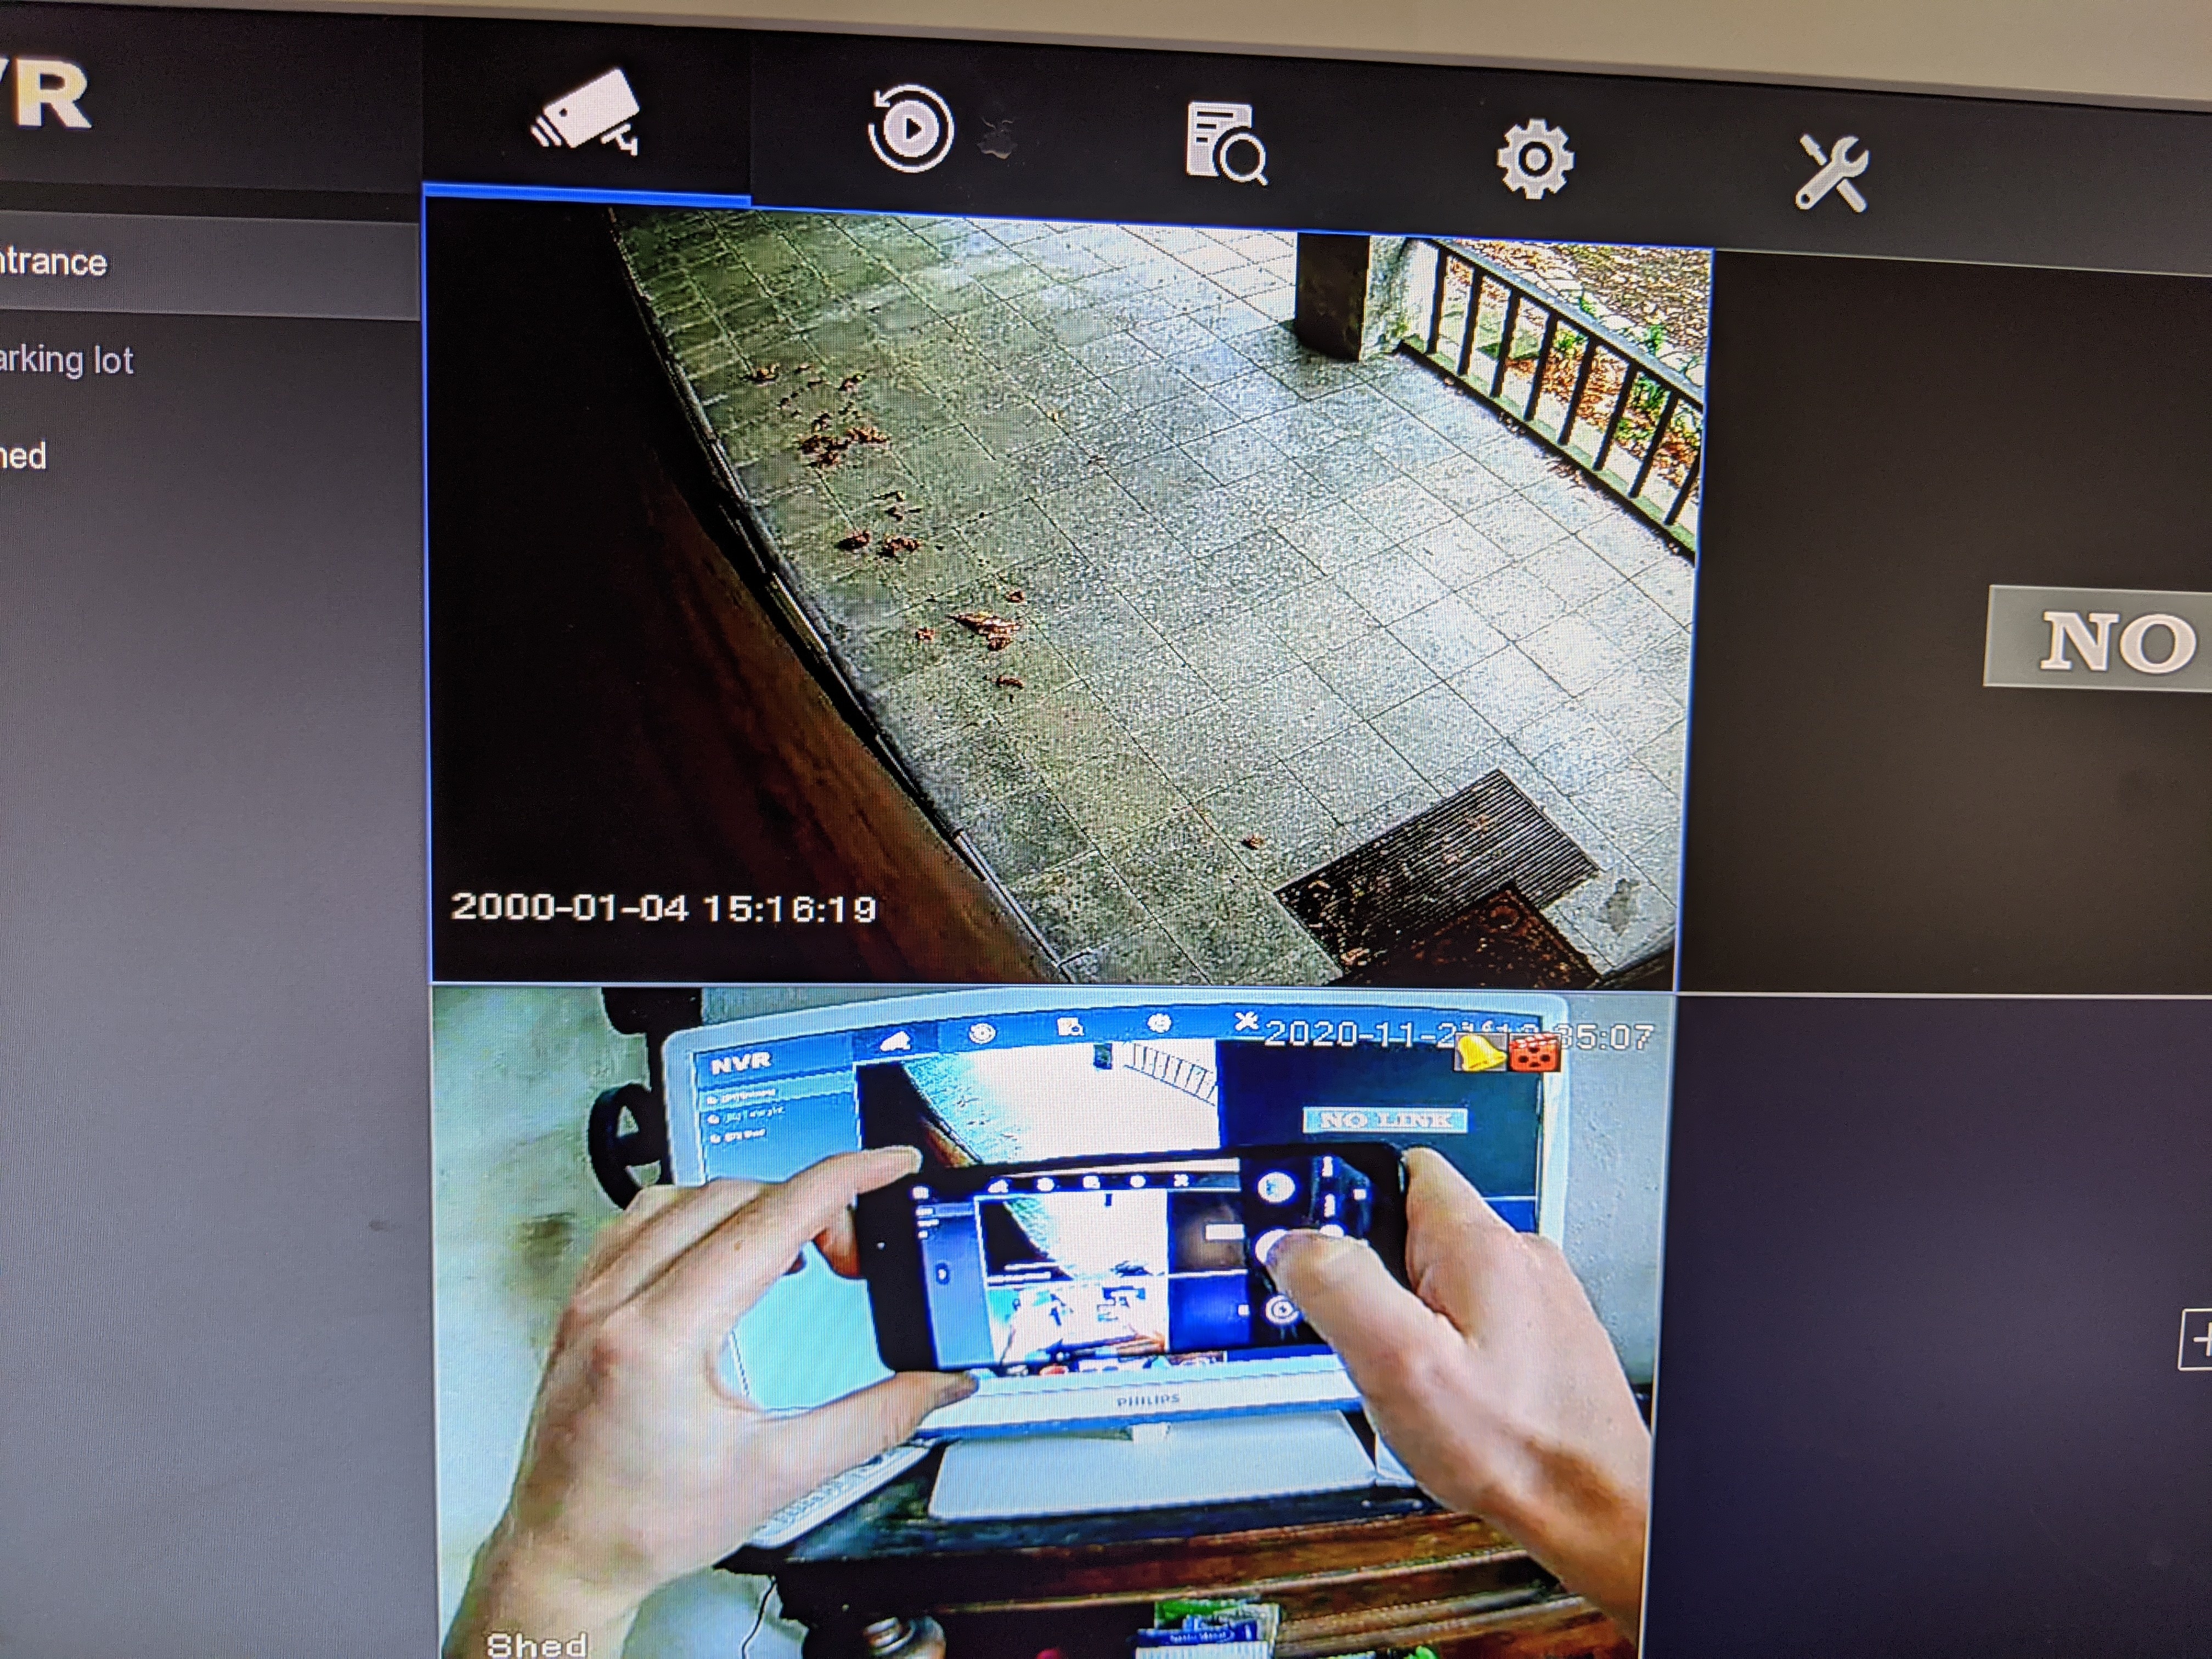
Aftermath
The whole process of getting the cameras connected to the NVR took me about 5 hours. I had many moments where I did not have enough equipment or information and thought I was stuck for good. When I finally succeeded at about 2AM, I could not believe it. I still have my mind blown on how I had to collect the hints from all over the internet, how much luck I had, and how many different skills I had to put to use in order to succeed.
�� Never ever expect devices from different manufacturers to just plug-and-play. And never give up ��