How to uninstall openjdk on windows
OpenJDK is an open-source implementation of the Java Development Kit (JDK). It is widely used by developers for writing Java applications. However, if you want to uninstall OpenJDK from your Windows or Linux system, you may face some difficulties, especially if you are not familiar with the process.
In this article, we will provide you with a step-by-step guide on how to uninstall OpenJDK from the below operating systems.
Uninstall openjdk on windows
Where is OpenJDK installed on Windows?
Before we proceed with the uninstallation process, it is essential to know the location of the OpenJDK installation on your Windows system. By default, OpenJDK is installed in the «Program Files» directory on your system drive. You can find it by following the below path:
The exact directory name may vary depending on the version of OpenJDK you have installed on your system.
Uninstall OpenJDK Manually :
We can uninstall openjdk manually in the same way as we would uninstall any other programs from Windows System.
Here is the step by step procedure to uninstall openjdk on Windows 10 / Windows 8 / Windows 7.
Uninstall openjdk from Windows 10
- Log on to windows 10 and click Start
- Click on Settings
- Click on System
- Choose Apps & features
- Click on the program to uninstall and then click its Uninstall button. follow the instructions to complete the uninstall.
Uninstall openjdk from windows 8
- Log on to windows 8 and click Start.
- Click on Search box and type control panel.
- Click on control panel and select Uninstall a Program from the Program Category.
- Select the openjdk and right click and then click on uninstall.
- Click Yes to Confirm the uninstall process.
Uninstall openjdk from windows 7
- Log on to windows 7 / Vista and click Start.
- Click on control panel.
- Click on control panel and select programs.
- Click on Programs and Features and Select the openjdk to be uninstalled.
- Click on Uninstall button to finish uninstall openjdk.
Uninstall openjdk from windows — By removing openjdk bin path from System PATH Variable
Go System Properties and then to Edit the system environmental variables and Click on Environment Variables.
Edit the path variable
Delete path variable if its not already removed and click OK to finish.
Go to command prompt and type java -version and confirm the uninstall
This command will display the version of Java installed on your system. If OpenJDK has been successfully uninstalled, this command should not return any output.
Uninstalling OpenJDK on Linux Redhat
Uninstalling OpenJDK on Linux Redhat is a bit different from Windows. You can use the following commands to remove OpenJDK from your system:
Step 1: Open the terminal and type the following command:
sudo rpm -qa | grep openjdk
This command will list all the installed OpenJDK packages on your system.
Step 2: To uninstall OpenJDK, use the following command:
sudo yum remove
with the name of the OpenJDK package you want to remove. For example, if you want to remove OpenJDK 11, you can use the following command:
sudo yum remove java-11-openjdk
Step 3: Press Enter and wait for the uninstallation process to complete.
Step 4: Once the uninstallation process is complete, you can verify that OpenJDK has been removed by running the following command:
This command will display the version of Java installed on your system. If OpenJDK has been successfully uninstalled, this command should not return any output.
Conclusion
Uninstalling OpenJDK from your system is a simple process that can be done in a few easy steps. Whether you are using Windows or Linux, the process remains the same.
By following the step-by-step guide provided in this article, you can easily uninstall OpenJDK 11, OpenJDK 8, or any other version of OpenJDK from your system.
It is essential to remember that you should always double-check the installation directory and take a backup of your data before proceeding with the uninstallation process.
How to Uninstall JDK from Windows
You should uninstall old version of JDK that is no longer used, for security reason because newer JDK always has improved security.
1. Uninstall Oracle JDK using uninstaller
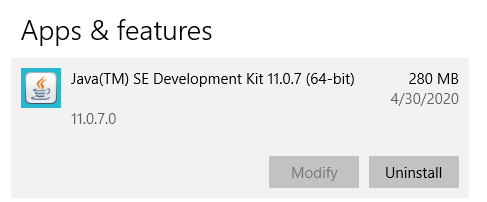
Just click Uninstall two times and it will remove JDK quickly from your operating system. You can verify by typing java -version in command prompt, and check the directory C:\Program Files\Java .
2. Uninstall Open JDK

Then change the current directory to OpenJDK directory and type the following command:
del /s /f /q jdk-15
3. Uninstall Oracle JDK without uninstaller
- JDK installation folder: C:\Program Files\Java\jdk1.8.0_251
- Java cache folder: C:\ProgramData\Oracle\Java
- Java updater program: C:\Program Files (x86)\Common Files\Java
- Java path: C:\Program Files (x86)\Oracle\Java
Other Uninstallation Guides:
About the Author:
 Nam Ha Minh is certified Java programmer (SCJP and SCWCD). He started programming with Java in the time of Java 1.4 and has been falling in love with Java since then. Make friend with him on Facebook and watch his Java videos you YouTube.
How to uninstall OpenJDK?
I don’t want OpenJDK installed on my Ubuntu 13.04 system, but trying to uninstall the openjdk-7-jre yields the following message:
What do I need to do so that no new packages, of which I need none, will be installed when removing openjdk-7 ?

7 Answers 7
Great question, I was wondering this myself.
I found that you can use the following to remove the openjdk-7-jre on Ubuntu 13.04:
Press ‘y’ and then press enter when prompted to confirm this change. This should also clean up all the additional dependency libraries that were installed with it.
I also found you can use the following command to perform additional clean up:
If you use the following command:
You should no longer see the openjdk-7-jre installed!
Hope this helps. 🙂
You can use the following command:
In this way no new packages will be installed. Here is my output for the above command:
But, I don’t suggest you to do this. In one day you will need for sure an OpenJDK (6 or 7).

To uninstall OpenJDK, you need to run these commands in your terminal. You can get the terminal by using these keys, ctrl + shift + enter .
Remove Openjdk only:
Remove Openjdk along with dependencies:
Remove Openjdk and it’s configuration files:
Remove Openjdk along with dependencies and it’s configuration files:

Why this happens
This happens likely because another package on your system is depending on Java. While removing openjdk-7-jre , apt-get sees that if it uninstalls OpenJDK, some packages will have unmet dependencies. To solve this, it installs another package which provides Java.
To find out what is causing this, run these commands in a terminal:
Example output (shortened):
This indicates that all the LibreOffice packages are depending on openjdk-7-jre . As long as these packages are installed, OpenJDK cannot be uninstalled without installing an alternate Java automatically.
To remove openjdk-7-jre
If you want to remove openjdk-7-jre (without installing other packages), you will need to uninstall all packages which depend on it first.
From the example output, that will be:
I notice you said you wanted to use Oracle’s JDK. If you want to install Oracle’s JDK instead, you can download that and extract it in the location of your choice.
Then you just use update-alternatives to tell your system where Java is installed. If you’re not sure about the syntax of update-alternatives, you can use the front-end for it, galternatives.
For example. I use Oracle’s JDK quite extensively here.
I extract it to /opt/java/.
Then, so all of Oracle Java’s binaries are the primary utilities for Java-related stuff, I do the following with update-alternatives:
This takes all of the Oracle Java utilities that you’ve previously extracted, and gives them the first priority, in case you have other versions of Java installed. (since Ubuntu allows you to have multiple versions of the same utility installed)
PSR.COM
Today, I’ll explain how to uninstall completely the openjdk from the RedHat Enterprise Linux (RHEL) machine.
Some of the softwares requires only the Oracle Java and having the openjdk, sometimes causes an issue. So, some users wants to remove the openjdk from the linux machine.
Pre-requisites
- openjdk installed on the machine
- Check for java alternatives, when multiple java versions installed
- #> /usr/sbin/alternatives —config java
- Result with + is the currently selected java for the machine
Procedure
1. Find out the installed openjdk versions
#> rpm -qa | grep java
#> rpm -qa | grep jdk
2. Remove the all openjdk versions
Example:
#> yum remove java-1.8.0-openjdk-1.8.0.191.b12-1.el7_6.x86_64