ПК HP – Ошибка жесткого диска 3F0 – Устройство загрузки не найдено (Hard disk 3F0 boot device not found)
Если устройство загрузки Hard Disk Error 3F0 не отображается на черном экране, выполните следующие действия для устранения ошибки.
Восстановление настроек BIOS по умолчанию
Чтобы восстановить настройки BIOS по умолчанию, откройте экран BIOS Setup.
Выключите компьютер и подождите пять секунд.
Нажмите кнопку питания , чтобы запустить компьютер, затем несколько раз подряд нажимайте клавишу F10 , чтобы открыть меню установок BIOS.
На экране установок BIOS нажмите клавишу F9 , чтобы выбрать и загрузить настройки BIOS по умолчанию ( Setup Default ).
Нажмите клавишу F10 , чтобы сохранить изменения и выйти из настройки BIOS Save and Exit .
С помощью клавиш со стрелками выберите Yes (Да), затем нажмите клавишу ввода Enter в ответ на запрос системы Exit Saving Changes? (Выйти, сохранив изменения?).
Для перезагрузки компьютера следуйте приглашениям системы.
Обновление BIOS
Перед попыткой выполнить дальнейшие действия по устранению неполадок обновите BIOS для устранения проблемы.
Дополнительные инструкции см. в следующих документах службы поддержки HP:
Выполните тестирование жесткого диска в HP PC Hardware Diagnostics UEFI
Когда Windows не запустится, откройте меню «Тесты симптомов» и запустите тестирование жесткого диска, следуя приведенным ниже инструкциям.
Нажмите и удерживайте кнопку питания не менее пяти секунд, чтобы выключить компьютер.
Включите компьютер и сразу нажмите клавишу esc несколько раз, примерно раз в секунду. Когда появится меню, нажмите клавишу F2 .
В главном меню нажмите » Тесты симптомов» .
Отобразится меню «Тесты симптомов».
Меню «Тесты симптомов» может отличаться в зависимости от компонентов, установленных на компьютере.
Выберите неисправность жесткого диска/SSD , затем нажмите клавишу ввода .
Если на компьютере установлено несколько жестких дисков, выберите диск для проверки. Чтобы проверить все жесткие диски, выберите Проверить все жесткие диски .
Если в тесте не был обнаружен жесткий диск, попробуйте переустановить Windows, выполнив указанные в документе действия Переустановка Windows на жестком диске.
По завершении проверки на экране появятся ее результаты. Результаты проверки также будут доступны в разделе Журналы проверки в главном меню.
Если быстрая проверка жесткого диска прошла успешно, но при этом по-прежнему возникают неполадки с диском, запустите расширенную проверку. Эта проверка включает в себя проверку SMART, короткую проверку DST, оптимизированную проверку DST и длинную проверку DST. Чтобы запустить эти проверки по отдельности, выберите их в меню «Проверки жесткого диска».
Если жесткий диск не проходит проверку, щелкните Устранение неполадок .
Выполните инструкции на экране, чтобы попытаться устранить проблему, затем нажмите кнопку Да .
Если проблема не устранена, нажмите кнопку Да , чтобы обратиться в службу поддержки клиентов HP.
Запишите или скопируйте идентификатор отказа (24-значный код) и идентификатор продукта, которые понадобятся для обращения в службу поддержки клиентов HP. Можно также использовать свое мобильное устройство, чтобы сделать снимок данной информации или отсканировать отображаемого QR-код. Данная информация также доступна в разделе «Журналы проверки» в главном меню.
Если компьютер в сети, нажмите кнопку ДАЛЕЕ , чтобы перейти на веб-сайт службы поддержки клиентов HP.
Если компьютер отключен от сети, используйте свое мобильное устройство для сканирования предоставленного QR-кода и получения доступа к службе поддержки клиентов HP.
Переустановка Windows на жестком диске
Переустановка Windows при помощи среды восстановления Windows (F11) или средства HP Cloud Recovery Tool.
Выполните действия, приведенные в разделе ПК HP – Сброс компьютера, чтобы выполнить сброс системы при помощи среды восстановления Windows (нажатием клавиши (F11)), когда ОС Windows не запускается.
Либо, чтобы воспользоваться инструментом HP Cloud Recovery Tool, прочтите документ, посвященный вашему компьютеру:
Если при переустановке Windows не удалось найти приводы, прочтите информацию в документе службы поддержки КОМПЬЮТЕРОВ HP — Во время установки ОС Windows 11 или Windows 10 не обнаруживается никаких дисков (процессоры 11-го поколения Intel).
После переустановки Windows запустите Центр обновления Windows, чтобы обновить все программы, микропрограммы и драйверы.
Boot Device Not Found на HP что делать
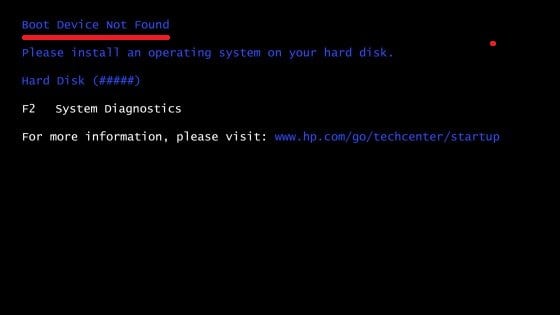
При включении своего ноутбука Hewlett-Packard пользователь может столкнуться с сообщением «Boot Device Not Found» и отказом компьютера загружаться. Причиной указанной дисфункции обычно являются ряд неверных настроек БИОС, но бывают и случаи, когда данная проблема возникает из-за выхода из строя жёсткого диска, или нарушения целостности операционной системы. В этой статье я расскажу, что это за сообщение, каковы причины данной дисфункции, и как избавиться от него на вашем ПК.
Причины дисфункции
В переводе данный текст звучит как «Загрузочное устройство не найдено», и обычно обозначает ситуацию, когда при включении компьютера система не обнаружила устройство, с которого должна быть произведена загрузка (или установка) операционной системы. Похожая ситуация, когда в диспетчере устройств не видна видеокарта была описана мной в прошлой статье.
Причинами такой дисфункции может быть следующее:
- Неверные настройки БИОС (UEFI) на компьютере;
- Используемый для загрузки жёсткий диск физически повреждён или вышел из строя;
- Загрузочный сектор или MBR жёсткого диска повреждены;
- Файлы операционной системы повреждены;
- Ваш ПК стал объектом атаки вирусных программ.
Как исправить ошибку «Загрузочное устройство не найдено» на HP
Для решения вопроса с Boot Device Not Found на HP рекомендую выполнить следующее:
-
Измените значение параметра «Legacy Support» в БИОС с «Disabled» на «Enabled». Перейдите в БИОС (обычно это получается путём нажатия на Escape, а потом на F10), выберите вкладку «System Configuration», найдите там параметр «Legacy Support», и измените его значение с «Disabled» на «Enabled». Затем нажмите на F10 для сохранения изменений и перезагрузите ваш HP. После перезагрузки компьютер может попросить вас ввести код (его значение будет на экране) и нажать Enter для подтверждения изменений. Введите указанный код, нажмите Enter и компьютер произведёт стандартную загрузку ОС;
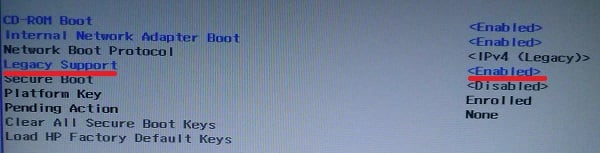
Затем меняем значение параметра «Legacy Support» из «Disabled» на «Enabled». В опции «Legacy boot order» выбираем, с чего мы хотим загружаться (обычно, это жёсткий диск ноутбука – hard disk). Для сохранения произведённых изменений жмём на F10, потом на «Yes», и перезагружаем наш ПК, это может помочь избавиться от ошибки на ноутбуке HP;
- Проверьте, виден ли в БИОС ваш жёсткий диск, чтобы устранить Boot Device Not Found. Если нет, тогда проверьте плотность его подключения (выключаем лэптоп, отключаем блок питания, снимаем нижнюю крышку, батарею, отключаем жёсткий диск, визуально проверяем его контакты, подключаем обратно жёсткий диск, батарею, ставим обратно крышку, подключаем блок питания и включаем ноутбук). Если винчестер вновь не виден, тогда есть вероятность, что он вышел из строя (проверьте работоспособность в сервисном центре) или повреждены шлейфы к нему (встречается довольно редко);
- Выполните hard reset вашего HP. Выполнение аппаратного сброса вашего лэптопа (hard reset) позволяет очистить память и восстановить корректные связи между БИОС и аппаратной начинкой ПК. Отключите все внешние, подключенные к ПК, устройства (в частности, USB и блок питания), изымите аккумулятор из ноутбука. Затем нажмите на кнопку питания (Power) и держите её нажатой в течение 15 секунд.
Потом подключите обратно аккумулятор и блок питания, другие внешние устройства не подключайте. Нажмите на кнопку питания, в появившемся меню выберите «Обычная загрузка Виндовс» (Start Windows Normally), и нажмите ввод.
- Загрузите настройки БИОС по умолчанию. Перейдите в БИОС, нажмите на F9 и загрузите настройки БИОС по умолчанию. Затем нажмите на F10, подтвердите изменения, и перезагрузите ваш компьютер;
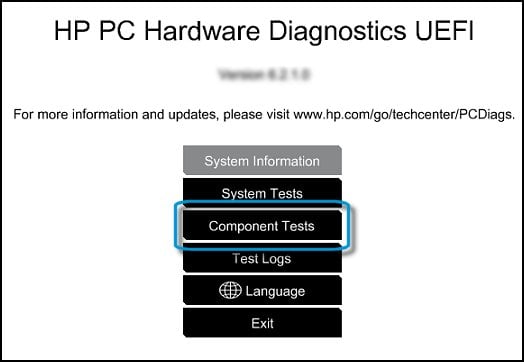
- Выполните тест вашего компьютера с помощью HP PC Hardware Diagnostics UEFI. Выключите ваш компьютер, затем включите его и быстро нажимайте на клавишу F2. Когда меню HP PC Hardware Diagnostics UEFI появится на экране, выберите тест компонентов (Component Tests).
Заключение
Решить проблему Boot Device Not Found hard disk (3f0) станет изменение настроек БИОС, аппаратный сброс ПК (hard reset), а также проведение теста структурных элементов лэптопа. В большинстве случаев помогает первый из описанных мной способов, позволяющий устранить ошибку на вашем ПК.
Что делать с ошибкой boot device not found 3F0 на ноутбуке HP?
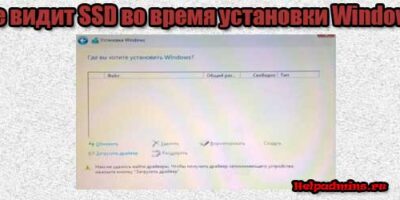
Данное сообщение чаще всего появляется на ноутбуках фирмы HP. В нем говорится о проблемах с загрузочным устройством с операционной системой, которым в ноутбуке является жесткий диск.
Но если ваш ноутбук отображает данное сообщение, то совсем не обязательно что вышел из строя жесткий диск, хотя и не исключено.
Первое, что стоит сделать в данной ситуации это проверить правильность настроек BIOS.
Для этого заходим в bios. На ноутбуках HP чаще всего это клавиша F10, которую нужно нажимать при включении ноутбука.
Вот так выглядит BIOS HP:
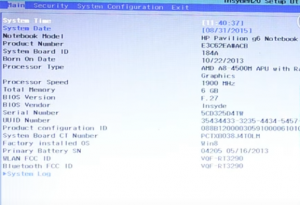
bios ноутбука HP
Заходим во вкладку “System Configuration” и выбираем “Boot Options” клавишами со стрелками.
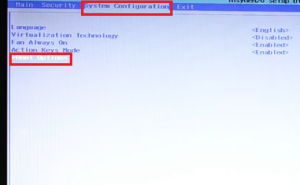
Меню bios – system configuration
Далее находим параметр “Secure Boot” и ставим его в состояние “Disable” клавишей “Enter”.
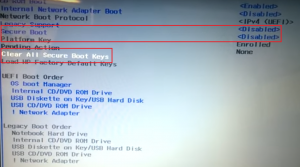
Secure boot – Disable
Следующим шагом выбираем параметр “Clear All Secure Boot Keys” и в открывшемся поле для ввода вводим код из скобок.
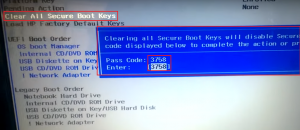
Параметр “Clear All Secure Boot Keys” в биос HP
Дальше активируем параметр “Legacy Support” выставлением его в положение “Enabled”.
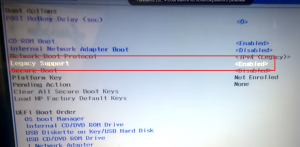
Legacy Support выставляем в Enabled
Последним шагом будет выставление приоритетов загрузки. На первое место нужно поставить “Notebook Hard Drive” клавишами F5 или F6.
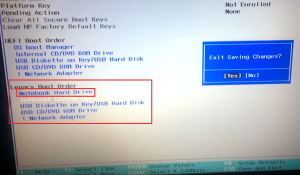
Выставление на первое место Notebook Hard Drive в Bios
Сохраняем выполненные настройки клавишей F10 и выходим из bios.
Если это не помогло, то нужно попробовать проверить шлейфы жесткого диска.
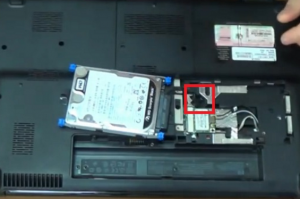
Проверка шлейфа жесткого диска в ноутбуке HP
Во всех остальных случаях вам скорее всего понадобится замена жесткого диска.
Easily Fix Boot Device not Found 3FO Error on HP Computers
The computer requires a proper boot environment to be set up in order to load the operating system and if not, some users get the boot device not found message while trying to start their computer up. In this article, we have compiled some mistakes that users make while installing their operating systems which trigger this error, and have also listed the solutions that will help you get around those errors and prevent you from making them in the future.
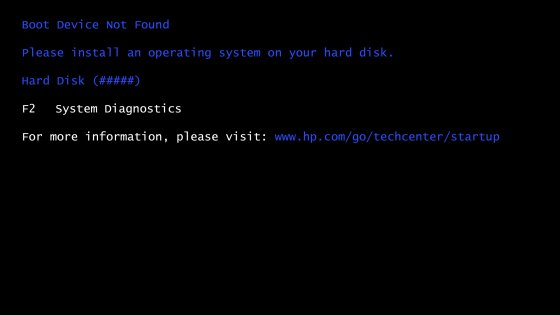
Make sure to go through the reasons due to which you get the “Boot Device not Found. Please install an Operating System on your Hard Disk” error which has been listed below and then start implementing the solutions in a step-by-step manner.
What Causes the Boot Device not Found Error?
Most complaints that we got were coming from HP computer owners and they complained that they were regularly seeing the “Boot Device not Found HP” error. Following are some of the primary reasons for it.
- Bios Settings: Some of your Bios settings might be incorrectly configured due to which you are getting the Boot Device not Found please install an operating system error on your computer. Therefore, we recommend that you switch the settings to their defaults as mentioned in the solution below, and then check to see if doing so fixes the issue.
- Incorrect Boot Order: In certain cases, the boot order that you have set on the computer might not be properly configured it and might be prioritizing boot from another device connected to the computer. Therefore, we recommend that you correct the boot order and then check to see if doing so fixes the Boot Device not Found Dell issue.
- Damaged Files: It is possible that some files on your hard disk have been damaged which contained important information related to the operating system and you are getting the error message due to this. Therefore, we recommend that you try and fix these damaged files and then check to see if the computer boots normally.
- Boot Type: If you have selected the incorrect boot type, you will be getting the error while trying to boot into the operating system. Therefore, we strongly suggest that you correct the Boot Type that you are using as mentioned in the solution below and then check to see if doing so has fixed your issue.
- Bad Sectors: Some users get the “Boot Device not Found on HP Laptop” if their hard disk has acquired some bad sectors. Therefore, we recommend that you try and scan your HDD for any bad sectors and then check to see if doing so gets rid of the issue.
- Hardware Issue: The hardware installed on your computer might be glitched due to which the error message might be triggered. Therefore, we suggest that you check to see if a Hardware diagnostic scan can pinpoint the issue.
Now that we have taken you through some of the most primary reasons behind its occurrence, we can finally move on towards implementing the solutions for it.
Fixing the boot device not found please install an operating system issue:
Solution 1: Restore BIOS Default Settings
Sometimes changed BIOS settings can cause the error, so resetting your BIOS as the first step could be helpful in solving the error. To do so follow these steps:

- Restart your PC as you would do normally and press the “BIOS” key displayed on the monitor to enter the BIOS settings, usually, this key is “F10”.
- Inside the BIOS menu press the “F9 or F5” key to bring up the “Load Default Options” prompt.
- Then click on “YES” to confirm the default process.
- Once done “Restart” your PC and let your computer boot normally.
- Now proceed to check if the boot device not found on hp laptop issue got resolved.
Solution 2: Perform A Hard Reset
A hard reset helps reset all temporary files and cache on your system and can also help resolve this issue. To hard reset your PC follow these steps:
- Shutdown your computer as you would do normally from the “Start” menu.
- Then “Unplug” the AC power cord from the case supply and take out the battery if you are on a laptop.
- Next, press down the “Power” button for almost 20-25 seconds, this helps reset the hardware and discharge capacitors.
- Now, “Power ON” your computer and press “F2” on the startup screen.
- Next, run the “Startup Test” to check for hardware components.
- In the end, restart your computer and let it boot into windows normally.
Solution 3: Reseat Your Hard-Drive
The error may be caused due to a loose connection to the Hard-drive so you can try reconnecting the hard drive and check if it helps in fixing the cause for you. Implement the below-listed steps:

- Turn OFF your computer as you would do normally from the “Start” menu.
- Then “Unplug” the power cord and remove the PC case side panels.
- Unplug all of your hard-drives and let them stay unplugged for a few seconds.
- Afterward, plug in all the drives back on close in the side panels. Then turn on your computer and check for the error.
- Wait until the process gets completed and verify if the boot device not found dell issue still exists or not.
Solution 4: Modify Your Computer’s Boot Order
The boot order on your PC may have changed due to an error and now it is booting from another drive instead of the windows drive so to change your boot order follow this procedure:

- Restart your computer using the “Restart” option on the Start menu.
- When the first display appears press the “BIOS” key shown on the screen, this key is usually “F10” or “ESC” depending on your manufacturer.
- Once you enter the “BIOS” menu look for and open up the “Boot” tab at the top of the window.
- Then use the “Arrow Keys” on your keyboard to navigate to the “Boot Devices”.
- Here make sure your “Hard Drive” is selected as the first priority. Once done press “F10” to save all the changes made and“Exit”.
Solution 5: Try To Rebuild the BCD Files
Another workaround to the error would be to Rebuild Boot Configuration Data or BCD files and to perform this step you would be needing Windows Installation Media. Carry on with the following procedure:

- Insert in the “Windows Installation Media”, on the boot window you will be asked to press a key to boot from the installation media, press any key on your keyboard.
- Select an “Installation Language” and then press “Next”. From the Windows Installation Options click to select “Repair Your Computer” and on the next window click on the “Troubleshoot”option.
- Then in the troubleshoot section choose to select “Advanced Options”.
- Next, click on the “Command Prompt”, once opened type in the following commands, and make sure to press “Enter” after each command:
- Once done, type in “Exit” to close the command prompt window and then proceed to “Restart” your computer to see if the problem got fixed.
Solution 6: Try Setting the System Partition To Active
This solution would require a “Bootable Windows 10 Installation Media”. To tweak the system partition settings follow these steps:
- Insert in the “Windows Installation Media”, on the boot window you will be asked to press a key to boot from the installation media, here press any key on your keyboard.
- Then select an “Installation Language” and click on “Next”. From the Windows Installation Options click to select “Repair Your Computer” and on the next window click on “Troubleshoot”.
- In the troubleshoot section choose to select “Advanced Options” and then click on “Command Prompt”.
- In the command prompt window type in the following command and hit “Enter” to start the “Diskpart Utility”.
- Now type in the next command and again press “Enter”:
- Next look for the “Disk Number” for your primary drive, in our case it is “1”, type in the following command afterward and press “Enter”:
- Once the disk is selected type in the following command to list all partitions:
- Now select the partition having around “100MB” of storage, in our case it is partition “2”, and type in the following command:
- Finally, type in the below command to mark the partition as active:
- In the end, type in “Exit” to close the command prompt window and once the process is complete, the primary drive should now be active and you may be able to boot into your computer without any error.
- When you are completed with all of the steps now verify if the error got resolved.
Solution 7: Enable Legacy Boot and Disable Secure Boot
Enabling the Legacy Boot option in your BIOS may be helpful in solving the issue, you can also disable secure boot for further assistance. Follow the steps below on how to switch to Legacy Boot:
- Restart your PC as you would normally and as soon as it starts press the “BIOS” key displayed on the monitor to enter the “BIOS Settings”, usually this key is “F10”.
- Inside BIOS choose the “System Configuration” menu using the “Arrow Keys” on the keyboard.
- Then select the “Boot” option and press “Enter”.
- Using the “Arrow Keys” on your keyboard move down to select “Legacy” and hit “Enter”.
- In here if the option is disabled, choose to select “Enabled”.

- Next, select “Secure Boot” from the window, hit “Enter” and afterward disable “Secure Boot”.
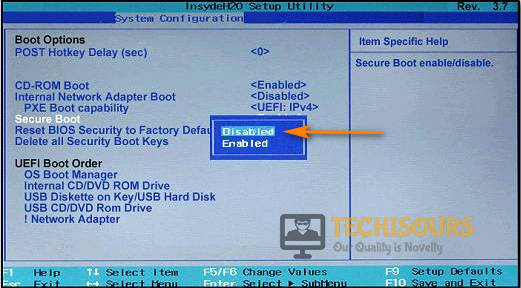
- Then press “F10” to save and accept all the changes made.
- Now your computer will start with “Legacy Support Enabled” and “Secured Boot Disabled”.
Solution 8: Repair Windows Using the Automatic System Recovery
- Inset the “Bootable USB/DVD” into your computer while it is still “ON”.
- Then “Restart” your PC as you would do normally and press any key when the computer prompts you to boot from the “USB/DVD”.
- Afterward, select your “Required Language” and then click on “Repair Your Computer” from the bottom left of the window.
- On the next screen click to select “Troubleshoot” and on the troubleshoot window click on the “Advanced” option.
- Next, click on “Automatic Repair” or “Startup Repair” and wait for the process to complete.

- Once done “Restart” your computer and see if the boot device not found hp windows 10 issue has been resolved.
Solution 9: Install Fresh Windows
If the solutions above do not work, you can try installing fresh windows on your computer. To do so follow this procedure:
- Once you create a “Bootable USB Drive” or you have a “Windows Installation DVD” insert it into your computer and when the computer detects the drive “Restart” your computer as you would do normally.
- On the first startup, your computer will ask you to press a key in order to boot from the installation media, press any key on the keyboard to continue.
- When “Windows Installation” is accessed, select “Language, Edition and Architecture” options and click on “Next”.

- In the following window click to select “Install Now”.
- Now the installation will ask you for a “Product Key”, it can be found on the back of the “DVD Pack”, you can also skip this step and enter your code once the installation is complete.

- In the next step click to select “Custom Install Windows Only (Advanced)”.
- Now in the following window, you will be shown all your “Partitions”, windows will ask you to select a partition for window installation, click to select the “Appropriate Partition”.
- Then click on “Next” to start “Windows Installation”. This may take a while so sit back patiently and wait until the Windows installation gets completed.
- Once done now proceed to check if you got rid of the error successfully.
Solution 10: Fix the Boot Loader
This solution would require a USB with bootable Ubuntu so make sure it is available in the first place. Then proceed with the following steps:
- Plug the “Bootable USB” into your computer, on the first boot click on the “BIOS” key to enter the BIOS settings, these keys are usually “ESC or F10” depending on the make of your computer.
- Inside BIOS go to the “Boot” tab at the top, use the “Arrow Keys” on your computer to navigate.
- Inside the Boot tab navigate towards the “Boot Devices” and select the bootable USB as “Boot Option # 1”.
- Afterward, press “F10” to save all the changes made and “Exit”.
- Now your computer will load into the “Bootable Ubuntu USB” and when the window appears click on “Try Ubuntu”.
- Once you are into the “OS Menu”, open up the Terminal by pressing “Ctrl + Alt + T” keys simultaneously.
- Next, enter the following command in the terminal window:
- Now, update the local repositories with the following command:
- Then install boot-repair using this command:
- The above command will open up the program, if it doesn’t you can use the following command to open it up:
- When the program opens, click on “Recommended Repair” and wait for it to complete the process.
- Now restart your computer without the USB drive and check to see if the problem still persists or not.
Solution 11: Install Windows 10 Alongside the Ubuntu
When the computer is unable to find the Ubuntu boot loader, installing windows 10 will help the computer to use the Windows 10 boot loader instead of the Ubuntu Boot loader. Go with implementing these steps:
- Install a fresh version of “Windows 10” following the above-mentioned solution.
- After windows are installed your computer will work normally with the newly installed windows.
- To boot from another Window you would have to tune into the “BIOS Boot” options, already mentioned in the solution above.
Solution 12: Run the Hardware Diagnostics
This particular error can also be caused due to hardware failure and to check for any hardware issues you can try running the built-in “Hardware Diagnostics Tool”. To do so follow this method:

- Restart your PC as you would do normally and as soon as it starts press the “BIOS” key displayed on the monitor to enter the BIOS settings, usually, this key is “F10 or F12”.
- Then select the “Boot To Utility Partition” or the “Diagnostics” option and afterward press “Enter” to start the process.
Solution 13: Check Bad Sectors On The Bootable HDD
This solution will require another working computer. You can download the Ease US Partition Master on the working computer and then plug in your hard drive. Ease US partition maker will help you do a surface test for the bootable disk very easily.
Solution 14: Replace Your Hard Drive
If errors are found on the hard drive that is beyond fixing, the only option you are left with is to replace your hard drive and get a new one. You can back up all the data from your previous hard drive by plugging it into the working computer. After replacing your hard drive now observe if the boot device not found hard disk 3f0 error got removed.
Hopefully, you will have resolved the problem until now but if you still continue to face any bugs you may Contact Us here.