How to fix permission denied error in Linux? [Solutions]
When you are working with the Linux Operating system then a common error occurs i.e. permission denied, In this article, you will get to know about how to ‘permission denied’ error in Linux?[linux permissions denied]
List of content you will read in this article:
In the Linux operating system, you cannot execute any command without proper permission. Every file and directory has some permission or privilege (read, write, or execute) associated with them. If you are not authorized to access the file or directory, executing any command on that will result as a “permission denied” error in Linux. This prevalent common can only be resolved by getting the proper access to that file and directory. In this article, we will help you with how to fix the permission denied errors in Linux and what type of error this is with the help of various Linux commands.
What is Linux Permission Denied Error?
This type of error will occur whenever you run a command for which you do not have the execute permission. Similarly, you cannot perform read or write actions if you do not have read or write permission for any file or directory. These Linux permissions are the primary reason behind the security of Linux, as they will help in protecting the data from unauthorized access.
Linux system has three types of permissions
- read permission
- write permission
- execute permission
So, if you want to solve a Linux permission denied error, you can check your privileges for the specific file or folder using the following command.
This command will display the long listing of all files and folders along with the permission, as shown below.
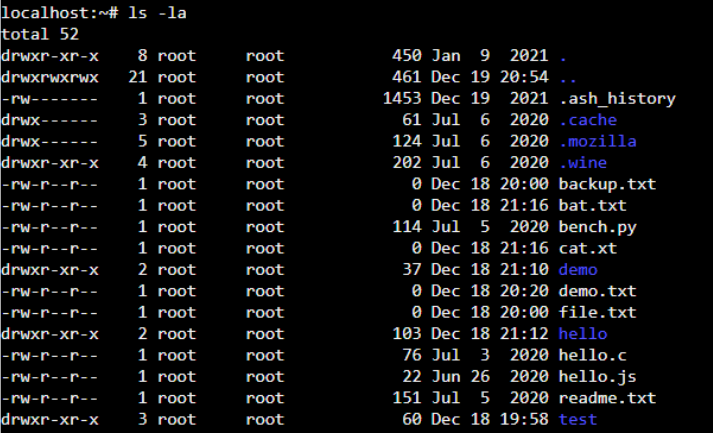
As shown below, we have created a shell script “hello.sh” without the execute permission. On executing “hello.sh”, you will get a “permission denied” error.

How To Fix Permission Denied Error in Linux?
For solving this error, you need to add the correct permissions to the file to execute. However, you need to be a “root” user or have sudo access for changing the permission. For changing the permission, Linux offers a chmod command. The chmod stands for change mod. This command has a simple syntax, as shown below.
- Flags are the additional options that users can set.
- Permissions can either be read, write or execute in the file. You can represent them in symbolic form (r, w, and x) or octal numbers.
- The Filename specifies the file’s name for changing the permissions.
Representation of permissions
Below is the symbolic and octal representation of the user’s permissions while executing the “chmod” command. First, we will understand the representation before using it.
Symbolic representation
chmod u=rwx,g=r,o=r file
- r specifies the read permissions
- w specifies the write permissions
- x specifies the execute permissions
- Octal representation-
- 4 specifies the read permissions
- 2 specifies the write permissions
- 1 specifies the execute permissions
- 0 means no permissions issued.
How to Solve Bash Permission Denied?
Now, we are aware of the error, as shown below.

Giving the appropriate permission to the user will solve the problem. Thus, we are giving the execute permission to the user to run the “hello.sh” shell script. Execute the below command to provide execute permission.
chmod +x hello.sh

Now, we can see the change in the permission of the “hello.sh” script file. The above command provides the execute permission to the file. As you can see, the root user can make the required changes. If we execute the shell script, we should not get the error. Let’s try by running the below command.

After executing the “hello.sh”, we get the output that displays the “hello.” Changing permission has solved the problem of bash permission denied.
Conclusion
If you are a regular Linux user, you might have faced the “permission denied” error while executing various commands. This might be due to the incorrect privileges to run that command. Only a root user or user with sudo access can change the permissions for the file or directory you want to access or execute. If you are the correct user to make the required permission changes, you can run the “chmod” command and add the desired permission.
This is all about how you can solve/fix permission denied errors in Linux with the help of the above-listed commands/methods. If you think there are other alternatives to achieve the goal, you can put them down via the comment box. Also, you can buy a Linux VPS server to run and test the above-listed commands.
Permission denied in Mac Terminal? Try this fix

Having spent some years coding applications for macOS, we’ve created a tool that everybody can use. The all-round problem fixer for Mac.

So here’s a tip for you: Download CleanMyMac to quickly solve some of the issues mentioned in this article. But to help you do it all by yourself, we’ve gathered our best ideas and solutions below.
The Terminal app is a great way to run processes and carry out tasks if you’re familiar with Unix commands. Mostly, it just works as long as you use correct commands. But occasionally, you may see an error message, such as ‘permission denied.’ This could occur for several reasons, such as because the file you’re trying to work on is locked or there is a permissions problem. In this article, we’ll show you what to do if you see a ‘permission denied’ error in Terminal.
What is Terminal?
Terminal is an app that lives in the Utilities folder inside Applications. It allows you to control your Mac, running processes and tasks from a command-line interface. Thanks to macOS’ Unix kernel, it can interpret and execute regular Unix commands. Until macOS Catalina, Terminal’s default shell was bash. The shell is the layer on which you type and execute commands. However, Terminal could run other shells on top of bash. One of those is called zsh. Zsh has some benefits over bash in that it’s easier to use for some tasks and doesn’t require strict user permissions in the way that bash does. And Zsh is now the default shell for macOS. You can tell which shell Terminal is running by looking at the top of any Terminal window. It will show your username, the shell name, and then the window’s dimensions.

Why do people use Terminal?
There are lots of reasons why Mac users love Terminal. If you are familiar with Unix commands, Terminal provides a very quick way to run processes and tasks. The other main reason for using Terminal is that it allows you to access parts of macOS that are hidden and don’t appear in System Settings. That way, you can change settings that would otherwise need a third-party app to change. For example, if you want to change the default file type for screenshots from png to jpg, you’ll need to use Terminal.
What does ‘permission denied’ mean?
If you see the error message, it means that Terminal can’t complete the command you’re trying to run because it is unable to access the file you want to work on. And as the name of the error suggests, it can’t access the file because it doesn’t have permission. This could be caused by several things, but it is usually because:
- You don’t have permission to edit the file.
- The file is locked.
- The command you are trying to run is incorrectly formatted.
How to fix ‘permission denied’ in Terminal
Check the file permissions
There are a couple of different ways to check file permissions. You can do it in the Finder or Terminal. We’ll show you both ways below.

Terminal
- Open Terminal and type the following command followed by a space: ls -l
- Locate the file or folder you were trying to work on when you got the error message and drag it onto the Terminal window.
- Press Return.
- If you see the letters ‘rwxr’ in the string of characters before your username in the result, it means you can read, write, and execute the file. If you only see, for example, ‘r,’ it means the file is read-only to you.
Finder
- Locate the file or folder in the Finder.
- Press Command-I to open the Get Info window.
- Look at the bottom of the window where it says Sharing & Permissions. If there’s nothing beneath it, click the arrow next to it.
- Look at the permissions next to your username. They should say ‘Read & Write.’
Change file permissions
If the permissions you just checked don’t allow you to write to a file, that’s probably what’s causing the ‘permission denied’ error. To fix it in Finder, click the Privilege column next to your username in Get Info, and choose Read & Write.
To change permissions in Terminal, do the following:
- Type this command followed by a space: chmod 755
- Drag the file or folder onto the Terminal window.
- Press Return.
- Permissions for the file or folder will be changed to read, write, and execute.
Change directory ownership
If changing permissions didn’t fix the problem, try changing the ownership of the directory to your username. In the steps below, change [username] to your username and [directorypath] to the path to the directory whose ownership you want to change — you can just drag the folder onto the Terminal window, as we did before.
- Type chown -R $[username]:[username] [directorypath]
- Press Return.
An easier way to fix problems with Terminal
It may be that you are seeing a ‘permission denied’ error because of a problem with Terminal itself. One way to fix that is to reset the app. And the easiest way to do that is to use a helpful app called CleanMyMac X. CleanMyMac X has several modules that can free up space, optimize your Mac, keep it safe from malware, and, importantly, in this case, fix problems. The app is notarized by Apple — you can download it for free here.
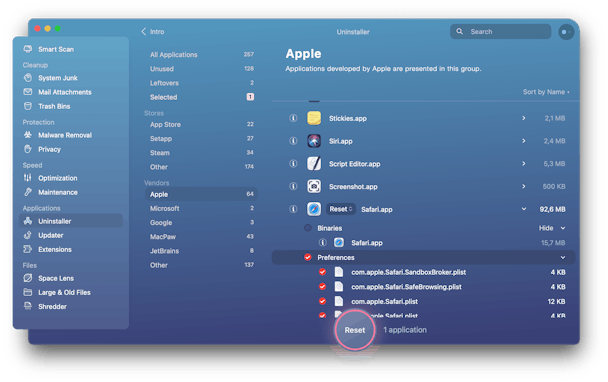
- Open CleanMyMac X and choose Uninstaller in the left sidebar.
- Use the search bar to search for Terminal.
- Click the arrow next to the file size.
- Select the circles next to the Preferences and Supporting Files.
- Click on the arrows next to Terminal and choose Reset.
- Click the Reset button.
To let CleanMyMac X reset default Mac apps, go to CleanMyMac X Preferences. Here, click Ignore List > Uninstaller. Deselect the box next to ‘Ignore system applications.’
The ‘Permission denied’ error in Terminal is usually caused by permission problems with the file or directory that you want to work on. You can usually fix it by changing permissions or re-assigning ownership. If that doesn’t work, use CleanMyMac X to reset the Terminal app and make sure you have formatted commands correctly.
How to fix adb's `Permission denied` when copying a file from a device
On a recent attempt to pull a realm database file created by an application that I built on my device, I got an error with the following message:
Let’s see how we can solve this!
Long story short, you can run the following command from the Terminal to create a copy of the file in your machine’s file system:
This only works for Debug builds and not for a production app.
But let’s break it down to pieces!
Explanation
You can use adb shell to connect to the device’s shell. Then, if you want to access the data of an app with an applicationId set to com.example.test , you will have to run the command run-as com.example.test inside the adb shell.
Once you execute this command, the working directory will change to the /data/data/com.example.test . From there, you can use commands like ls to get a list of the available directories and cat to get the content of a specific file.
The last step ( > default.realm ) is to redirect the content of the file to a file on my machine’s file system.
And that’s it! Now you will be able to copy the file from a device for an application that you have built without any error!
How to Fix SSH “Permission Denied” with Git Clone
Are you frustrated that cloning your Git repository over SSH always results in a “permission denied” error message in the terminal? Here’s how to fix it once and for all.

I operate several droplets on DigitalOcean and this issue has been bugging me for ages. When I couldn’t take it anymore, I spent a whole hour searching for and trying out various suggested fixes with absolutely no avail. Then I reflected on what I was doing in the first place and figured out the logic behind the operations.
Before we start, I wanted to let you know that you can start your own droplet on DigitalOcean with a $100 credit. Simply follow this link:
DigitalOcean — The developer cloud
Helping millions of developers easily build, test, manage, and scale applications of any size — faster than ever…
If you’re not logged in as the root user on your machine, you’ll likely have tried this command to clone your Git repository (GitLab in this case):
And this error keeps re-appearing:
Generate SSH Keys and Test SSH Authentication
First of all, ensure that your SSH key has been generated and the file containing the corresponding public key id_rsa.pub has been added to the account where your Git repository is hosted (scroll below to find a list of Git hosting services and where to add your public key).
If you haven’t generated an SSH key yet, this should be your first step. Run the following command on the machine you plan to Git clone in:
Press return for all questions by keeping the defaults and empty passphrase. This will generate two files in the
/.ssh directory within your home directory:
Copy and paste the content of the newly-generated id_rsa.pub file into the account where your repository is hosted. In my case, this is GitLab.
- GitLab: Navigate to your User Settings > SSH Keys
- GitHub: Navigate to your Settings > SSH and GPG Keys
- BitBucket: Navigate to your Bitbucket settings > SSH keys
Now you can do an SSH authentication test using this command:
Authentication should succeed with this return message:
Everything should work, but I still cannot clone my Git repository. Argh!
Solution 1: Use HTTPS
This is the most effortless solution at hand. Simply switch to cloning from the HTTPS path for your Git repository. But the convenience of never having to enter your credentials again and letting the SSH keys authenticate you will forever haunt you.
Each git pull will ask for authentication over and over again. That’s not the solution you were looking for. Me neither.
Solution 2: Use ‘sudo git clone’
Move SSH Key Files to root’s .ssh Directory
When performing operations while not logged in with the root user, we are accustomed to precede all commands with sudo . But sudo implies that SSH keys need to be available in the root’s home directory.
This solution is the most elegant because it allows you to continue with the same directory permissions that you had been working with thus far. No radical permission changes will be performed (we’ll get to that in the 3rd solution below).
All you do is move the SSH keys we’ve generated above to the root’s SSH directory located at /root/.ssh . If you try sudo git clone now, you’ll likely encounter this error:
While this warning won’t let you proceed any further, there is a simple fix to it. Set the file permissions to 600 (owner read-write) and retry sudo git clone .
It should work now.
Solution 3: Use ‘git clone’ (without sudo)
Amend Permissions of the Target Directory
This solution requires a change of file permissions for entire directories. As it’s quite intrusive, this isn’t my favorite option.
You can actually git clone without the sudo, but will probably run into writing permission errors like these:
A workaround is to amend the target’s directory permissions so that your non-root user can clone the necessary files into it. I followed a simple tutorial to correct permissions on /var/www:
- Change the directory owner and group:
sudo chown www-data:www-data /var/www - Allow the group to write to the directory with appropriate permissions:
sudo chmod -R 775 /var/www - Add yourself to the www-data group:
sudo usermod -a -G www-data USER
Replace USER with your account’s user name. That’s it. You should now be able to clone into the desired directory under /var/www.
Conclusion
I hope either one of three solutions suggested above will help you in fixing the persistent permission errors. It’s just a matter of using common sense: SSH-ing with the superuser command means that SSH will look for keys in the root’s home directory.
Not using the superuser command is generally unconventional. At least it will look up SSH keys in your home directory, but requires appropriate directory writing permissions.