Turning Sublime Text Into a Lightweight Python IDE
A solid text editor is a developer’s best friend. Ideally, you use it constantly and it becomes like an extension of your hands. The keyboard commands you use daily become so engrained in your muscle memory that you stop thinking about them entirely.
With Sublime Text, it’s possible to turn your text editor into the functional equivalent of a Python IDE. The best part is you don’t have to install an IDE to do it.
Requirements
Here are my requirements for an ‘IDE’:
- It should provide excellent, configurable syntax colorization.
- It should allow for robust tab completion.
- It should offer the ability to jump to the definition of symbols in other files.
- It should perform automatic code linting to help avoid silly mistakes.
- It should be able to interact with a Python interpreter such that when debugging, the editor will follow along with the debugger.
Which Version?
Version 3 is the best available version. You should use it. Version 2 will be fine, but some of the plugins I recommend are not available for it. If you want the functionality they provide, you’ll have to find alternatives.
Basic Settings
All configuration in Sublime Text is done via JSON. You should already know the structure of JSON and how to write it. If you do not, go and read that link then return here.
There are a number of different levels of configuration in Sublime Text. You will most often work on settings at the user level.
Open Preferences -> Settings — Default to see all the default settings and choose which to override. It is a very long list. Remember that defaults are often just fine. Only change those settings you need to change.
Create your own set of preferences by opening Preferences -> Settings — User . This will create an empty file. You can then copy the settings you want to override from the default set into your personal settings.
Here’s a reasonable set of preliminary settings. Don’t just copy-and-paste them into your own settings file. Consider what each setting does, and write it into your settings file manually.
Please note that the color scheme, and theme listed are not available by default. You may want to install them using the sublime package manager, or you may wish to find your own. My favorite monospaced font Droid Sans Mono Slashed is also not installed on any machine by default. Any monospace font will do, but I really like that one. Please be sure that the font you choose for yourself is in fact a monospace font. This is vital when typing a whitespace sensitive language like Python.
Especially important is the setting translate_tabs_to_spaces . This ensures that any time you hit a tab key, the single \t character is replaced by four \s characters. In Python this is vital!
Extending the Editor
Most of the requirements above go beyond basic editor function. Use Plugins.
Sublime Text comes with a great system for Package Control. It handles installing and uninstalling plugins, and even updates installed plugins for you. You can also manually install plugins that haven’t made it to the big-time yet, including ones you write yourself. Happily, the plugin system is Python!
Before you begin installing packages with package control, you must install the system itself. Do so by following the instructions here.
Once the system is installed, you can install a plugin. Open the command palette with shift-super-P ( ctrl-shift-P on Windows/Linux). The super key is command or ⌘ on OS X. When the palette opens, typing install will bring up the Package Control: Install Package command. Hit enter to select it.
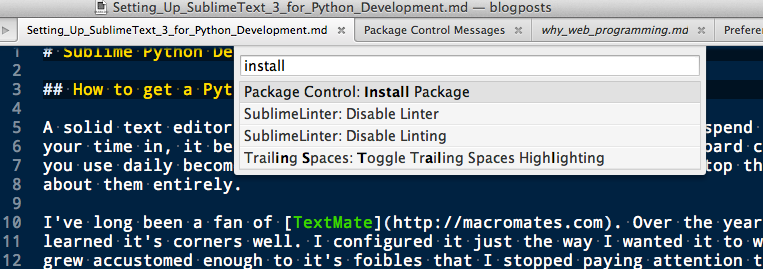
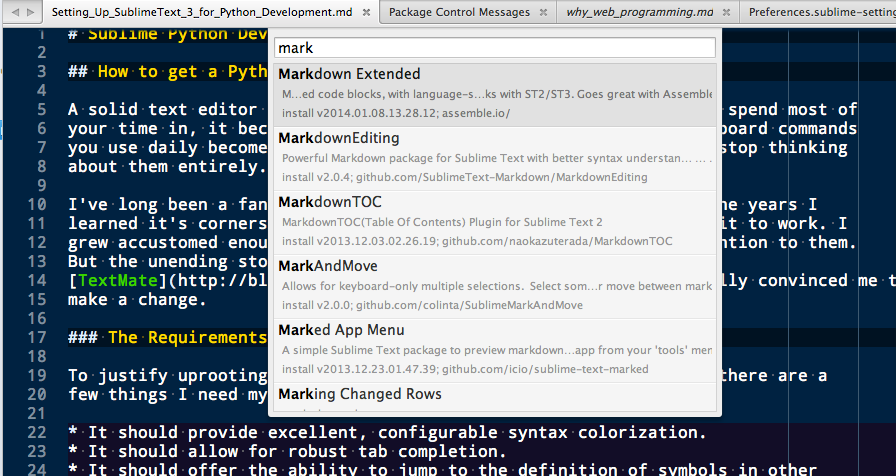
After you select the command, Sublime Text fetches an updated list of packages from the network. It might take a second or two for the list to appear. When it does, start to type the name of the package you want. Sublime Text filters the list and shows you what you want to see. To install a plugin, select it with the mouse, or use arrow keys to navigate the list. Hit enter when your plugin is highlighted.
Useful Plugins
Here are the plugins I’ve installed to achieve the requirements above.
Autocompletion
By default, Sublime Text will index symbols in open files and projects. But that doesn’t cover installed python packages that may be part of a non-standard run environment.
There are two to choose good plugins to choose from:
-
offers strong support for multiple languages through it’s own plugin system. It is a bit heavy and requires building an index. only supports Python, but is faster and keeps an index on its own.
I’ve installed SublimeJedi . Using it I can set up individual settings for my projects. First, I use the Project menu to save project as. . I give my project a name (perhaps foo ) and then save. Once I’ve done so, I will have a foo.sublime-project file on disk. This file can contain special settings that will apply to this project only. Project settings will override more general settings like User preferences.
To allow SublimeJedi to see any package I install in the virtualenv for my project, I can add the following settings to that file:
The python_interpreter_path allows me to indicate which Python executable should be introspected for symbol definitions.
The python_package_paths setting allows designating additional paths that will be searched for Python packages containing symbols. By pointing this at the site-packages directory of my project virtualenv, I get autocompletion for any package I install in this project with pip .
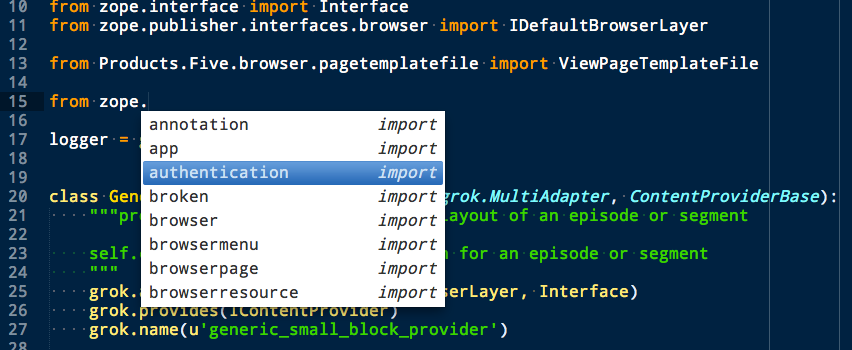
Once configured, you should be able to use the ctrl-shift-G keyboard shortcut to jump directly to the definition of a symbol. You can also use alt-shift-F to find other usages of the same symbol elsewhere in your code.
Code Linting
Code linting shows you mistakes you’ve made in your source before you attempt to run the code. This saves time. Sublime Text has an available plugin for code linters called SublimeLinter.
Python has a couple of great tools available for linting, the pep8 and pyflakes packages. Pep8 checks for style violations, lines too long, extra spaces and so on. Pyflakes checks for syntactic violations, like using a symbol that isn’t defined or importing a symbol you don’t use.
Another Python linting package, flake8 combines these two, and adds in mccabe, a tool to check the cyclomatic complexity of code you write. This can be of great help in discovering methods and functions that could be refactored to be more simple.
There is a nice plugin for the SublimeLinter that utilizes flake8. For it to work, the plugin will need to have a Python executable that has the Python tools it needs installed.
SublimeLinter and the flake8 plugin for it work best in Sublime Text 3. If you have a hard time getting them to work, consider trying the less-featureful but simpler package Python Flake8 Lint.
This same admonition applies if you have trouble getting SublimeLinter to work.
Use virtualenv to accomplish this. First, create a virtualenv and activate it:
Then use Python packaging tools to install the required packages:
The Python executable for this virtualenv now has the required packages installed. You can look in /path/to/sublenv/bin to see the executable commands for each:
Now install SublimeLinter and then SublimeLinter-flake8 using Package Control.
Here are settings you can add to Preferences -> Package Settings -> SublimeLinter -> Settings — User :
The paths key points to the path that contains the flake8 executable command. The python_paths key points to the location of the python executable to be used. In both cases, you will want to provide values in the appropriate place for the OS you are using.
The settings inside the flake8 object control the performance of the linter. Read more about them here. In particular, you can use "excludes" to control which linting errors you want to ignore. This can be very helpful in quieting the less important errors. If you’re curious, here’s a list of error codes:.
White Space Management
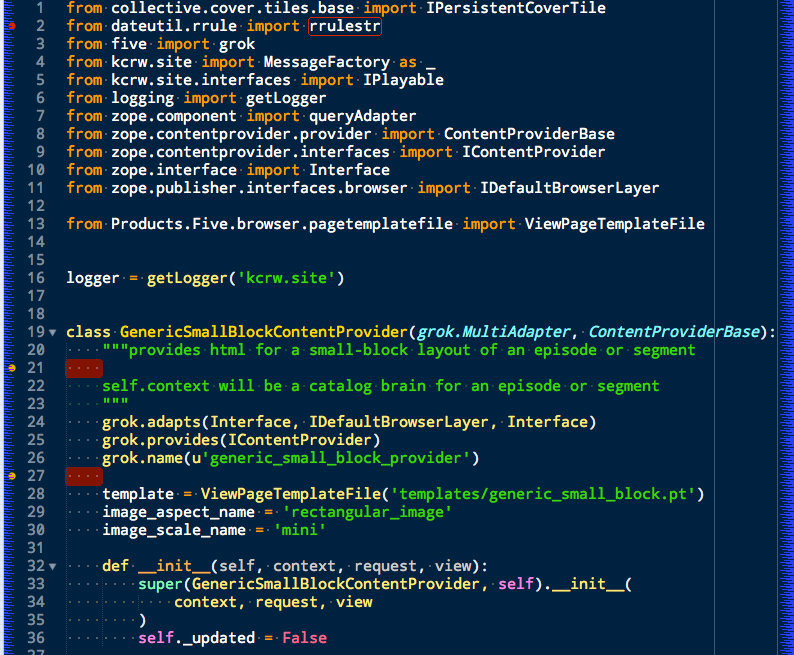
One of the issues highlighted by flake8 is trailing spaces. Sublime text provides a setting that allows you to remove them every time you save a file:
Do not use this setting
Removing trailing whitespace by default causes a ton of noise in commits.
You should keep commits for stylistic cleanup separate from those that make important changes to code. The TrailingSpaces SublimeText plugin can help with this.
Here are the settings you can use:
This allows trimming whitespace on save, but only on lines you have directly modified. You can still trim all whitespace manually and keep changesets free of noise.
Follow-Along
The final requirement for a reasonable IDE experience is to be able to follow a debugging session in the file where the code exists.
There is no plugin for SublimeText that supports this. But there is a Python package you can install into the virtualenv for each of your projects that does it.
The package is called PDBSublimeTextSupport and its simple to install with pip :
Once the plugin is installed you have one more step to take. You must configure the Python debugger to communicate with your editor. Add a file called .pdbrc to your home directory. In that file, type the following Python code:
You can also place a .pdbrc file in your project where you interact with the command line. Python will read the one from your home directory first, if present. If there is one in your current working directory, that will override the one in your home directory.
Now, whenever you set a breakpoint in your code and it is hit, your editor will open. You’ll see your cursor on the line of code where your debugger is. As you step through the code, you will see the current line in your Sublime Text file move along with you. It will even follow you to other files if you step into functions that are called.
Настройка Python на Sublime text3
Теперь проблема с Tools->SublimeREPL->Python->Python пишет не удается найти файл, через CTRL + B тоже пишет:
[WinError 2] Не удается найти указанный файл
Что делать? Как РЕПЛ настроить?

Открываем Sublime Text -> Tools -> Build System -> New Build System
Вставляем в открывшийся файл следующие строки, чтобы получилось вот так:
Сохраняем файл с названием python3.sublime-build и не меняем путь предложенный редактором
Идем и ставим галочку Tools -> Build system -> python3
Если вам не требуется передавать через консоль в программу аргументы (например input()), то вы уже можете проверить работу создав и сохранив (без сохранения будет ошибка) тестовый файл, а затем нажав Ctrl+B. Снизу появится консоль с выводом результата.
Для проверки предлагаю выполнить следующий код:
——Делаем интерактивную консоль——
Заходим на сайт https://packagecontrol.io/installation и копируем содержимое бокса Sublime Text 3 в буфер обмена.
Открываем Sublime Text -> View -> Show Console и вставляем содержимое буфера обмена, затем жмем Enter. Если у вас ничего не произошло, то выполните ручную установку описанную на сайте из пункта 5.
Жмем Ctrl+Shift+P -> пишем Install Package -> пишем sublimeREPL и устанавливаем.
Поскольку в sublimeREPL установлен python 2, то идем в Sublime Text -> Preferences -> Browse Packages
Открываем в текстовом редакторе файл SublimeREPL -> config -> Python -> Main.sublime-menu
Находим внутри этого файла столбик с аргументами children -> args -> cmd и меняем значение «python» на «python3». Сохраняем и закрываем файл.
Открываем тестовый python-файл (например из пункта 4)
Открываем консоль редактора как в пункте 6 и пишем sublime.log_commands(True)
Sublime Text -> Tools -> sublimeREPL -> Python -> Python RUN current file и затем копируем из консоли строку repl_open целиком со всеми аргументами.
В консоли пишем sublime.log_commands(False)
Sublime Text -> Preferences -> Key Bindings. Забиндим хоткей для быстрого исполнения файла в интерактивной консоли REPL
Вставьте в User-конфиг (он пустой) следующий код (ключ keys сделайте свой по желанию, в «сommand» пишите «repl_open», а в «args» закидываете все атрибуты которые скопировали из консоли. Их не обязательно так разбивать по строкам, можно все в одну оставить:
How to run python codes in sublime text editor

The first thing to run a python code in sublime text editor, is to install the sublime text editor, which we may get from the official website of sublime. I’m leaving a link here, https://www.sublimetext.com/3 download the required version depending upon your OS and your system configuration.
Once the above step is done, write a piece of code and save it with the extension of (.py format). Now if you observe it clearly the color of your font changes. Here, in my case I saved the file with test.py name.
The additional tip, before running the code make sure you had made these changes
Setting Up Sublime Text 3 for Full Stack Python Development
Sublime Text 3 (ST3) is a lightweight, cross-platform code editor known for its speed, ease of use, and strong community support. It’s an incredible editor right out of the box, but the real power comes from the ability to enhance its functionality using Package Control and creating custom settings.
In this article, we’ll look at how to setup Sublime Text for full stack Python development (from front to back), enhance the basic functionality with custom themes and packages, and use many of the commands, features, and keyword shortcuts that make ST3 so powerful.
Note: This tutorial assumes you’re using a Mac and are comfortable with the terminal. If you’re using Windows or Linux, many of the commands will vary, but you should be able to use Google to find the answers quickly given the info in this tutorial.
Before we start, let’s address what I mean exactly by “full stack.”
In today’s world of HTML5 and mobile development, JavaScript is literally everywhere. EVERYWHERE. Python coupled with a framework such as Django or Flask is not enough. To really develop a website from end-to-end, you must be familiar with JavaScript (and the various JavaScript frameworks), REST APIs, responsive design, and of course HTML and CSS, and so on.
Let’s face it: as a programmer, you are like any other craftsman. If you want to be the best you can be, then you need your tools to be sharp. Your development environment must be set up for full stack development—which is exactly what we are going to do right now.
Free Bonus: 5 Sublime Text Tweaks to Boost Your Python Productivity, a free email class that shows you how to optimize your Python + Sublime development setup for maximum efficiency.
Features
Let’s start by looking at a few of the default features of Sublime Text 3:

Split Layouts allow you to arrange your files in various split screens. This is useful when you are doing test driven development (Python code on one screen, test scripts on another) or working on the front end (HTML on one screen, CSS and/or JavaScript on another).
Vintage Mode provides you with vi commands for use within ST3.
Note: You can also create your own snippets: Tools > New Snippet. Refer to the documentation for help, and also check out some of my snippets here.
Customizing Sublime Text 3
After you download ST3, you can customize it.
Install the subl command line tool
Just Like TextMate has the mate command, Sublime Text has a command line tool called subl that allows you to open one file, or an entire directory of files and folders, from the terminal.
To enable this command, create a symbolic link to the subl binary:
Ensure that the link works by opening Sublime:
If that didn’t work, you probably need to add /bin to your path:
Then repeat step one.
Note: If you are still having trouble, check out this article for help. You can also read up on creating the symbolic links in Windows and Linux.
Now you can open a file or directory using the following commands:
If there are spaces in the path, you must surround the entire path in double quotes:
To view all the commands, open up the help file:
Install Package Control
To begin taking advantage of the various packages for extending Sublime’s functionality, you need to manually install the package manager called Package Control. Once you have it installed, you can use it to install, remove, and upgrade all other ST3 packages.
- To install, copy the Python code for Sublime Text 3 found here. Click View > Show Console to open the ST3 console. Paste the code into the console. Press Enter . Reboot ST3.
- You can now install packages by using the keyboard shortcut Cmd + Shift + P . Start typing install until Package Control: Install Package appears. Press Enter and search for available packages.
Here are some other relevant commands:
- List Packages shows all your installed packages.
- Remove Package removes a specific package.
- Upgrade Package upgrades a specific package.
- Upgrade/Overwrite All Packages upgrades all your installed packages.
Check out the official documentation to view more commands.

Create a Custom Settings File
You can fully configure Sublime Text using JSON-based settings files, so it’s easy to transfer or synchronize your customized settings to another system. First, we need to create our customized settings. It’s best to create a base file for all environments as well as language-specific settings files.
To set up a base file, click Sublime Text > Preferences > Settings — User. Add an empty JSON object to the file and add your settings like so:
- For language specific settings, click Sublime Text > Preferences > Settings — More > Syntax Specific — User. Then save the file using the following format: LANGUAGE.sublime-settings. For Python-specific settings, save the file as Python.sublime-settings.
- You can obviously configure your settings to your liking. However, I highly recommend starting with my base and Python-specific settings and then making changes as you see fit.
- Optional: You can use Dropbox to sync all your settings. Simply upload your settings files to Dropbox and load them from there to sync the Sublime environments on all your machines.
- A good reference for settings can be found at the Sublime Text Unofficial Documentation.
Themes
ST3 also gives you the option to change the overall theme to better suit your personality. Design your own. Or, if you’re not artistically inclined, you can download one of the various custom themes designed by the Sublime community through Package Control. Check out ColorSublime to preview themes before installing them.
The ever popular Soda Dark Theme and the minimal Flatland are two of my personal favorites.
After installing a theme, make sure to update your base settings through Sublime Text > Preferences > Settings — User:
Packages
Besides the packaged themes, I take advantage of the following packages to speed up my workflow.
SideBarEnhancements
SideBarEnhancements extends the number of menu options in the sidebar, speeding up your overall workflow. Options such as New File and Duplicate are essential and should be part of ST3 out of the box. The Delete option alone makes it worth downloading. This feature simply sends files to the Trash, which may seem trivial, but if you delete a file without it, then it’s very difficult to recover unless you’re using a version control system.

Download this now!
Anaconda
Anaconda is the ultimate Python package. It adds a number of IDE-like features to ST3 including the following:
- Autocompletion works by default, but there are a number of configuration options.
- Code linting uses either PyLint or PyFlakes with PEP 8. I personally use a different linting package, as I will explain shortly, so I disable linting altogether within the user-defined Anaconda settings file, Anaconda.sublime-settings, via the file menu: Sublime > Preferences > Package Settings > Anaconda > Settings — User:
- McCabe code complexity checker runs the McCabe complexity checker tool within a specific file. If you’re not familiar with what complexity is, be sure to visit the link above.
- Goto Definitions finds and displays the definition of any variable, function, or class throughout your entire project.
- Find Usage quickly searches where a variable, function, or class has been used in a specific file.
- Show Documentation shows the docstring for functions or classes (if defined, of course).
You can view all of the features here or within the README file in ST3’s Package Settings: Sublime Text > Preferences > Package Settings > Anaconda > README.
Note: SublimeCodeIntel is another popular package that has many of the same features as Anaconda. I suggest testing them both out.
Djaneiro
Djaneiro supports Django templating and keyword highlighting and provides useful code snippets (tab completions) for Sublime Text. The snippet system is an incredible time-saver. You can create common Django blocks with only a few keystrokes for templates, models, forms, and views. Check out the official documentation to see a list of snippets.
My personal favorites are for templating: var creates << >> and tag creates <% %>.
requirementstxt
requirementstxt provides autocompletion and syntax highlighting as well as a nice version management system for your requirements.txt files.
SublimeLinter
SublimeLinter is a framework for ST3 linters. The package itself does not include any actual linters; those must be installed separately via Package Control using the SublimeLinter-[linter_name] naming syntax. You can view official linters here. There are also a number of third party linters, which can be viewed in Package Control. Check out the installation instructions here.
Note: Most of these linters have dependencies associated with them, so please read the installation instructions before installing.
You can customize each linter in the user-defined SublimeLinter.sublime-settings file: Sublime Text > Preferences > Package Settings > SublimeLinter > Settings — User. For example, I ignore the following PEP 8 errors and warnings:
GitGutter
GitGutter shows little icons in ST3’s gutter area that indicate whether a line has been inserted, modified, or deleted since the last commit.

Note: If you want support for a number of distributed version control systems (Git, SVN, Bazaar, and Mercurial), check out Modific.
FTPSync
FTPSync syncs your project with your remote files. Simply open the file to download it (if the remote file is newer than your local file) and upload it to your remote server with every save. That’s a great way to keep your local and remote(s) in sync. You’ll want to make sure to add at least one remote connection by clicking Sublime Text > Preferences > Package Settings > FTPSync > Setup FTPSync.
I personally set the password to null because I don’t want it visible in that file. FTPSync just asks for my password after each save.
AdvancedNewFile
AdvancedNewFile is used to create a new folder or file from within ST3 with key bindings alone.
Simply bring up the AdvancedNewFile input through the appropriate key binding. Then, enter the path, along with the file name into the input field. Upon pressing Enter , the file will be created. In addition, if the directories specified do not yet exist, they will be created. By default, the path to the file being created will be filled shown in the status bar as you enter the path information.
For a more detailed explanation on its usage, check out the documentation on GitHub. Be sure to read about Tab Completion as well as Predefined Aliases.
I replaced the normal Cmd + N command to create a new file with AdvancedNewFile by adding the following code to the Key Bindings — User file: Sublime Text > Preferences > Package Settings > AdvancedNewFile > Key Bindings — User:
You can also setup a default directory to start with: Sublime Text > Preferences > Package Settings > AdvancedNewFile > Settings — User
Now when I create a new file, the /Users/michaelherman/Documents/repos string is automatically inserted first, since 99% of the time I store all my scripts in that directory.
Emmet
Emmet, previously known as Zen Coding, uses simple abbreviations to generate HTML or CSS code snippets.
For example, if you type a bang, ! , and press Tab in an HTML file, then the HTML5 doctype and a few basic tags will be generated:
Check out the official documentation as well as this handy cheat sheet for more info.
Markdown Preview
Markdown Preview is used for previewing and building markdown files.
To use, open the Package Manager and type Markdown Preview to show the available commands:
- Markdown Preview: Python Markdown: Preview in Browser
- Markdown Preview: Python Markdown: Export HTML in Sublime Text
- Markdown Preview: Python Markdown: Copy to Clipboard
- Markdown Preview: GitHub Flavored Markdown: Preview in Browser
- Markdown Preview: GitHub Flavored Markdown: Export HTML in Sublime Text
- Markdown Preview: GitHub Flavored Markdown: Copy to Clipboard
- Markdown Preview: Open Markdown Cheat Sheet
Once converted, the output file will be updated on each subsequent save.
Keyboard Shortcuts
- Goto Anything Cmd + P is used for quickly finding and opening files. Just type in a part of a path and filename within a project and you can easily open that file. This is great for quickly opening files in large Django projects.
- Goto Line Number Ctrl + G takes you to a specific line number in an active file.
- Goto Symbol Cmd + R lists all functions and classes within a file to make them easier to find. Simply start typing the one you want.
- Go to beginning of line Cmd + Left and Go to end of line Cmd + Right help you navigate within lines.
- Delete current line Ctrl + Shift + K deletes the current line.
- Multi-Edit is by far my favorite shortcut:
- Select a word and press Cmd + D to select the next same word. Then press Cmd + D again to select the next same word again, and so on.
- Press Cmd + Left Button to create a cursor for editing everywhere you click.
Note: For more shortcuts, take a look at this article.
Custom Commands
It’s easy to write your own custom commands and key bindings with Python. I currently use this workflow:
- Copy the path of the current file to the clipboard (link).
- Close all tabs except the active one (link).
Install these by adding the Python files to your /Sublime Text 3/Packages/User directory via the file menu (Sublime > Preferences > Browse Packages) and then opening the User directory. To complete the setup, bind them from the Key Bindings — User file (Sublime Text > Preferences > Package Settings > AdvancedNewFile > Key Bindings — User).
Additional Resources
Free Bonus: 5 Sublime Text Tweaks to Boost Your Python Productivity, a free email class that shows you how to optimize your Python + Sublime development setup for maximum efficiency.
Conclusion
I hope that this article was helpful to you and that you were able to integrate some of the above packages and custom settings along with your own based on your personal preferences to improve your workflow.
If you have any questions or suggestions of your own, please let me know in the comments below. Finally, check out the dotfiles folder in this repo to view all the resources that I created. Cheers!
Get a short & sweet Python Trick delivered to your inbox every couple of days. No spam ever. Unsubscribe any time. Curated by the Real Python team.
Each tutorial at Real Python is created by a team of developers so that it meets our high quality standards. The team members who worked on this tutorial are: