Скопировать эффект с одного объекта на другой
Для того, чтобы скопировать эффект с одного объекта на другой, можно воспользоваться таким способом:
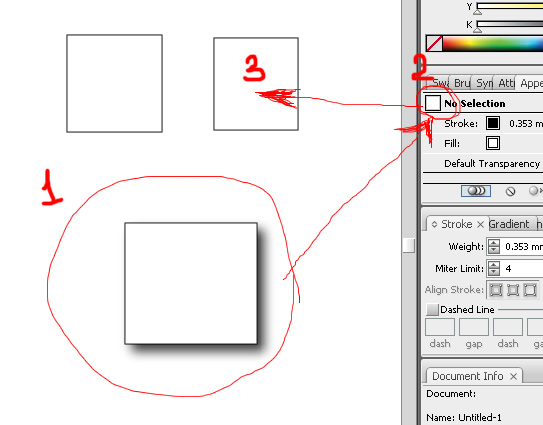
Выделить объект с эффектом (см. на рисунке 1), затем открыть панельку Appearance, нажать левую кнопку мышки над штучкой 😀 (см. на рисунке 2), а затем не отпуская левой кнопки мышки навести указатель мышки на требуемый объект (см. на рисунке 3). Отпустить левую кнопку мышки. Всё.
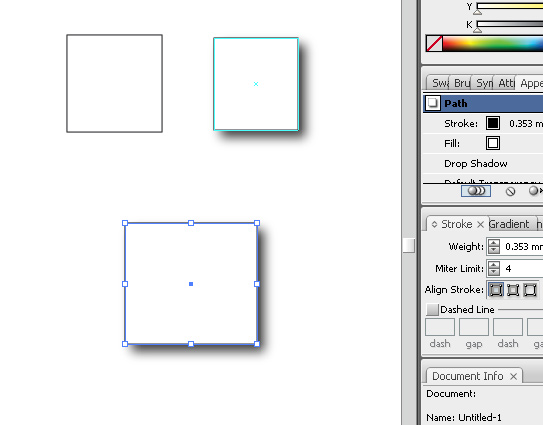
Ну, и ещё один способ.
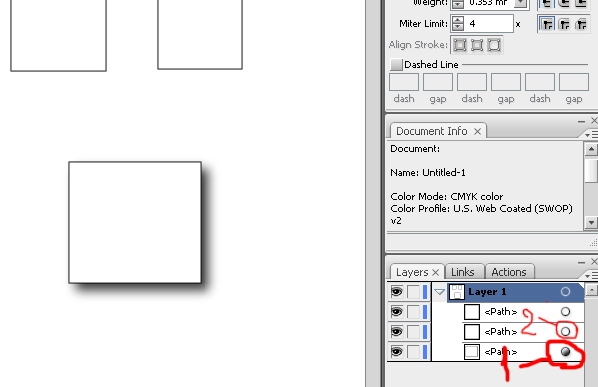
открыть палитру Layers.
найти в ней объект с эффектом.
зажать Alt, нажать левую кнопочку мышки над штучкой (см. на рисунке 1). Переместить указатель мышки на штучку (см. на рисунке 2) объекта без эффекта. Отпустить кнопку мышки.
Work with effects
Once you apply an effect to an object, the effect appears in the Appearance panel. You can edit the effect, move, duplicate, delete, or save it as part of a graphic style. When you use an effect, you must expand the object before you can access the new points.
The effects in the top half of the Effects menu are vector effects. In the Appearance panel, you can apply these effects only to vector objects or to the fill or stroke of a bitmap object.
The effects in the bottom half of the Effects menu are raster effects. You can apply them to either vector or bitmap objects.
Apply an effect
Select the object or group (or target a layer in the Layers panel).
If you want to apply an effect to a specific attribute of an object, such as its fill or stroke, select the object and then select the attribute in the Appearance panel.
Do one of the following:
Choose a command from the Effect menu.
Click Add New Effect in the Appearance panel, and choose an effect.
If a dialog box appears, set options, and then select OK .
About raster effects
Raster effects are effects that generate pixels, rather than vector data. Raster effects include SVG Filters, all of the effects at the bottom section of the Effect menu, and the Drop Shadow, Inner Glow, Outer Glow, and Feather commands in the Effect > Stylize submenu.
The Resolution Independent Effects (RIE) capability in Illustrator makes it possible to do the following:
When the resolution in Document Raster Effects Settings (DRES) changes, the parameters in the effect are interpreted to a different value so that there is minimal or no change in the appearance of the effect. The new modified parameter values are reflected in the Effect dialog box.
For effects with more than one parameter, Illustrator reinterprets only those parameters that are related to the document raster effects resolution setting.
For example, there are different parameters in the Halftone Pattern dialog box. However, only the Size value changes when the DRES changes.

You set rasterization options for a document by choosing Effect > Document Raster Effects Settings . (See Rasterization options.)
If an effect looks good on‑screen but loses detail or appears jagged when printed, increase the resolution of the document’s raster effects.
Spot colors and transparency in CS2, CS3 and later
When you use spot colors and transparency, Illustrator sometimes manipulates file content to maintain the appearance of artwork in PostScript and other transparency flattening processes. When Illustrator manipulates content during the flattening process, spot colors involved in specific transparency scenarios sometimes require conversion to process colors. While these cases are less and less common with each successive version of Illustrator, the following items address the remaining limitations to spot color preservation when interacting with transparency in Illustrator CS3 and later and CS2.
Raster effects
In Illustrator CS2 when you apply raster-based effects (for example, Rasterize and Gaussian Blur) at the object, group, or layer level to objects that contain multiple spot colors or a combination of spot and process color, Illustrator converts the object color to either the document’s process color space, grayscale, or bitmap. You can choose one of these options in the Raster Effects Settings dialog box. For example, in a simple rectangle with a spot color fill and a process black stroke, the spot color fill convert to a process color. However, if all of the attributes of an object, group, or layer are colored with a single spot color, then the spot color is maintained regardless of where you apply the effect. Illustrator CS3 and later maintain the spot color in any of the above scenarios.
The Preserve Spot Colors When Possible check box (CS2) or the Preserve Spot Colors check box (CS3 and later) in the Raster Effects Settings dialog box is not selected by default when you open Illustrator files created in versions earlier than CS2. This setting ensures that the printing behavior of these files is consistent with earlier versions of Illustrator. The selection in the Preserve Spot Colors When Possible check box in Illustrator CS2 files is maintained when the files are reopened.
Gradients and gradient mesh
Illustrator CS3 and later and CS2 (or Cs2 and later) preserves spot-color-to-spot-color gradients and spot-color-to-process-color gradients in both opaque and transparent scenarios. To print and export spot colors in gradient scenarios, select Preserve Overprints and Spot Colors in the Object > Flatten Transparency dialog box.
In Illustrator CS2, when a gradient mesh contains more than one spot color, or a process color and a spot color, Illustrator converts the mesh to the document’s process color space. Illustrator CS3 and later retain the spot color in both of the preceding gradient mesh scenarios.
Spot-to-spot blends
When you create a blend between two different spot color objects, Illustrator converts all of the intermediate steps to the document’s process color space.
Rasterization
In Illustrator CS2, the Object > Rasterize command allows you to convert all spot colors to the document’s process color space, grayscale, or bitmap. Spot colors aren’t preserved when rasterized. The Effects > Rasterize command is subject to the Effect limitations explained in Raster Effects (above) and will "Preserve Spot Colors When Possible" when you select this option in the Raster Effects Settings dialog box.
Illustrator CS3 and later allows you to retain spot colors when using both the Object > Rasterize and Effects >Rasterize command by selecting the Preserve Spot Colors option in the Object > Rasterize dialog box and the Effects > Document Raster Effects Settings dialog box respectively.
Rasterization options
You can set the following options for all raster effects in a document or when you rasterize a vector object.
Determines the color model that is used during rasterization. You can generate an RGB or CMYK color image (depending on the color mode of your document), a grayscale image, or a 1‑bit image (which may be black and white or black and transparent, depending on the background option selected).
Determines the number of pixels per inch (ppi) in the rasterized image. When rasterizing a vector object, select Use Document Raster Effects Resolution to use global resolution settings.
Determines how transparent areas of the vector graphic are converted to pixels. Select White to fill transparent areas with white pixels, or select Transparent to make the background transparent. If you select Transparent, you create an alpha channel (for all images except 1‑bit images). The alpha channel is retained if the artwork is exported into Photoshop. (This option anti-aliases better than the Create Clipping Mask option.)
Applies anti-aliasing to reduce the appearance of jagged edges in the rasterized image. When setting rasterization options for a document, deselect this option to maintain the crispness of fine lines and small text.
When rasterizing a vector object, select None to apply no anti-aliasing and maintain the hard edges of line art when it is rasterized. Select Art Optimized to apply anti-aliasing that is best suited to artwork without type. Select Type Optimized to apply anti-aliasing that is best suited to type.
Create Clipping Mask
Creates a mask that makes the background of the rasterized image appear transparent. You do not need to create a clipping mask if you selected Transparent for Background.
Add Around Object
Adds a padding or border around the rasterized image, using the specified number of pixels. The resulting image’s dimensions appear as the original dimensions plus the Add Around Object setting’s value. You can use this setting, for example, to create a snapshot effect: Specify a value for Add Around Object setting, choose White Background, and do not select Create Clipping Mask. The white boundary added to the original object becomes a visible border on the image. You can then apply a Drop Shadow or Outer Glow effect to make the original artwork look like a photo.
Imported raster formats
Methods for accommodating spot colors imported from raster formats are much improved in both Illustrator CS3 and later and CS2 over earlier versions. Illustrator CS2 retains spot colors in embedded native Photoshop files as a raster opacity mask over a rectangle that is filled with the spot color and set to overprint, and in Illustrator CS3 and later it converts the image to a deviceN raster object (all spot and process colors are retained together in an NChannel format). Illustrator CS3 and later, CS2 (or CS and later) retains spot colors in embedded PDF files as output-friendly non-native art. The only significant raster format limitations remaining are listed below and are all fixed by Illustrator CS3 and later.
- TIFF: Illustrator CS2 does not import spot colors in TIFF files. Only the CMYK, RGB, or Grayscale portion is imported. Illustrator CS3 and later import spot colors in TIFF files exported from Photoshop.
- PSD Duotone: You can’t link or embed PSD Duotone in Illustrator CS2. These actions cause an error message and the Place function fails with no result. You can successfully link and embed PSD Duotone files in Illustrator CS3 and the spot colors are retained.
- EPS Duotone: Illustrator CS2 converts spot colors in embedded EPS Duotone files to process colors. Illustrator CS3 and later retain spot colors in embedded EPS Duotone files.
- DCS 2.0 EPS: Illustrator CS2 does not support spot colors or high-resolution data contained in DCS EPS files when the DCS EPS interacts with transparency. In this case, only composite data is preserved. Illustrator CS2 supports DCS EPS only in non-transparent separated workflows. Illustrator CS3 supports DCS 2.0 EPS files and the retention of spot colors in both transparent and non-transparent host-separated workflows. DCS 1.0 EPS files are still limited to non-transparent host-separated workflows in both Illustrator CS3 and CS2 (CS2 and later).
Alpha channel transparency
Illustrator CS2 and later preserve spot colors that interact with alpha channel transparency (for example, opacity masks, live raster effects, and transparent images). Earlier versions of Illustrator convert spot colors to process colors in these scenarios.
Applying effects to bitmap images
Effects let you apply a special look to bitmap images as well as vector objects. For example, you can apply an impressionistic look, apply lighting changes, distort images, and produce many other interesting visual effects.
Consider the following information when applying effects specifically to bitmap objects:
Effects do not work on linked bitmap objects. If you apply an effect to a linked bitmap, it is applied to an embedded copy of the bitmap instead of to the original. To apply the effect to the original, you must embed the original bitmap in the document.
Adobe Illustrator supports plug-in effects from Adobe products such as Adobe Photoshop and from non‑Adobe software developers. Once installed, most plug-in effects appear in the Effect menu and work the same way as do built-in effects.
Some effects can be memory-intensive, especially when applied to a high-resolution bitmap image.
Improving performance for effects
Some effects are very memory-intensive. The following techniques can help improve performance when applying these effects:
Select the Preview option in effect dialog boxes to save time and prevent unintended results.
Change the settings. Some commands, such as Glass, are extremely memory-intensive. Try different settings to increase their speed.
If you plan to print to a grayscale printer, convert a copy of the bitmap image to grayscale before applying effects. Note, however, that in some cases, applying an effect to a color bitmap image and then converting it to grayscale may not have the same result as applying the same effect directly to a grayscale version of the image.
Modify or delete an effect
You modify or delete an effect by using the Appearance panel.
Select the object or group (or target the layer in the Layers panel) that uses the effect.
Do one of the following:
To modify the effect, click its blue underlined name in the Appearance panel. In the effect’s dialog box, make the desired alterations, and then click OK.
To delete the effect, select the effect listing in the Appearance panel, and click the Delete button.
Live Trace tool
Illustrator CS3 and later and CS2 preserves spot colors in grayscale raster objects when the spot color has been applied in Illustrator. Spot colors in all other raster format files, whether linked or embedded, are converted to process colors or ignored when you use the Live Trace command.
SVG filters
When you apply any SVG Filter in Illustrator CS2, spot colors are converted to the document’s process color space.
Legacy formats
When you save files to Illustrator version 8 or earlier, and select Preserve Appearance and Overprints in the Save dialog box, all spot color objects are converted to process color objects.
Can you copy and paste effects in Illustrator?
To copy the Appearance of the third path to the other paths, simply hold down Option and drag from the filled-in circle to another circle (2). Do this for any shapes you want the Appearance copied to. The Appearances will now be the same (3).
Similarly, How do you copy an effect in Illustrator?
Copy appearance attributes by dragging
- Drag the thumbnail at the top of the Appearance panel onto an object in the document window. …
- Alt‑drag (Windows) or Option‑drag (Mac OS) the target icon in the Layers panel onto the item to which you want to copy appearance attributes.
Hence, How do you copy a graphic style in Illustrator? Show activity on this post. Use graphic styles.
- Take your existing element with the shadow and drag it to the Graphic Styles panel.
- Now merely Edit > Copy the element. ( You can close the file now)
- Open a different asset file.
- Paste.
- Delete.
- Select the new asset and then click the style in the Graphic Styles Panel.
How do I copy layers in Illustrator?
Do one of the following:
- Choose Duplicate “Layer name” from the Layers panel menu.
- Drag the item in the Layers panel to the New Layer button at the bottom of the panel.
- Start to drag the item to a new position in the Layers panel, and then hold down Alt (Windows) or Option (Mac OS).
Beside above, How do you use clipping mask in Illustrator?
A clipping mask can be made in a few different ways:
- Drop down Menu: Object > Clipping Mask > Make.
- Shortcut Key: Command > 7.
- Layer Panel: Make/Release Clipping Mask icon at the bottom.
- Right click: highlight all objects and select Make Clipping Mask.
Table of Contents
How do you duplicate an object in Illustrator?
An object can be duplicated in Adobe Illustrator by copying it (Command / Ctrl + C) and pasting it to the front (Command / Ctrl + F) and to the back (Command / Ctrl + B). A new object will be located above or beneath our original object and the contours of both objects will match.
How do I edit a drop shadow in Illustrator?
Once you’ve selected your assets, navigate to the “effects” menu and make the following selections: Effect -> Stylize -> Drop shadow. Voila! Your drop shadow dialogue box will now appear on screen, along with a shadow that’s been added to your asset.
How do you edit a shadow in Illustrator?
By selecting your text layer and clicking on your appearance panel, you have now seen the appearance attributes of that layer such as if it has a fill, stroke, set transparency or an effect. In this case a drop shadow, select then the drop shadow layer and drag it to the trash can icon.
How do I copy and paste a layer?
Do one of the following: Choose Select > All to select all of the pixels in the layer, and choose Edit > Copy. Then make the destination image active, and choose Edit > Paste. Drag the layer’s name from the Layers panel of the source image into the destination image.
Where is Paste remember layers in Illustrator?
Paste Remembers Layers (found under the Options menu of the Layers palette) does exactly what its name implies. If you copy an object from a Layer and paste it, Illustrator will “remember” what Layer that object is from and paste it in a Layer with that same name in the document or in another document.
How do you copy a selected object?
Select the object, click the Edit menu, and then click Copy. Click in the target document or artboard, click the Edit menu, and then click Paste, Paste in Front, Paste in Back, Paste in Place, or Paste on All Artboards.
How do I turn a clipping mask into an object?
Click on the <Clip Group> object to select it. Select no other objects. Then in the pathfinder window, click on the crop button. This produce a regular <Group> (no longer a clipping group) with all the vectors objects inside the old clipping group clipped to the old <Clip Outline> .
How do I mask multiple objects in Illustrator?
If you try to use more than one object as a clipping mask, only the last object you created will act as a mask—the others will be ignored. To use those multiple objects as a mask, you’ll first have to select all the objects and from the Object menu, choose Compound Path>Make, or press Command-8 (PC: Control-8).
How does a clipping mask work?
A clipping mask is a group of layers to which a mask is applied. The bottommost layer, or base layer, defines the visible boundaries of the entire group. For example, suppose you have a shape in the base layer, a photograph in the layer above it, and text in the topmost layer.
What is Ctrl D in Illustrator?
One of my favorite tricks to use in Illustrator which I forgot to mention in my “favorite Illustrator tips” blog is Ctrl-D (Command-D), which allows you to duplicate your last transformation and is especially useful when you’re copying objects and want them to be spaced an exact distance apart.
Is there a clone tool in Illustrator?
The Clone Stamp tool uses pixels from one area of an image to replace the pixels in another part of the image.
How do I use the eyedrop tool in Illustrator?
Click and hold with the Eyedropper tool anywhere in your Illustrator document, then drag to the color you want to sample outside of Illustrator, and release. This adds the color to your color panel, to the fill or stroke, depending on whichever is active.
How do you add a shadow in Illustrator 2020?
To add a drop shadow in Illustrator, select your object and navigate to Effect, Stylize, and choose Drop Shadow. Use the Drop Shadow menu to adjust the settings to your preferences, then click OK to apply the changes.
How do you expand a drop shadow?
Taking Apart the Drop Shadow
To get this go to Effect > Stylize > Drop Shadow and you’ll get the blow dialogue box to modify your drop shadow as you wish. However if you were to apply this effect and then Object > Expand it and drill down into the group it produces, you’d notice that it contains a raster element.
What is the shortcut key to duplicate a layer?
With your layer selected, press Command + J (Mac) or Control + J (PC) to duplicate the layer.
How do you use the Move tool?
The Move tool helps you position selected content or layers when customizing your work.
- Select the Move tool (V) .
- Use the Options bar to customize tool settings, like Alignment and Distribution, to get the effect you want.
- Click on an element—like a layer, selection or artboard—to move it.
How do you copy adjustments in Photoshop?
To copy a change from one image to another, select your adjusted image (image A) and press Return to switch to Edit mode. Then choose Image > Copy Adjustments or press Command-Option-C.
Как скопировать эффекты Appearance в иллюстраторе?

Подскажите пожалуйста, как скопировать эффекты и атрибуты примененные к объекту в панели Appearance в Adobe Illustrator?
Подскажите пожалуйста, как скопировать эффекты и атрибуты примененные к объекту в панели Appearance в Adobe Illustrator?

Подскажите пожалуйста, как скопировать эффекты и атрибуты примененные к объекту в панели Appearance в Adobe Illustrator?
В панели Слои (англ. Layers) справа от названия слоя находим кружочек и с зажатым ALT переносим на другой слой. При этом рядом с курсором мышки появится небольшой плюсик:

Подскажите пожалуйста, как скопировать эффекты и атрибуты примененные к объекту в панели Appearance в Adobe Illustrator?
В панели Слои (англ. Layers) справа от названия слоя находим кружочек и с зажатым ALT переносим на другой слой. При этом рядом с курсором мышки появится небольшой плюсик: