Настройка страницы корзины в WooCommerce
Изначально планировал написать про внедрение одного хака на странице корзины WooCommerce, однако позже решил рассказать сразу о нескольких фишках для ее модификации. Хочу заметить, что в данном блоге есть специальный раздел про WooCommerce корзину, т.к. этот вопрос включает в себя множество нюансов. Сегодня статья будет посвящена больше внешнему виду и отображению информации на сайте. Начнем с настроек самого модуля, потом рассмотрим вопрос удаления доставки и заодно изменение шаблона корзины. Думаю, пост пригодится не только новичкам.
На одном из начальных шагов разработки интернет-магазина на WooCommerce система создает несколько ключевых страниц (корзину в том числе). Если посмотрите в редакторе ее содержимое, то увидите шорткод [woocommerce_cart].
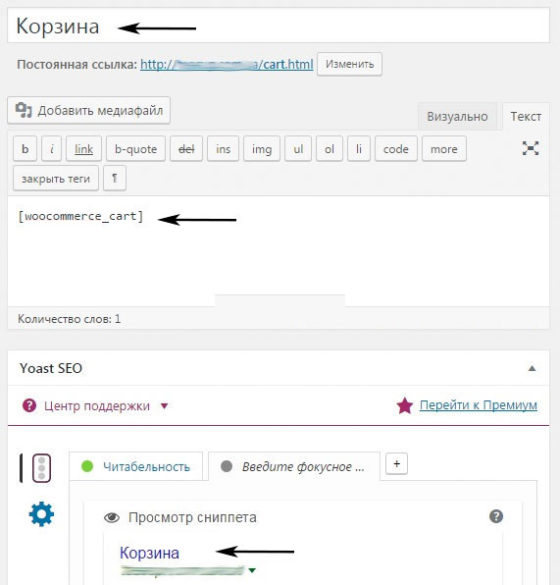
Здесь же можете изменить название и добавить немного своего текста на страницу. Также задаете МЕТА тег описания и тайтл с помощью модуля SEO Yoast.
Настройки корзины в WooCommerce
В настройках модуля есть разные параметры для управления корзиной. Некоторые из них найдете во вкладке «Доставка» — «Варианты доставки».
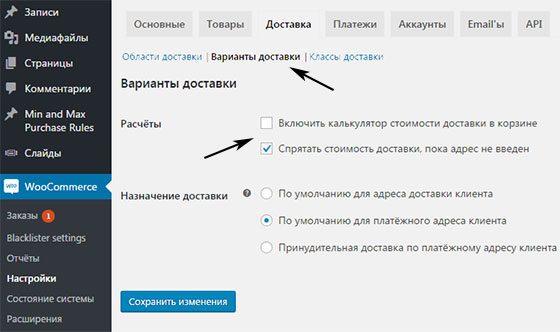
В опции «Расчеты» можно:
- включить в корзине калькулятор доставки;
- спрятать отображение ее стоимости, если еще не заполнен адрес.
При включенном расчете доставки на странице WooCommerce корзины появится соответствующая ссылка. При клике на нее пользователь увидит поля для ввода адреса.
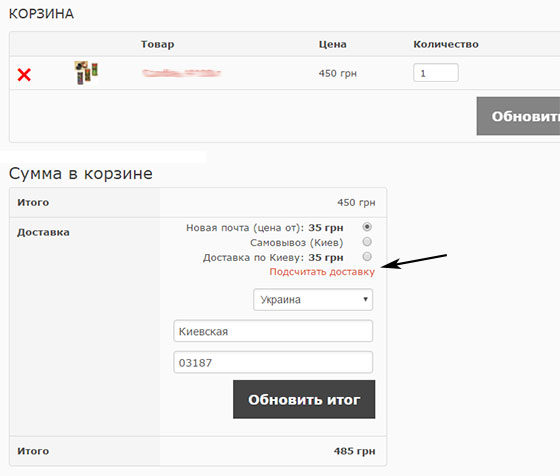
Если данную опцию выключить, то ссылки на калькулятор видно не будет, но сама информация о вариантах доставки останется.
Как удалить доставку со страницы корзины
Собственно, наша следующая задача — удалить на этапе формирования заказа все лишнее, что не касается выбора товаров и их количества. По-умолчанию в настройках плагина, как видите, это не предусмотрено, но в этом есть определенный смысл. Чем меньше разных отвлекающих и запутывающих пользователя факторов будет в вашем интернет-магазине, тем больше вероятность, что покупатель сможет завершить оформление заказа.
Для решения задачи нам понадобится разместить в файле функций вашей темы (custom-function.php или function.php) следующий хак:
function delshipping_calc_in_cart( $show_shipping ) < if( is_cart() ) < return false; >return $show_shipping; > add_filter( ‘woocommerce_cart_ready_to_calc_shipping’, ‘delshipping_calc_in_cart’, 99 );
Шаблон корзины WooCommerce
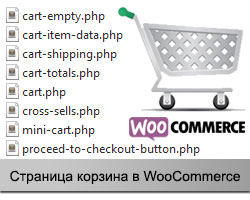
Все основные файлы шаблона для страницы корзины в WooCommerce находятся в папке cart. Напоминаю, что редактировать шаблон WooCommerce нужно после того как скопируете папку templates в свою дочернюю тему. По умолчанию директория содержит нескольких файлов:
- php
- cart-totals.php
- cross-sells.php
- cart-empty.php
- cart-item-data.php
- cart-shipping.php
- mini-cart.php
- proceed-to-checkout-button.php
- shipping-calculator.php
Каждый из них отвечает за определенные функции, например, в файле cross-sells.php задается отображение кросс продаж, в cart-empty.php — выполняется обработка пустой корзины и т.п. Вы можете изменить вывод всех элементов страницы так, как вам это нужно. Хотя некоторые правки принято делать через хаки/сниппеты как например в посте про обновление Ajax корзины.
Давайте рассмотрим один пример дабы немного прояснить логику работы. После внедрения хака с предыдущего шага настройки WooCommerce корзины мы избавились от доставки, но страница все еще выглядит немного странно.
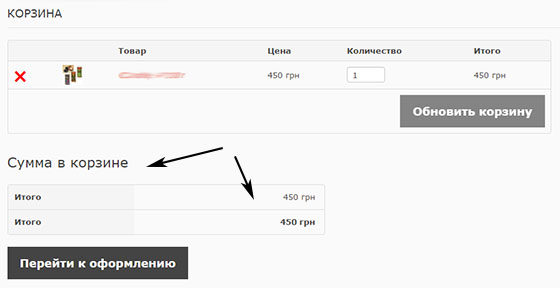
Если внимательно изучить файлы шаблона корзины, то увидите, что за отображение блока под товарами отвечает строка:
<?php do_action( ‘woocommerce_cart_collaterals’ ); ?>
С помощью утилиты WinGrep можете найти где именно используется эта функция либо подсмотреть информацию в интернете. Оказывается она задает отображение двух элементов — кросс продаж и блока итого (который виден на скриншоте выше). Соответствующий код размещен в /includes/wc-template-hooks.php:
add_action( ‘woocommerce_cart_collaterals’, ‘woocommerce_cross_sell_display’ ); add_action( ‘woocommerce_cart_collaterals’, ‘woocommerce_cart_totals’, 10 );
Теперь, по сути, у вас есть 3 варианта чтобы все это скрыть:
- закомментировать строку с do_action в cart.php;
- использовать функцию remove_action в custom-function.php (или function.php);
- подправить файлы cross-sells.php и cart-totals.php, которые непосредственно вызываются данными функциями.
После внедрения любого из этих способов будет скрыт не только блок итоговый цены, но и ссылка на оплату заказа. Поэтому вам нужно вернуть на страницу корзины WooCommerce соответствующую кнопку. Добавляете ее в cart.php после формы:
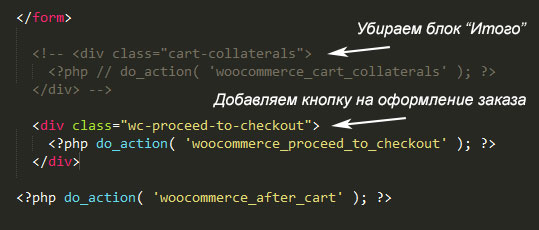
Это лишь один из примеров работы с шаблоном, надеюсь, суть вы уловили. В принципе, есть 2 варианта его модификации — в файлах напрямую (легче и нагляднее), либо работа через хуки и функции remove_action / add_action (вроде как, считается правильнее и более гибко). Какой бы вариант вы не выбрали, помните, что правки нужно вносить в копию макета магазина в дочерней теме.
Хак для купонов
Если вы используете промокоды в магазине то можно добавить отображение новой цены напротив каждой позиции. Найденный сниппет имеет вид:
Если код вам не совсем понятен загляните в статью про WooCommerce купоны скидок, где я описал его чуть подробнее (в самом конце заметки).
Если будут еще какие-то вопросы / дополнения по настройке корзины WooCommerce и модификации соответствующей страницы на сайте, пишите в комментариях.
Понравился пост? Подпишись на обновления блога по  RSS,
RSS,  Email или
  twitter!
 Оцените статью:
Customize your WooCommerce Cart Page Template
In a previous article, we saw how to customize the product page. Now, let’s customize our cart page.
Let’s transform this: 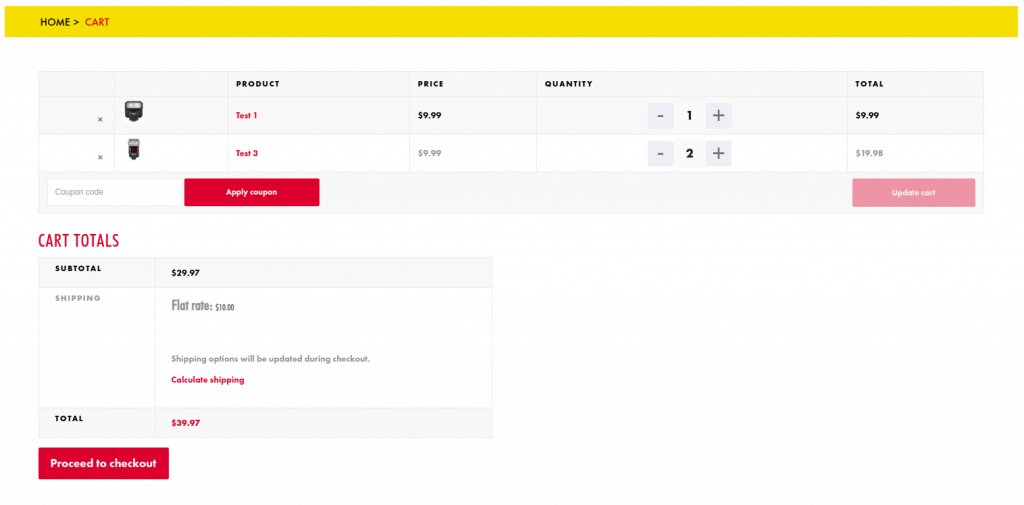
Into this: 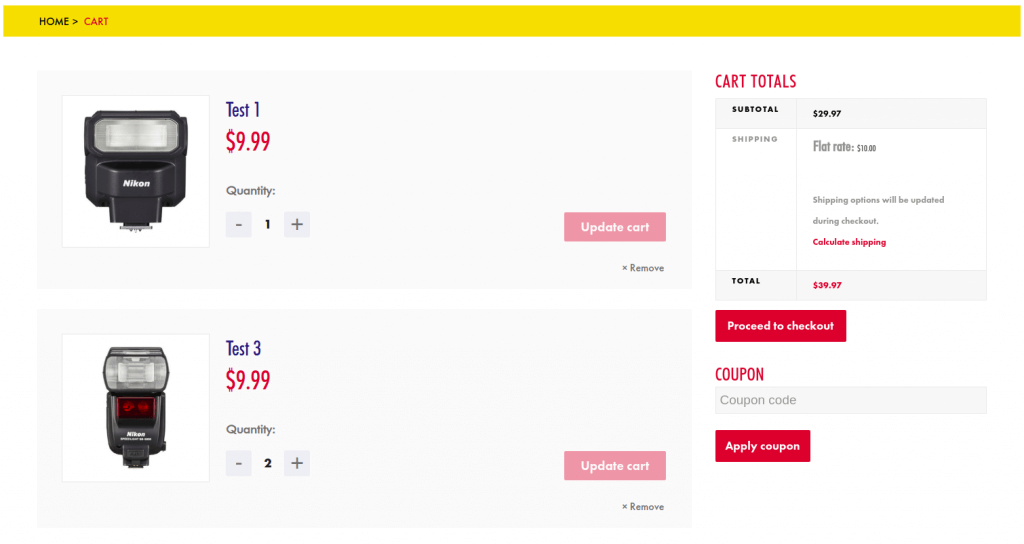
The product list was changed from <table> to <ul> . The cart totals were moved from the bottom the right side and the coupons were moved from the product list to the “cart totals”.
# 1. Clone cart.php
The cart template file is called cart.php . But if we change it directly, all our work will be lost (overwritten) once we update the WooCommerce plugin.
The update-safe way to do this is to copy the file we want to change to our theme folder and change this copy. WooCommerce detects the custom file and uses it instead of the default one.
First, create the structure:
The -p argument on mkdir -p a/b/c creates the a/b/c structure even if a doesn’t exist.
Then, copy the original file to our new structure:
# 2. Edit cart.php and change <table> to <ul>
Refactor the code, changing the table/tr/td tags to ul/li/div . Feel free to play with the template file and change more elements. You can also add some CSS to change the colors, spacing, fonts, etc.
From this (table/tr/td): 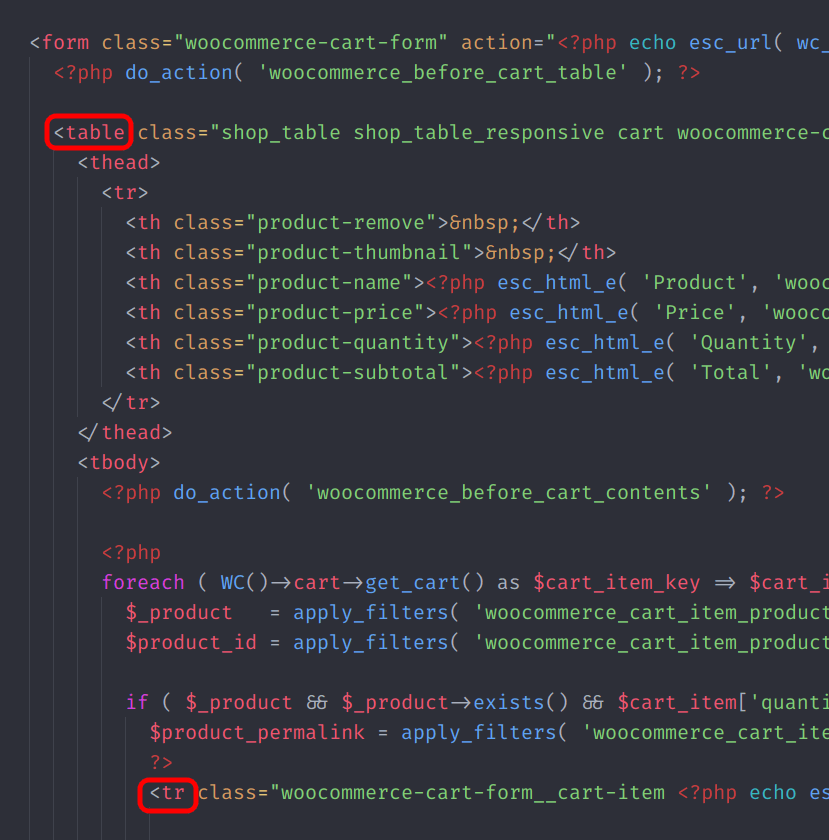
To this (ul/li/div): 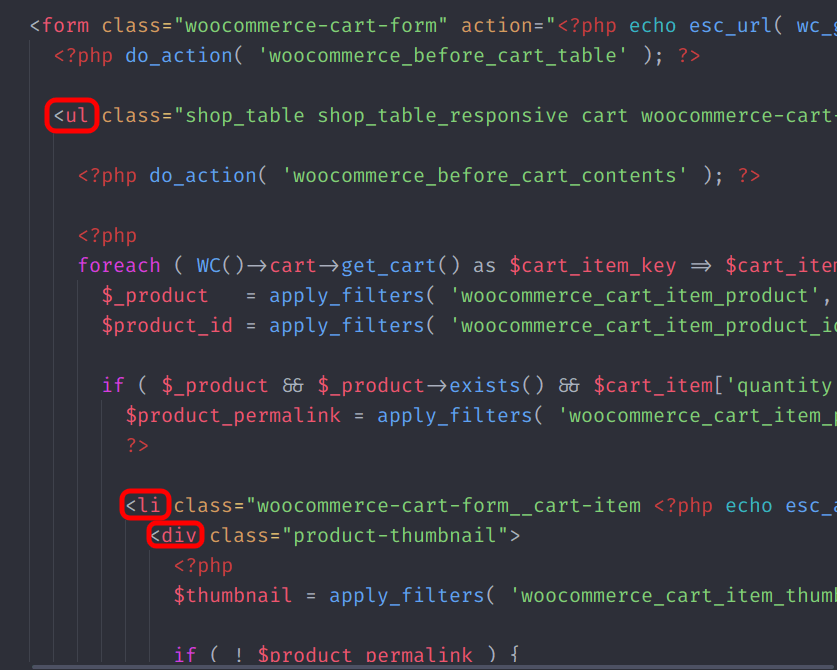
After each modification, test it on the browser. Add some CSS styling too.
# 3. Move “Apply Coupons” to the “Cart Totals” section
You need to move this “Apply Coupon” HTML code: 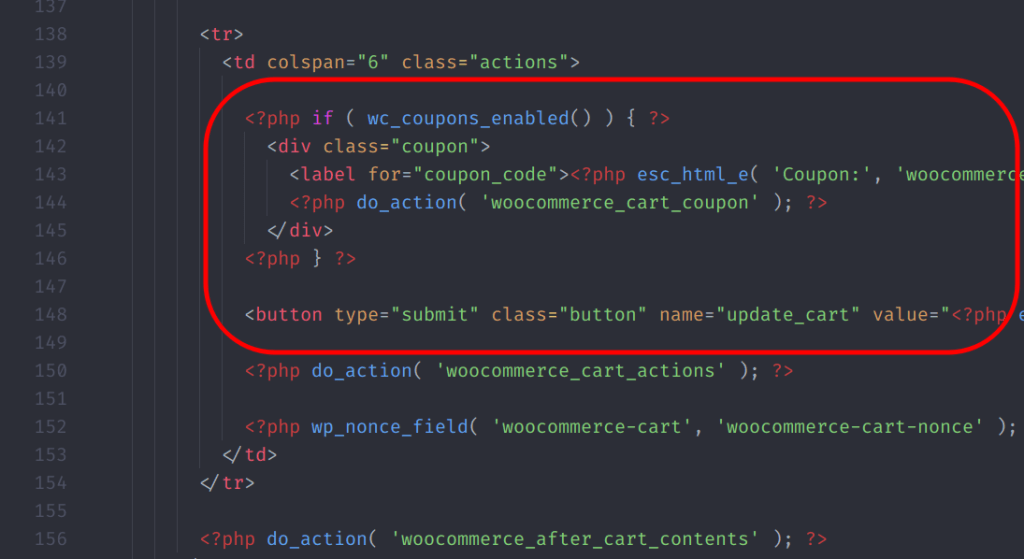
To the “Cart Totals” wrapper: 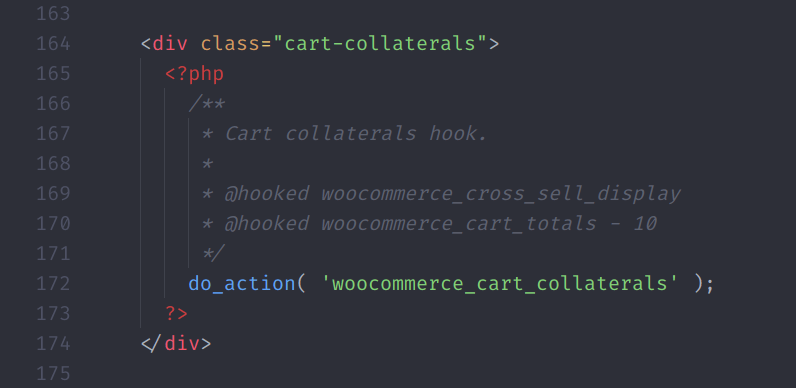
As the inputs are outside the “form” tag, you need to reference the form on the inputs: 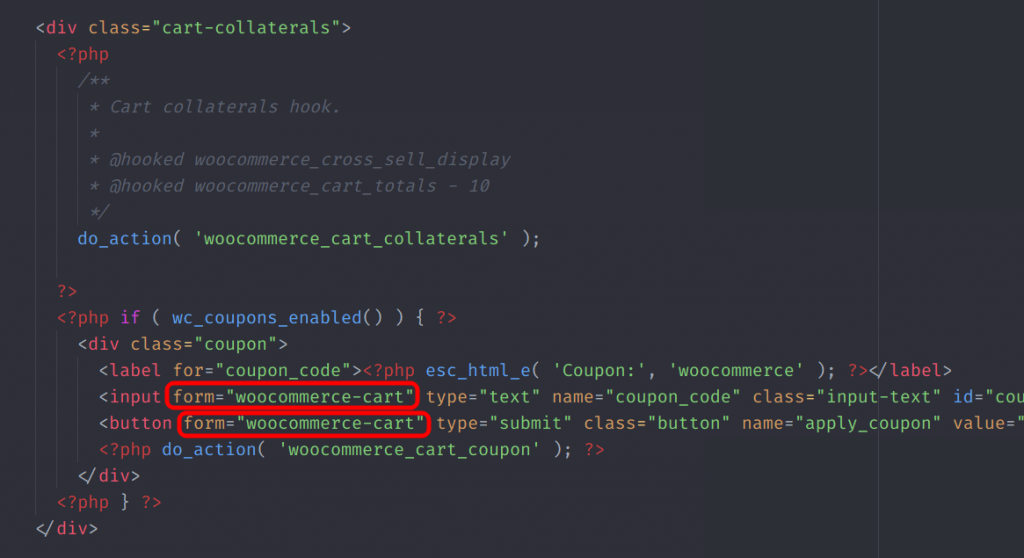
Add an id to the form so the reference can work (use a different id if you want): 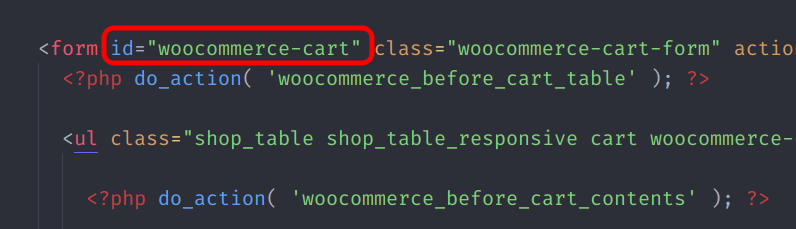
How To Customize WooCommerce Cart Page Template With Woostify?
WooCommerce is an awesome eCommerce platform for you to start an online store in just a few minutes. In WooCommerce, there are several pages that make things easier for online stores such as the shop page, product page where to display products, and the Cart page, Checkout page where list all items you are purchasing and checkout information, my account page, and thank you page. All of these pages have their premade templates.
However, you can make further customization on such pages easily with simple steps. In this article, we will present the way to customize WooCommerce cart page template with Woostify theme builder.
What is WooCommerce cart page?
A WooCommerce cart page is an essential element of any WooCommerce online store. It is the place where display all the products that customers want to buy from a store and checkout and delivery information. A shopping cart page helps a lot, especially for those who are buying multiple items from the WooCommerce store.
In detail, this page shows the individual prices of each of the products, the quantity of the items for each product, and the total amount of all the items being purchased. It allows customers to simply checkout in one go instead of paying individually for every item they buy online or cash on delivery payment. That can help customers save a great deal of time while shopping.
An overview of the default WooCommerce cart page
By default, the WooCommerce cart page contains the shortcode [Woocommerce_cart] and links to the cart’s contents. By clicking on the Cart link, the customers will be directed to the contents of their Cart.
When it comes to the default settings of WooCommerce cart page, there are only two sections. The first one is cart form that includes all products name, price, quantity, coupon codes filling bar, and subtotal. The second part is the cart total containing the subtotal and the final price and the button leading to the WooCommerce checkout page.
The default WooCommerce cart page can only be edited by using code or a third-party plugin. Therefore, in case you desire to make change on WooCommerce cart page, you need to have certain coding knowledge or installing a WordPress cart page plugin.
The two most important elements when it comes to an eCommerce shopping cart design are the Add to Cart button and the cart page. In the previous article, we did show you how to customize WooCommerce Add to Cart button so in this tutorial, we are focusing on editing the WooCommerce cart page to make it better performance and give users a better shopping experience.
Why you should edit WooCommerce cart page design?
The shopping cart page has many functions. It allows customers to see the order, change quantities, remove items, and return to the WooCommerce product page. But its key goal is to move customers to the last stage in the sales funnel: the checkout. So it’s important that this page is well-designed, easy to use, and includes full sale information to satisfy the customers.
Below are the two most benefits you can get with the ability to customize WooCommerce cart page template:
Add custom text as you want: you can change this default text to something more actionable and reflecting your brand voice such as “Review your order” or something cute like ‘Your new wardrobe staples’.
Encourage upsells: Displaying WooCommerce related products on cart page is a great way to encourage more sales. You can add custom text like, “We think these would look great with your items/….”
But how to add custom field in woocommerce cart page?
As mentioned earlier, to customize the cart page in WooCommerce, you need to use codes or a plugin supporting this function. To make things easier for shop owners, in this tutorial, we are presenting the way to create a custom WooCommerce cart page with Woostify theme. The process is extremely easy and requires no coding knowledge.
How to Create a WooCommerce Custom Cart Page template with Woostify?
Step 1: Set the Cart page
The first step is to set the cart page in WooCommerce. To do that, in the WordPress dashboard, go to WooCommerce > Settings > Advanced tab.
In the Cart page section, select Cart from the dropdown options. After completing, scroll to the page bottom and click Save changes.
Step 2: Activate WooBuilder addon of Woostify Pro
Woostify comes with free and premium versions. The Woostify free theme allows you to start a standard eCommerce store. To unlock advanced features, you need to install Woostify Pro with the cost starting at $49.
Woostify pro offers various customization options for you to empower your WooCommerce store. The most powerful add-on is the WooBuilder addon that allows you to make any changes on the single product page, shop page, my account page, checkout page, thank you page, and cart page.
Therefore, to create a custom WordPress cart page with this WooCommerce page builder, you need to install and activate Woostify theme pro in your store.
After having Woostify pro in your store, you can enable Woobuilder by navigating Woostify Options from the dashboard menu. Then you will see a list of customization options you can do with Woostify, click on Activate of the WooBuilder option.
Step 3: Create a Custom WooCommerce Cart Page Design
Create a shoping cart template
Once activating WooBuilder addon, head on Setting to start the process of customizing WooCommerce cart page.
In WooBuilder section, click on the Add New button
A popup appears, then you can set the type of template as Cart Page from the dropdown menu, and give your shopping cart template a name. Once finishing, hit the CREATE TEMPLATE button to start creating a custom WooCommerce cart page design.
Add required elements for your WordPress cart page
Woostify is an Elementor WooCommerce theme, so the shop page customization made with Woostify will be done on the Elementor editing interface.
First, you need to Add New Section by clicking on the pink Plus icon.
Then, you can SELECT YOUR STRUCTURE. Of course, you can change your structure later if you are not satisfied with it.
How to add custom field in woocommerce cart page?
In the left side of the Elementor interface, you can see many Woostify widgets that are grouped together, thus you can easily find out the widgets you need for a shopping cart page design.
To create a WooCommerce custom cart page, the next step is to drag and drop the two most important factors to the cart page which are Cart Form and Cart Overview. To build a beautiful shopping cart page design, in the middle part, you should add space to separate the 2 sections above by using the Spacer widget.
Note: To have the cart page appear with the products’ name, quantity, and price in the editing area, you have to add some products to the cart before.
Customize WooCommerce cart page design
Woostify Cart Form
In the Cart Form, you can easily edit all sections such as Table Border, text size, color, and space of the Product Name, Price, Quantity, and Subtotal. You can also customize the border foot including the coupon code area and the Update Cart button.
Woostify Cart Overview
We use the Cart Overview widget to wrap up the cart page and take your customers through to Checkout. It will automatically generate the final total financial value of the cart.
Besides the required elements like Subtotal and the Total price, the shipping method, and the Proceed To Checkout button, the Cart Overview part includes the Related product section that offers customers other products they may want to buy before checking out. This is a useful feature you want to add to your WooCommerce cart page design because it may help you convert more sales.
In this section, you are allowed to edit all elements like Table Border, text size, color, and space of all texts. You can also customize the Checkout button to make it meets your requirements.
Once added the required information, you can add other elements if you wish. In this example, I use the Text Editor widget to include a custom text “Here are the products you are buying!” to make it more unique.
How to create a custom WooCommerce Empty cart page?
By default, the cart page will display a notice with something like “No products in the cart” and/or a button to return to the shop, if a customer hasn’t placed any items into their cart.
With WooBuilder, you can change the default text to ‘Oops! You don’t have any products here.’ or ‘Start shopping!’ and add a specific redirection URL as you want in a blank cart page.
To customize the empty cart page design, go to WooBuilder settings then create a new template as the process you create a cart page template above.
After that, you can select Cart Empty as the type of template and give it a name then click CREATE TEMPLATE button to start designing your empty cart page with Elementor.
You can use the Text Editor widget to add custom text and a Button widget to include a button to direct customers to a specific place you want. Of course, you can use other addons to make any changes on your WooCommerce empty cart page.
Once finishing, hit the Publish button at the page bottom left to save your template.
Here is the result of the empty cart template I have created.
Final Thought
It is extremely easy to create a WooCommerce custom cart page template with Woostify, right? Even a small change like changing the position of some factors, the color of a text, call to action button on the cart page can have a huge impact on conversion rate and shopping experience. Hopefully, this article can help you design the best cart page template that fits your online shop style and meets your requirements.
How to modify & update cart details on WooCommerce checkout page

Most of you would know that WooCommerce does not allow customers to update the cart from the checkout page. Which means that you cannot change the quantity or delete the product from the checkout page. Customer needs to go back to cart page, update the cart, and then go to the checkout page again. This results in customers having to fill all the required information again. This is a bit frustrating for the customers, especially for guest users (which is a large majority).
In this post, we will discuss how to update the cart on the checkout page of WooCommerce. I have developed this feature in our Fun Friday event at the office. On Fun Fridays, we try to spend an entire day doing things which aren’t related to the core work activity of the person.
First, let’s take a look at the cart details table on the WooCommerce Checkout page:

Here, the customer cannot edit the quantity of the product or delete it. So we want to provide the functionality of changing the quantity and delete the product without having your customer leave the Checkout page.
Let’s begin
If you want to skip this explanation, and instead want to implement the functionality on your store, then you can download the plugin which I have created.
Recover Your Lost Sales
«This plugin helps us reach those customers that do not complete the checkout process. What a valuable plugin. Laser Pegs have converted THOUSANDS of abandoned shopping carts, thanks to this plugin, Abandon Cart Pro. We love it. Great plugin, the best features and support is superb! 5 Stars!» — Tim Mathews at VP of Web Development Laser Pegs Ventures
1. Making the UI changes on cart section of checkout page
We need to modify the “Product” column in “Your order” table. We need to add the “Delete” icon and the “Quantity selector” for each item in the cart.
To achieve this, WooCommerce has given a filter which allows you to modify the Product name row of each cart item: woocommerce_cart_item_name.
The selected quantity displayed on the Your order table is also modifiable using the another WooCommerce filter: woocommerce_checkout_cart_item_quantity.
We will use both filters and allow customers to edit cart details on the checkout page. You can implement the below changes by creating a new plugin.
First, we don’t need the quantity shown for each item on the Your order table. So we will use the filter and return a blank string so it will overwrite the WooCommerce data.

After this, we will modify the Product name row using the filter woocommerce_cart_item_name & add the Quantity field & Delete icon.
Here we are using the is_checkout() function to make sure that we are applying the changes on checkout page only. I have split it into 3 steps as mentioned in above code snippet.
Step 1: Add delete icon
Here in this step, we will add the Delete icon for each item in the cart. This is the same icon used in the WooCommerce cart.
Here, we have used the WooCommerce function get_remove_url(). We need to pass the $cart_key for each cart item. So get_remove_url() function will return a unique URL to delete each cart item.
Step 2: Add product name
As we are modifying the product name row, we also need to add the product name in the row along with the new fields. We will get the product name from the filter itself, which is passed as the first argument. It is $product_title in our case.
Increase WooCommerce Store Sales
«It’s interesting to see how much WooCommerce Abandoned Cart Pro has increased sales for high value products. I would have expected the plugin to increase sales for low value products that customers don’t mind whether or not they purchase (e.g. food), but I have been more surprised to see the difference it can make for products that require such a big buying decision.» — Katie Keith, Operations Director at Barn2 Media
Step 3: Add quantity selector
Lastly, we will add the quantity selector. Here we will use the WooCommerce function woocommerce_quantity_input().
We need to give the four parameters for the function “input_name”, “input_value”, “max_value”, “min_value”.
- input_name: It will contain the array with the name ‘cart’, in this you need to pass the cart item key & the quantity.
- input_value: It will contain the selected quantity of the product.
- max_value: It will be the max stock number of the product.
- min_value: It will be the minimum value of the quantity selector.
Once all above steps are done, it will now display the delete button and quantity selector on the Your order table of the Checkout page.
The filter which we have used for modifying the product name column value (woocommerce_cart_item_name) is also called on the Cart page of your store. So to make sure that the code which we write does not break the functionality of the Cart page we have ensured that changes are only applied on the checkout page.
2. Updating the Cart via Ajax call
Adding this much won’t work, we need to make sure when a customer changes the quantity it will reflect on the cart total.
Changing Quantity
We need the Ajax call to change the cart total. So when a customer changes the quantity, we need to take an action and change the cart total.
Now, we will enqueue “add_quantity.js” file in the footer of the website and we will make sure that it is included when we are on the checkout page.
Now we need to add the function in the Javascript file, which will call the ajax for changing the cart total.
Above javascript will call the ajax in which we will pass the data of the modified checkout form. But it will call when we click on the quantity icon. So it will contain the modified value of the quantity.
Now, we need to add the function for the ajax, which will change the cart total according to the modified quantity.
When we modify the quantity on the checkout page the above function will get called and it will change the cart total. We have used the WooCommerce functions in our functions.
We have used “set_quantity()”, “calculate_totals()”, “woocommerce_cart_totals()” functions for modifying the cart total and displaying it on the Your Order table of the checkout page.
set_quantity(): This function will set the modified quantity to the cart.
We have sent the data from the javascript function which will have the modified quantity value, so we will use that modified value and set it to the cart.
calculate_totals(): Using this function we instruct that again calculate the total of the cart.
woocommerce_cart_totals(): This function is used to display the modified cart.
Once all above calculation is done it will return back to the javascript from which we had called the ajax function. In the response of that function, we will ‘trigger’ the ‘update_checkout’ function which will, in turn, modify the cart and display it to the user.
We need the CSS for the “Delete” button of the Your order table. So it should look like the WooCommerce cart delete button. So we need to add the CSS for it. You can add the CSS in the footer of your website.
Once it is added we need to give the CSS to the delete button in the CSS file. The CSS has been shown below.
So, we are ready with the functionality where we can modify the quantity on the checkout page of WooCommerce.
After implementing the above, this is how the Your order table on the checkout page would look:

It will add the quantity selector and the delete icon for the each item of the Your order table of the checkout page.
I have built this as a plugin, named as Change Quantity on Checkout for WooCommerce which was released in September 2016. It is used on 400+ WooCommerce stores. If you are already using this plugin on your WooCommerce store, then I would appreciate if you can spare some time to review the plugin.
If you have any feedback, then you can let me know in the comments below or you can post on the plugin’s support forum.