Доступ к FTP-серверу за NAT
Протокол FTP является старейшим сетевым протоколом (создан в 1971 году), но, тем не менее, широко используется по сей день. Важной особенностью протокола является то, что он использует несколько соединений: одно для управляющих команд, остальные для данных. Причем соединений для передачи данных может открываться несколько.
В зависимости от способа установления соединения для передачи данных различают активный и пассивный режимы работы FTP. В активном режиме сервер сам устанавливает соединение передачи данных к клиенту, в пассивном наоборот.
Активный режим
В активном режиме клиент устанавливает управляющее соединение на порт 21 сервера и передает специальную команду PORT , в которой указывает свой адрес и порт для передачи данных. Получив данную команду, сервер устанавливает соединение с 20 порта на указанный в команде порт клиента.
Тут сразу виден недостаток данного метода: для работы в активном режиме клиенту требуется выделенный IP-адрес. Также определенные сложности будут возникать при нахождении клиента за брандмауэром или NAT-ом.
Пассивный режим
В пассивном режиме клиент устанавливает управляющее соединение на порт 21 сервера и передает специальную команду PASV . В ответ сервер передает адрес и порт, на который следует устанавливать соединение для передачи данных. Получив эту информацию, клиент устанавливает подключение к серверу и начинает передачу данных.
Как видим, в пассивном режиме все соединения инициирует клиент и поэтому к нему нет никаких требований, он может находиться за NAT и брандмауэром, а также не иметь выделенного IP-адреса. Поэтому на сегодняшний день основным режимом работы FTP является пассивный.
FTP сервер за NAT
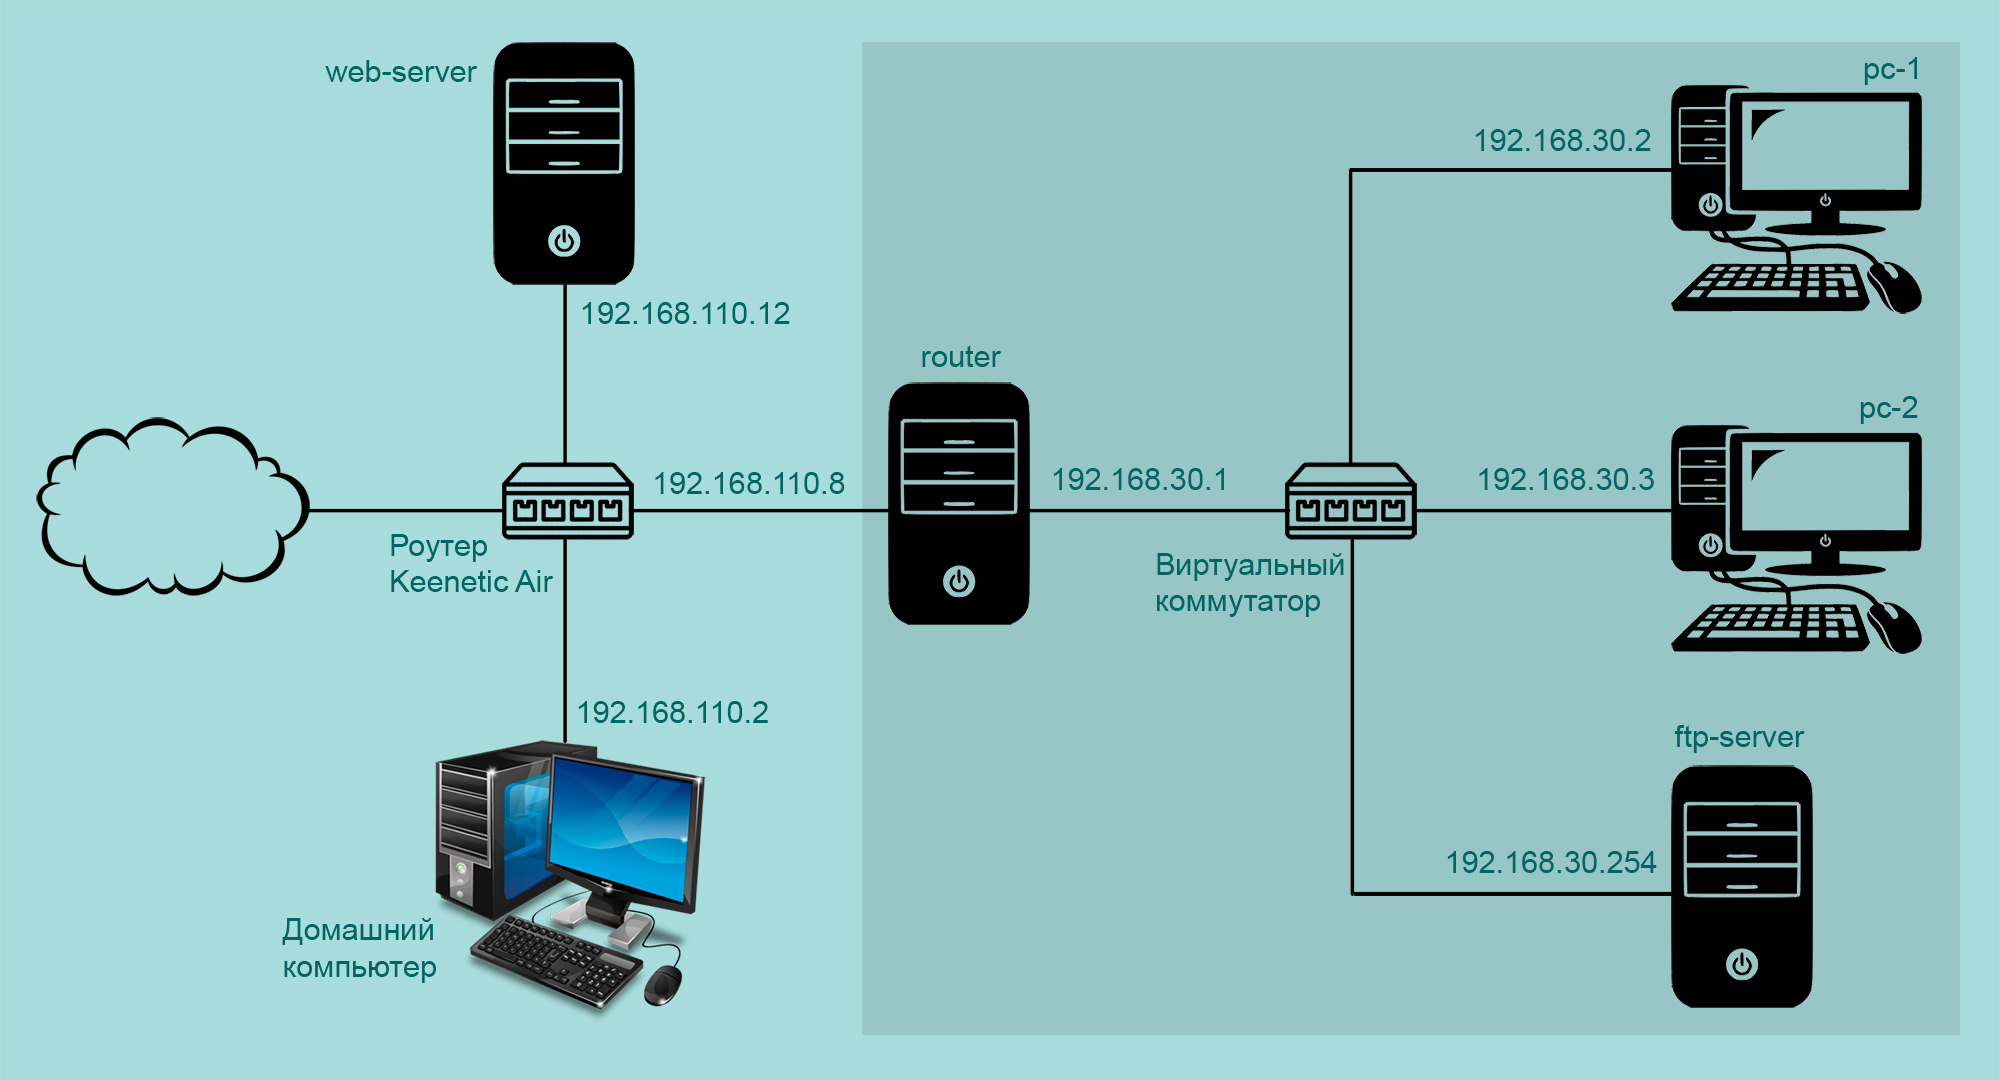
У меня дома компьютер с установленной Windows 10 и VirtualBox. Давайте создадим несколько виртуальных машин: router , pc-1 , pc-2 , ftp-server и web-server (будет играть роль FTP-клиента). У виртуальной машины router два сетевых интерфейса:
- enp0s3 (сетевой мост) — смотрит в домашнюю сеть, получает ip-адрес 192.168.110.8 от роутера Keenetic Air
- enp0s8 (виртуальная сеть) — смотрит в одну сеть с виртуальными машинами pc-1 , pc-2 и ftp-server
Виртуальная машина router обеспечивает выход в интренет для pc-1 , pc-2 и ftp-server . Все это более подробно можно прочитать здесь. А если совсем коротко, то тогда так
Давайте установим на виртуальную машину ftp-server FTP-сервер vsftpd :
Про настройки подробно рассказывать не буду (подробнее можно прочитать здесь), упомяну только важные для нас:
- pasv_enable=NO — используется только активный режим
- pasv_enable=YES — можно использовать пассивный режим
- pasv_address=XXX.XXX.XXX.XXX — этот ip-адрес сервер будет передавать клиенту вместо своего в ответ на PASV
- pasv_min_port и pasv_max_port — сервер будет отправлять клиенту порт из этого диапазона в ответ на PASV
Теперь на виртуальной машине router настроим перенаправление пакетов, которые приходят на внешней интерфейс enp0s3 , порт 21 — это управляющее соединение от клиента к серверу:
И будем перенаправлять пакеты, которые приходят на внешней интерфейс enp0s3 , порт 60000-60100 , при работе в пассивном режиме — это соединение от клиента к серверу для передачи данных:
Сохраняем новые правила, чтобы они применились после перезагрузки:
Активный режим
В реальной ситуации FTP-клиент и маршрутизатор должны иметь белые ip-адреса. Но мы здесь моделируем ситуацию, как будто бы у них белые ip-адреса. Просто потому, что у нас маршртузатор и FTP-клиент находятся в одной сети 192.168.110.0/24 и видят друг друга. Когда FTP-клиент устанавливает управляющее соединение с FTP-сервером — он отправляет пакеты на внешний интерфейс маршрутизатора, на порт 21. А маршрутизатор отправляет эти пакеты внутрь сети 192.168.30.0/24 — на ip-адрес 192.168.30.254 FTP-сервера (DNAT, первое правило).
Вроде все готово для испытаний, файл конфигурации FTP-сервера разрешает использовать только активный режим. Пробуем из сети 192.168.110.0/24 подключиться к FTP-серверу за NAT с виртуальной машины web-server (ip-адрес 192.168.110.12 ).
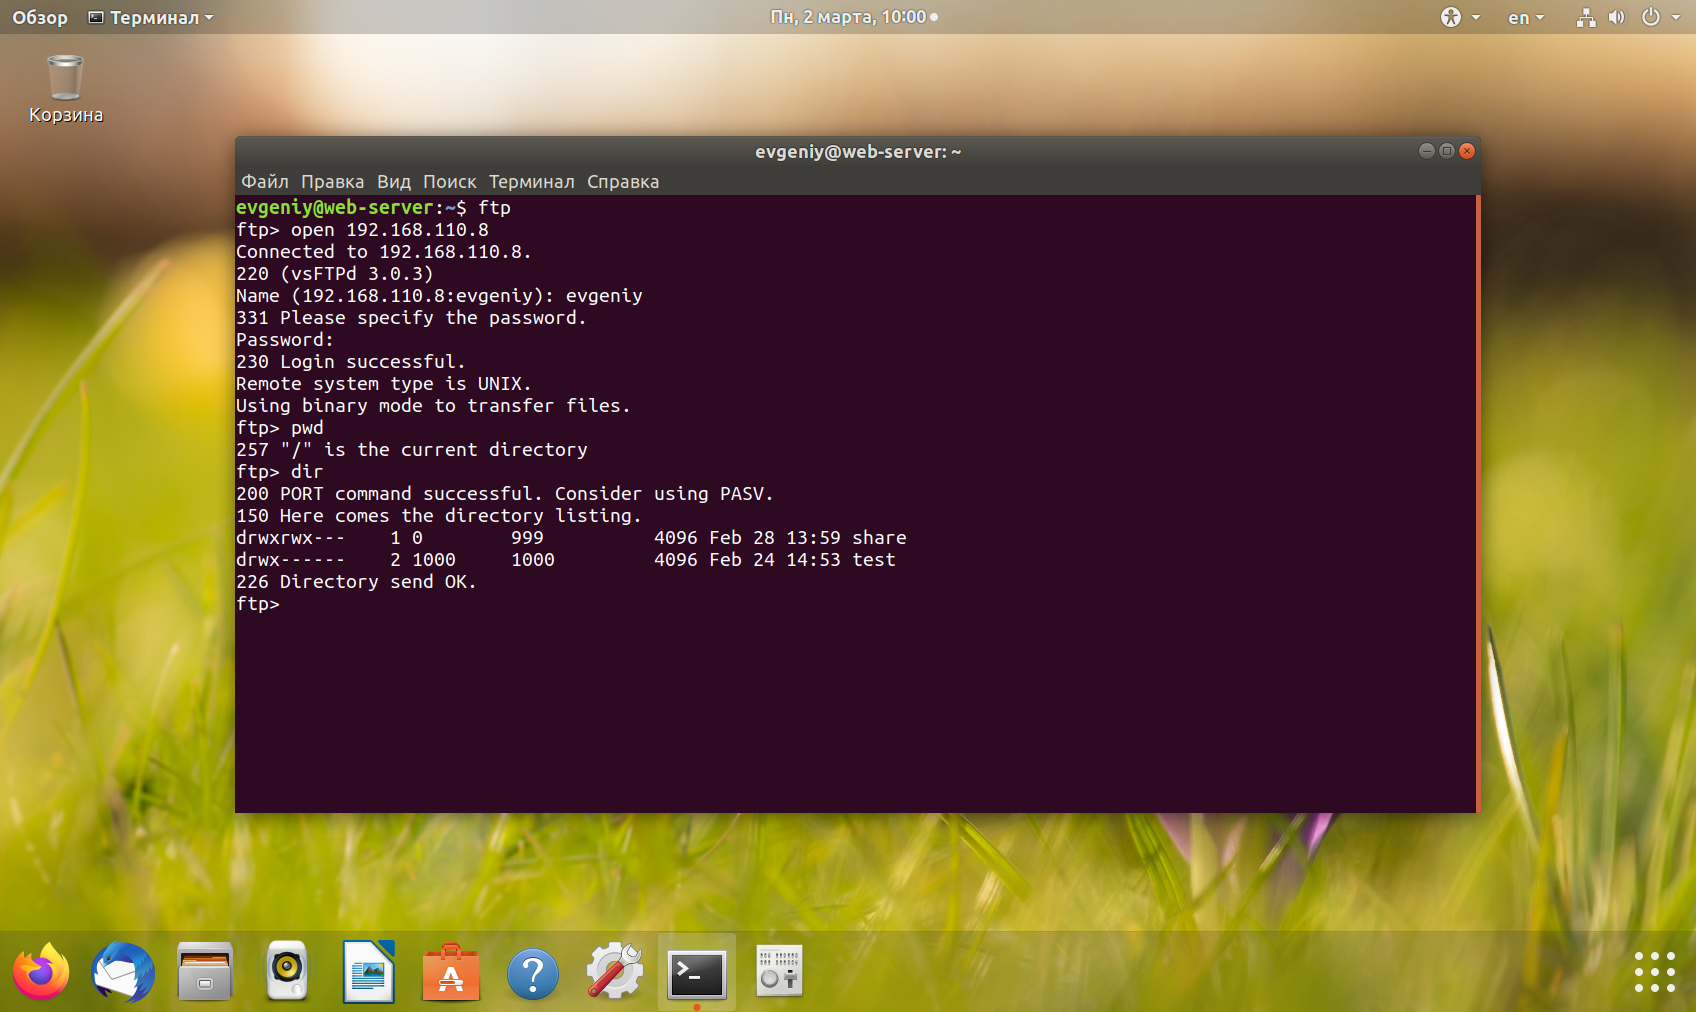
Сервер получил от клиента команду PORT и успешно ее обработал — PORT command successful . Сервер устанавливает соединение с 20 порта на указанный в команде PORT ip-адрес и порт клиента и отправляет листинг директории. Адрес клиента — это 192.168.110.12 , сервер отправит данные в шлюз 192.168.30.1 (по дефолтному маршруту), маршрутизатор перебросит пакеты с интерфейса enp0s8 на enp0s3 и отправит дальше — FTP-клиенту web-server .
Пассивный режим
Теперь изменим настройки сервера, чтобы разрешить работу в пассивном режиме:
Пробуем подключиться к серверу
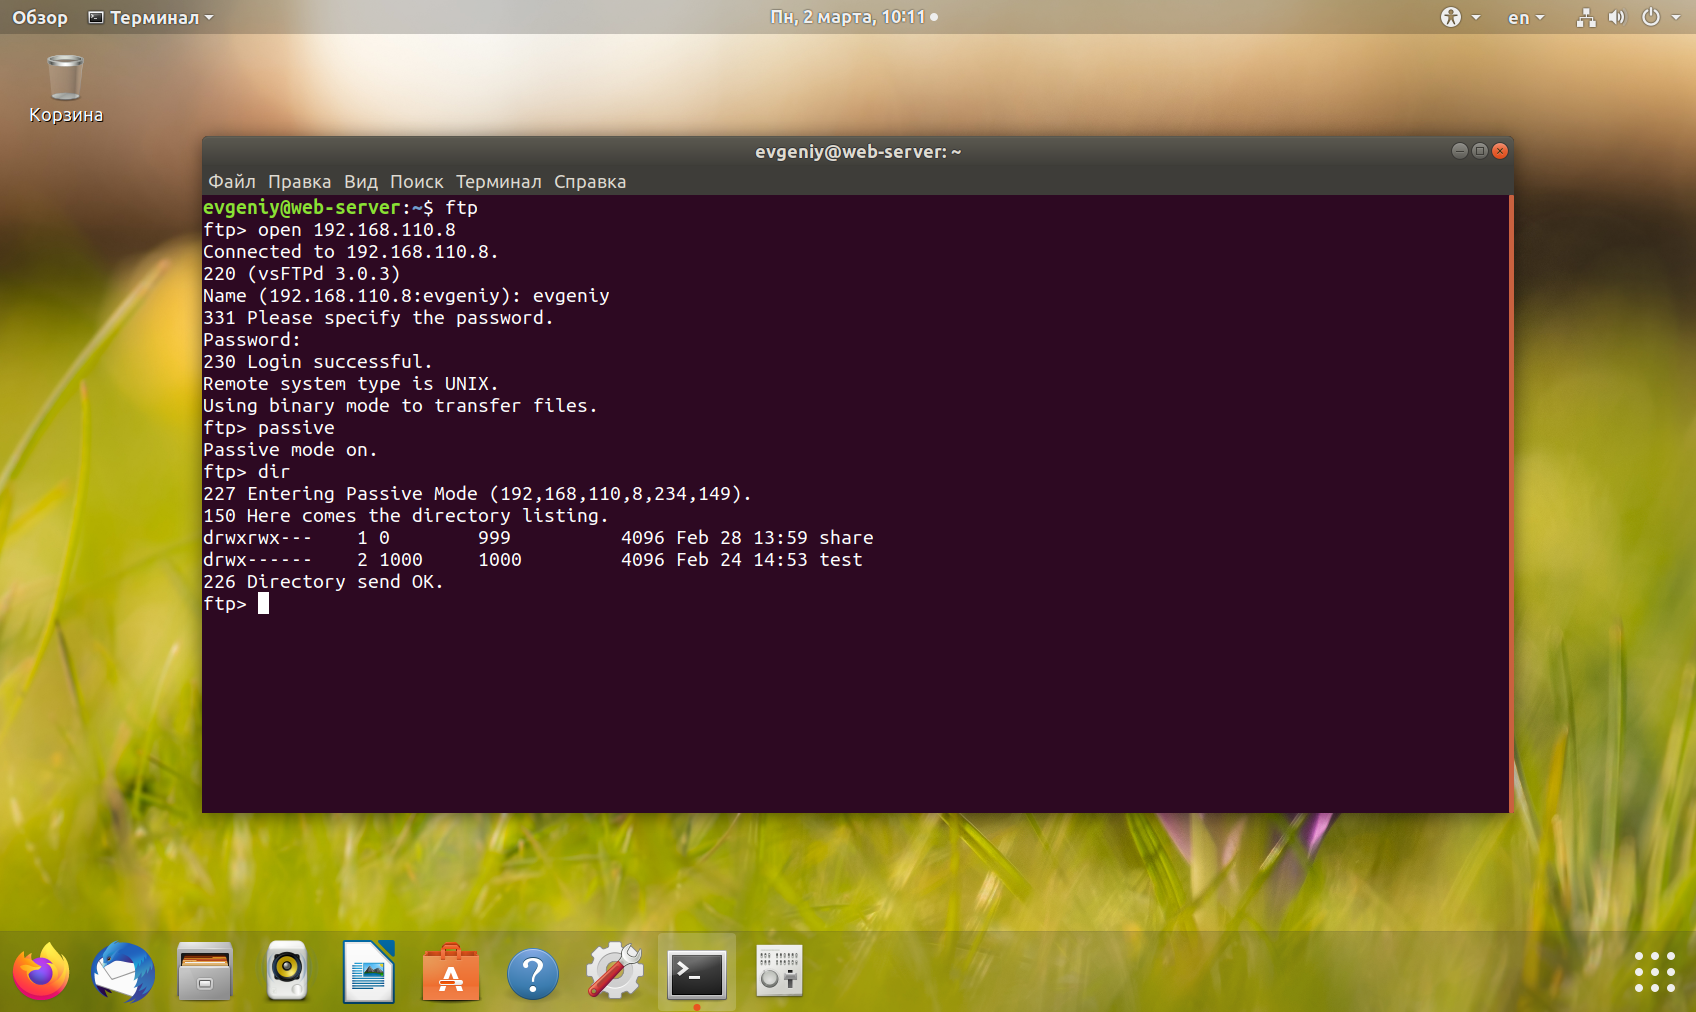
После команды passive ( PASV , пассивный режим), сервер сообщает клиенту ip-адрес 192.168.110.8 из директивы pasv_address (вместо своего 192.168.30.254 ) и порт — 60053 (порт вычисляется как 234*256+149=60053 ). А клиент устанавливает еще одно соединение с сервером — уже для передачи данных.
Тут важно то, что FTP-сервер сообщает FTP-клиенту не свой серый ip-адрес, а белый ip-адрес внешнего интерфейса шлюза (который на самом деле серый, но мы только моделируем реальную ситуацию). И сообщает порт из диапазона 60000-60100, который мы задали в настройках FTP-сервера. FTP-клиент отправляет пакеты с данными на белый ip-адрес маршрутизатора (который на самом деле серый), на порт 60053 . А маршрутизатор отправляет эти пакеты внутрь сети 192.168.30.0/24 — на ip-адрес 192.168.30.254 FTP-сервера (DNAT, второе правило).
Как включить пассивный режим ftp
Did you find this document helpful?
Would you like to provide more feedback on this document?
Table of Contents
How to Enable FTP Passive Mode
Last modified: May 2, 2023
Overview
This document explains how to use the active or passive mode to connect to a File Transfer Protocol (FTP) server.
In cPanel & WHM version 60 and later, the system enables passive ports 49152 through 65534 for Pure-FTPd servers and ProFTPD servers by default. If you use the ConfigServer Security & Firewall (CSF) firewall plugin, the system also adds passive port ranges to your server’s firewall by default.
If you use the nftables , firewalld , or iptables applications for your firewall, you must enable firewall settings for the passive ports manually. For more information about firewalls, read our How to Configure Your Firewall for cPanel & WHM Services documentation.
Active and passive mode sessions
FTP uses a data port and a command port to transfer information between a client and a server. During a typical active mode session, the command port uses port 21 and the data port uses port 20 . When you use a passive mode session, however, the data port does not always use port 20 .
Active
In active mode, the FTP server responds to the connection attempt and returns a connection request from a different port to the FTP client. Network Address Translation (NAT) configurations block this connection request.
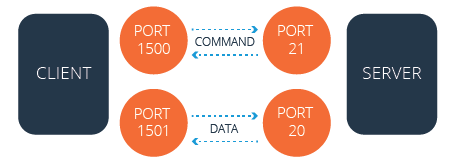
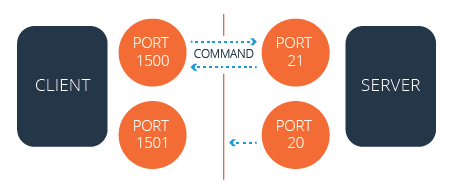
Active FTP (with firewall)
The firewall blocks the server’s attempt to communicate with the client because the server uses a different port than the first connection.
Passive
In passive mode, the FTP client initiates both connection attempts. NAT configurations do not block this connection request.
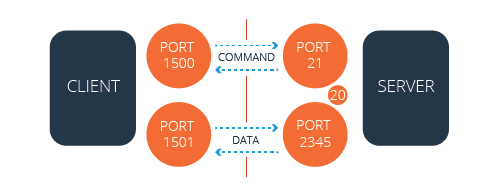
Passive FTP (with firewall)
The firewall does not block the server’s attempt to communicate with the client because the client initiated the communication both times.
Configure FTP servers
The sections below explain how to edit the default configurations for a Pure-FTPd server and a ProFTPD server.
- A local file contains your desired settings which overwrite any default settings from the main file.
- The system enables passive ports 49152 through 65534 for Pure-FTPd servers and ProFTPD servers by default.
Pure-FTPd servers
To edit the FTP configuration for a PureFTP server, perform the following steps:
- Log in to the server as the root user via SSH.
- Open the /var/cpanel/conf/pureftpd/local file, if it already exists, with a text editor. If it does not already exist, create the /var/cpanel/conf/pureftpd/local file.
- Add the desired changes to the file. If your FTP server exists behind a NAT configuration, set the ForcePassiveIP option to the FTP server’s public IP address, as in the following example:
ProFTPD servers
To edit the FTP configuration for a ProFTPD server, perform the following steps:
- Log in to the server as the root user via SSH.
- Open the /var/cpanel/conf/proftpd/local file, if it already exists, with a text editor. If it does not already exist, create the /var/cpanel/conf/proftpd/local file.
- Add the desired changes to the file. If your FTP server exists behind a NAT configuration, set the MasqueradeAddress option to the FTP server’s public IP address, as in the following example:
Configure the firewall
You may need to add your FTP server’s passive port range to the firewall manually.
ConfigServer Security & Firewall
If you use the CSF plugin to manage your server’s firewall, open the /etc/csf/csf.conf file, and confirm that the passive port range exists at the end of the TCP_IN line. The system adds your FTP server’s passive port range to the firewall by default. For more information about how to install and use CSF, visit the CSF website.
CSF does not function with the firewalld utility. If you install CSF, you must remove the firewalld utility. To do this, run the yum remove firewalld command.
nftables
If you use the nftables framework for your AlmaLinux OS, CloudLinux™ 8 or higher, or Rocky Linux™ server, run the following commands to add the passive port range to your server’s firewall:
You will find the nftables ruleset for your server in the /etc/sysconfig/nftables.conf file.
firewalld
If you use the firewalld application for your CentOS 7, CloudLinux 7, or Red Hat® Enterprise Linux® (RHEL) 7 server, run the following commands to add the passive port range to your server’s firewall:
iptables
Red Hat Enterprise Linux (RHEL) 8 deprecated the iptables utility. While cPanel, L.L.C. does not support this version of RHEL, this change affects all cPanel-supported operating systems. We recommend the nftables utility for servers that run the AlmaLinux OS 8, Rocky Linux 8, or CloudLinux 8 operating systems. We recommend the firewalld utility for servers that run the CentOS 7, CloudLinux 7, or RHEL 7 operating systems. For more information, read Red Hat’s When to use firewalld, nftables, or iptables documentation.
If you use the iptables application for your FTP server’s firewall, perform the following steps to add the passive port range to your server’s firewall:
Install the iptables-services package if it does not already exist on your server. This package provides the iptables and ip6tables services, which are not included in the iptables application. To install this package, run the following command:
Run the following commands to add the rules to the firewall and save the configuration:
SolusVM and Xen
If you use SolusVM and Xen® on a CloudLinux server, you may experience problems with Passive FTP. These problems may resemble a firewall or other connection issue, even when no firewall exists.
To resolve these issues, perform the following steps:
-
Replace the IPTABLES_MODULES=ip_conntrack_netbios_ns line in the /etc/sysconfig/iptables-config file on the VPS node with the following line:
Troubleshoot FTP passive mode
If your NAT-configured server cannot execute Passive FTP connections to other IP addresses on the server, perform either of the following actions:
-
In cPanel & WHM version 66 and later, set the ForcePassiveIP option with a tilde (
Настройка сети
Настройка FTP является довольно сложной задачей. Т.к. существуют тысячи разных файрволов и моделей роутеров, практически невозможно привести полное пошаговое руководство для каждого пользователя. Пользователь должен понимать основы протокола FTP для того, чтобы настроить FileZilla и роутеры/файрволы через которые происходит подключение. В этой статье приведена краткая история развития протокола FTP и принципы работы некоторых его аспектов. Внимательное прочтение этой статьи предотвратит многие проблемы, которые могут возникнуть при настройке FTP-подключения.
Содержание
Общие сведения
В этом разделе будет кратко рассмотрена история и технические сведения, касающиеся протокола FTP. Для получения подробной информации смотрите спецификации.
Исторические сведения
На фоне быстро развивающейся сети Интернет протокол FTP выглядит не просто старым, а действительно архаичным. Ранние черновые спецификации протокола датируются 1971-ым годом, составление текущей спецификации начато в 1985-ом. На протяжении последних двух десятилетий протокол не менялся в своей основе.
В те времена сетью Интернет пользовались в основном университеты и исследовательские центры. Сообщество пользователей было небольшим, большинство из них знали друг друга и все работали сообща. Интернет был дружелюбной сетью, а проблемы безопасности как таковой не стояло.
Те времена прошли и многое изменилось. Технологический прогресс шел быстрее, чем кто-либо мог себе представить, одновременно выросло новое поколение пользователей. Интернет теперь — повсеместное явление, благодаря которому миллионы людей общаются друг с другом множеством разных способов. Главное ощутимое изменение: Интернет стал враждебным. Доступность и открытость сети привлекла злонамеренных пользователей, активно эксплуатирующих ошибки и неопытность других.
Побочным эффектом такого развития событий стали, следующие явления:
-
-роутеры. Большинство сети использует протокол IPv4, имеющий ограниченное адресное пространство (IPv6 разработан решить эту проблему). Благодаря NAT-роутерам системы с большим количеством устройств могут пользоваться одним и тем же IP-адресом.
- Персональные файрволы для защиты пользователей от недоработок операционных систем и приложений.
В большинстве случаев эти явления конфликтуют с работой протокола. Ситуацию ухудшают недоработки в самих роутерах и файрволах.
Тем не менее, при правильной настройке FTP предлагает надежный и опробованный способ передачи файлов.
Технические сведения
Основные отличие FTP от остальных протоколов — использование вторичных подключений для передачи файлов. При подключении к FTP-серверу создается т.н. контрольное подключение, через которое передаются команды протокола и ответы на эти команды. Для того, чтобы передать файл или листинг директории, клиент должен отослать команды через контрольное подключение, после чего будет создано подключение для передачи данных.
Существует два способа создания этого подключения: активный и пассивный режимы.
В пассивном режиме, который является рекомендуемым, клиент отсылает серверу команду PASV, на которую сервер отвечает адресом. После этого клиент отсылает команду для передачи файла или листинга директории и создает вторичное подключение по адресу, который был получен от сервера.
В активном режиме клиент открывает сокет на локальном устройстве и отсылает серверу адрес сокета с помощью команды PORT. После отсылки команды передачи файла или листинга сервер создает подключение по заданному адресу, который был указан клиентом.
В обоих случаях файл/листинг будут переданы через подключение для передачи данных.
Создание исходящих подключений требует задания меньшего количества параметров для роутеров/файрволов, чем создание входящих подключений. В пассивном режиме, подключение является исходящим от клиента и входящим для сервера. В активном режиме клиент и сервер меняются ролями — входящее подключение для клиента и исходящее для сервера.
Примите во внимание, что разница состоит только в порядке подключения, после создания подключения для передачи данных, данные могут как загружаться, так и выгружаться.
Типичная сетевая конфигурация может выглядеть так:

Таким образом, в пассивном режиме роутер и файрвол на стороне сервера должны быть настроены для приема и перебрасывания входящих подключений. В свою очередь, на стороне сервера должны быть разрешены только исходящие подключения, а в большинстве случаев исходящие подключения разрешены.
Аналогично в активном режиме роутер и файрвол на клиентской стороне должны быть настроены для приёма и перебрасывания входящих подключений. Очевидно, на стороне сервера должны быть разрешены только исходящие подключения.
Т.к. сервер обычно обслуживает много клиентов, намного легче настроить роутер и файрвол на стороне сервера один раз для пассивного режима, чем настраивать клиентский роутер/файрвол для каждого клиента в активном режиме. Именно поэтому пассивный режим является рекомендуемым.
NAT-роутеры
У большинства пользователей широкополосного подключения NAT-роутер расположен между их компьютером и сетью. Это может быть самостоятельное устройство (возможно беспроводной роутер), или же встроенный роутер в DSL- или кабельном модеме. В среде NAT все устройства за роутером составляют локальную сеть (LAN), каждое из устройств в сети имеют локальный IP-адрес (четыре небольших числа разделённых точками). NAT-роутер в свою очередь имеет свой локальный IP-адрес, а также внешний IP-адрес для идентификации в глобальной сети. Локальные адреса действительны только внутри LAN, для удаленного устройства они не имеют смысла. Пример:

Предположим, что сервер находится за NAT-роутером. Смоделируем ситуацию, в которой клиент подключается в пассивном режиме, но серверу не предоставлен внешний IP-адрес роутера. В этом случае сервер отсылает свой локальный адрес клиенту, после чего могут произойти две вещи:
- Если клиент не расположен внутри NAT, подключение будет разорвано, т.к. адрес сервера не является действительным.
- Если клиент расположен внутри NAT, адрес сервера может совпадать с адресом устройства в сети самого клиента.
Очевидно, в обоих случаях пассивный режим не сработает.
Таким образом, если сервер находится за NAT-роутером, ему должен быть предоставлен IP-адрес роутера для работы пассивного режима. В обоих случаях сервер отсылает внешний адрес роутера клиенту. Клиент создает подключение с роутером, который в свою очередь передает подключение на сервер.
Файрволы
Предназначением персонального файрвола является защита пользователя от уязвимости в безопасности операционной системы или используемых приложений. Зловредные приложения, к примеру, черви, часто используют эти уязвимости для заражения вашей системы через сеть. Файрволы помогают избежать таких случаев.
В особенности при использовании FTP пользователи файрвола могут получать такие сообщения:
Почти во всех случаев такое сообщение — ложная тревога. Любое приложение может выбрать любой порт для сообщения через интернет. Может случиться так, что FileZilla выберет порт, случайно являющийся портом по умолчанию для трояна или другой зловредной программы. Дистрибутив FileZilla скачанный с официального сайта не содержит вирусов.
Умные роутеры, файрволы, и саботаж данных
Некоторые роутеры или файрволы достаточно умны. Они анализируют подключения и при обнаружении FTP-подключения бесшумно подменяют данные передающиеся между клиентом и сервером. Такое поведение является саботажем данных и может доставить неприятности, если пользователь не разрешил такое поведение явным образом.
Приведем пример. Предположим, что клиент находится за NAT-роутером и пытается подключиться к серверу. Предположим также, что клиент не осведомлен в том, что он находится за NAT и использует активный режим. Клиент отсылает команду PORT со своим локальным, немаршрутизируемым IP-адресом, серверу:
Эта команда указывает серверу на подключение по адресу 10.0.0.1 на порту 12*256+34 = 3106
После этого NAT-роутер бесшумно подменяет команду, включая внешний IP-адрес, а также создает временный порт для переброски FTP-сессии, возможно даже на другом порту:
Эта команда указывает серверу на подключение по адресу 123.123.123.123 на порту 24*256+55 = 6199
Благодаря такому поведению NAT-роутер позволяет неправильно настроенному клиенту использовать активный режим.
Почему такое поведение не является приемлемым? Если эта возможность используется по умолчанию, без согласия пользователя, из этого следует множество проблем. FTP-подключение в своей основе будет работать, но сразу после исчерпания тривиальных случаев использования передача будет разорвана, не оставляя особых средств диагностики проблемы.
- NAT-роутер слепо предполагает, что некоторые подключения принадлежат FTP основываясь на таких данных, как целевые порты или ответы сервера:
- Нет никакой гарантии относительно используемого протокола, несмотря на автоматическое определение (такие случаи называют ложной тревогой). Хоть это и маловероятно, вполне допустимо, что в будущих версиях протокола FTP синтаксис команды PORT может измениться. NAT-роутер, модифицируя команду PORT, изменяет без ведома пользователя параметры, которые он не поддерживает, из-за чего соединение будет разорвано.
- Определение протокола роутером может не распознать FTP. Предположим, что роутер следит только за целевым портом, а если этот порт 21-ый, он будет распознан как FTP. Подключения в активном режиме от неправильно настроенного клиента к серверу на 21-ом порту будут работать, но подключения к другим серверам на нестандартных портах — нет.
Как мы видим, возможности специфические для протоколов, включенные на NAT-роутере по умолчанию могут вызвать множество проблем. Хороший NAT-роутер всегда и полностью работает с протоколом без информации о самом протоколе. Исключением может быть случай, когда пользователь явно применил эту возможность и осознает все возможные последствия.
В этом подразделе мы рассматривали сочетание NAT-роутера на стороне клиента в активном режиме, те же рассуждения применяются и в случае сервера за NAT и ответами на команду PASV.
Настройка клиента FileZilla
Если вы пользуетесь FileZilla 3, мы рекомендуем запустить мастер настройки сети. С помощью мастера вы пройдете все нужные шаги, а после их завершения у вас будет возможность протестировать вашу конфигурацию.
Очевидно, что для подключения к любому серверу ваш файрвол должен разрешить такие действия для FileZilla. Большинство обычных FTP-серверов используют 21-ый порт, SFTP-серверы — 22-ой, а FTP через SSL/TLS (неявный режим) по умолчанию — 990-ый. Номера портов не являются жестко заданными, поэтому лучше всего разрешить исходящие подключения на любой порт.
Т.к. в интернете достаточно неправильно настроенных серверов, или серверов, которые не поддерживают оба режима передачи, вам рекомендуются оба режима передачи на своей стороне.
Пассивный режим
Клиент не может указывать серверу выбор порта для передачи данных в пассивном режиме, поэтому для использования пассивного режима вам нужно разрешить исходящие подключения по любому порту на своем компьютере.
Активный режим
В активном режиме клиент открывает сокет и ожидает от сервера подключения для передачи.
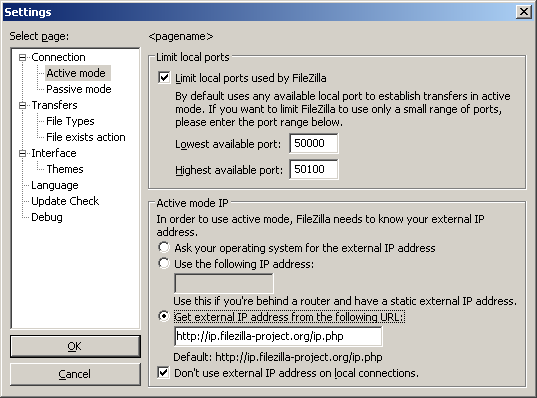
По умолчанию клиент FileZilla запрашивает у операционной системы IP-адрес и свободный номер порта. Такая конфигурация сработает только в случае прямого соединения с интернетом без NAT-роутеров, также ваш файрвол должен разрешать создание подключений на всех портах выше 1024-го.
Если у вас присутствует NAT-роутер, вам нужно указать FileZilla внешний IP-адрес, в противном случае соединения в активном режиме не сработают для серверов вне вашей локальной сети:
- Статический IP-адрес можно указать в диалоге настройки FileZilla.
- Если ваш IP-адрес динамический, у вас есть возможность разрешить FileZilla получать внешний IP-адрес на специальном сайте автоматически каждый раз при запуске. Никакая информация не будет передана от вас на этот сайт, кроме версии используемого клиента FileZilla.
Если вы не уверены в своем выборе, используйте второй вариант.
Если вы не хотите разрешать входящие соединения на всех портах, или ваш компьютер расположен за NAT-роутером, укажите FileZilla использовать определенный диапазон портов для соединений в активном режиме. Этот диапазон также нужно будет открыть для вашего файрвола. При наличии NAT-роутера вам нужно перебросить эти порты на локальный компьютер, на котором установлен FileZilla. Вы можете перебросить диапазон портов, или же каждый порт по отдельности, это зависит от модели вашего роутера.
Доступные порты находятся в диапазоне от 1 до 65535, порты ниже 1024-го зарезервированы для остальных протоколов. Для активного режима FTP лучшим выбором является номер порта равный или выше 50000. В связи с устройством протокола TCP (протокол, который находится ниже уровня FTP и используется для передачи данных), порт не может быть использован повторно сразу после каждого подключения. Таким образом, диапазон портов не должен быть слишком узким, в противном случае вы не сможете передать много файлов малого размера. В большинстве случаев достаточно диапазона в 50 портов.
Настройка и тестирование сервера FileZilla
Настройка сервера по большей части повторяет настройку клиента, главным отличием является то, что в случае сервера активный и пассивный режимы меняются ролями.
Важно отметить, что проверка работы сервера в большинстве случаев происходит ошибочным образом, особенно часто эту ошибку допускают владельцы NAT-роутеров. Находясь внутри локальной сети, вы сможете протестировать сервер, только используя локальный IP-адрес. Использование внешнего адреса внутри локальной сети в большинстве случаев не сработает по одной из приведенных причин:
- Роутер заблокирует доступ к своему внешнему адресу изнутри локальной сети как возможную атаку
- Роутер перебросит соединение вашему провайдеру, который заблокирует его как возможную атаку.
Даже если вам удалось подключиться, у вас нет никакой гарантии того, что пользователю из внешней сети удастся это сделать и, кроме того, загружать файлы на ваш сервер. Единственное надежное средство проверки работы сервера — подключение извне вашей локальной сети.
Активный режим
Убедитесь, что серверу FileZilla разрешено создавать исходящие подключения по любому порту, т.к. в этом режиме клиент определяет порт для соединения.
На локальной стороне подключения сервер FileZilla пытается использовать порт со значением на единицу ниже, чем у порта для контрольного соединения (к примеру, порт 20, если сервер принимает соединения на порту 21). Тем не менее, это не всегда возможно, поэтому не следует всегда полагаться на эту особенность.
Пассивный режим
Настройка сервера в этом случае практически повторяет настройку клиента в активном режиме.
В пассивном режиме сервер открывает сокет и ожидает соединения от клиента.
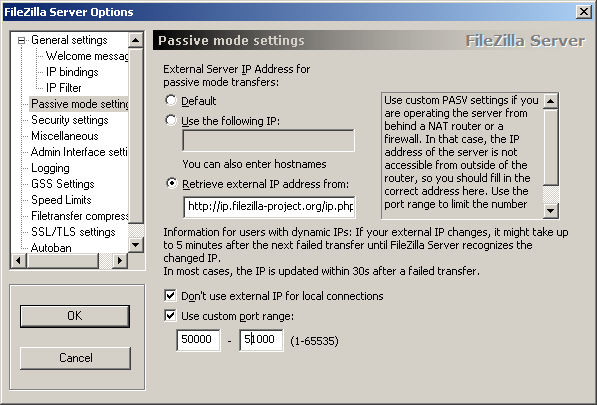
По умолчанию сервер FileZilla запрашивает у операционной системы IP-адрес компьютера и свободный порт. Эта конфигурация является рабочей только, если компьютер напрямую подключен к интернету без NAT-роутеров и установленным для файрвола разрешением на входящие подключения по всем портам выше 1024-го.
При наличии NAT-роутера вам нужно сообщить серверу FileZilla ваш внешний IP-адрес, в противном случае соединения в пассивном режиме будут работать только внутри локальной сети:
- Статический IP-адрес можно указать в диалоге настройки сервера FileZilla.
- Если ваш IP-адрес динамический, у вас есть возможность разрешить серверу FileZilla получать внешний IP-адрес на специальном сайте автоматически при каждом запуске. Никакая информация не будет передана от вас на этот сайт, кроме версии используемого сервера FileZilla.
Если вы не уверены в своем выборе, используйте второй вариант.
Если вы не хотите разрешать входящие соединения на всех портах, или ваш компьютер расположен за NAT-роутером, укажите серверу FileZilla использовать определенный диапазон портов для соединений в активном режиме. Этот диапазон также нужно будет открыть для вашего файрвола. При наличии NAT-роутера вам нужно перебросить эти порты на локальный компьютер, на котором установлен сервер FileZilla. Вы можете перебросить диапазон портов, или же каждый порт по отдельности, это зависит от модели вашего роутера.
Доступные порты находятся в диапазоне от 1 до 65535, порты ниже 1024-го зарезервированы для остальных протоколов. Для активного режима FTP лучшим выбором является номер порта равный или выше 50000. В связи с устройством протокола TCP (протокол, который находится ниже уровня FTP и используется для передачи данных), порт не может быть использован повторно сразу после каждого подключения. Таким образом, диапазон портов не должен быть слишком узким, в противном случае вы не сможете передать много файлов малого размера. В большинстве случаев достаточно диапазона в 50 портов.
Решение проблем
К сожалению, множество персональных файрволов и пользовательских роутеров имеют свои недоработки или, в некоторых случаях, даже способны саботировать работу FTP (например SMC Barricade v1.2).
В первую очередь, пользуйтесь последними стабильными версиями программного обеспечения, в том числе файрвола и прошивки роутера.
Если это не помогает, у вас есть возможность попробовать удалить ваш файрвол для анализа ситуации. Простое отключение файрвола не всегда помогает, т.к. некоторые файрволы нельзя полностью отключить.
Если это возможно, попробуйте подключиться к интернету напрямую без роутера.
Если вы пытаетесь настроить сервер и он работает нормально внутри вашей локальной сети, но не доступен вне её, попробуйте сменить порт для подключения. Некоторые провайдеры не разрешают своим клиентам размещать сервера и блокируют порты ниже 1024-го.
Причиной другой возможной проблемы может быть использование 21-го порта по умолчанию для вашего FTP-сервера. На стороне вашего провайдера может присутствовать файрвол, который может неожиданно изменять порт для команды PASV. Попробуйте использовать порт отличный от порта по умолчанию для вашего FTP-сервера.
Если время от времени вы наблюдаете сообщение «невозможно открыть подключение для передачи данных», т.е. FTP-клиент способен без проблем подключиться к FTP-серверу достаточное число раз, пока вы не получите данное сообщение, возможным препятствием может быть антивирус на клиентском ПК, настроенный на блокировку исходящих подключений по определенному диапазону портов. При работе сервера в пассивном режиме исходящие порты клиента определяются случайным образом, а при выборе портов попадающих в заблокированный диапазон, вы будете получать сообщение об ошибке. Для того, точной диагностики, вам следует просмотреть логи антивируса на машине клиента, который получает данную ошибку. В общем, любое ПО, способное блокировать диапазон исходящих портов, может быть причиной проблем подобного рода.
Таймауты при передаче больших файлов
Если передача небольших файлов происходит без проблем, но загрузка больших файлов обрывается по таймауту, причиной этого является неправильно настроенный роутер и/или файрвол находящийся между клиентом и сервером.
Как было сказано выше, в FTP используются два TCP-подключения: контрольное подключение для отсылки команд и получения ответов на команды, и также подключение для передачи данных. По принципу работы FTP контрольное соединение не используется во время передачи файлов.
В спецификации TCP не указывается лимит времени для сохранения неиспользуемого подключения. Предполагается, что подключение сохраняется на неопределенное время пока не будет закрыто явным образом. Тем не менее, большинство роутеров и файрволов автоматически закрывают свободные подключения по истечению некоторого времени. Более того, в большинстве случаев разрыв соединения происходит без уведомления об этом его участников. В случае продолжительной передачи данных через FTP это значит, что контрольное соединение может быть разорвано, но, ни клиент, ни сервер не будут об этом уведомлены. Таким образом, после того, как все данные были переданы, сервер все еще ожидает, что контрольное подключение можно использовать и отсылает через него подтверждение передачи клиенту. Аналогично, клиент готов использовать контрольное соединение и ожидает ответа от сервера. Но, т.к. контрольное соединение было разорвано, это ответ никогда не будет доставлен, что приводит к таймауту.
Для решения этой проблемы спецификация TCP предусматривает способ отправки пакетов для поддержки неиспользуемого подключения, сообщающих участников о том, что соединение требуется сохранить для дальнейшего использования. Тем не менее, в спецификации TCP явно указывается, что такие пакеты можно передавать не чаще, чем один раз каждые два часа. Для этого, предусматривая задержки в сети, срок жизни неиспользуемого подключения устанавливается спецификацией в 2 часа и 4 минуты.
Препятствием этому служит то, что многие роутеры и файрволы разрывают соединения, которые не использовались меньше чем 2 и 4 минуты. Такое поведение нарушает спецификацию протокола TCP, в RFC 5382 это указано достаточно ясно. Другими словами, роутеры и файрволы, разрывающие соединение раньше нужного момента, нельзя признать рабочими, т.к. они не могут использоваться при длительной передаче данных через FTP. К сожалению, производители роутеров потребительского класса и поставщики файрволов не заботятся о соблюдении спецификаций.
Для решения этой проблемы вам нужно удалить такие файрволы и заменить неправильно работающий роутер на качественный.
Настройка сервера FileZilla под Windows Firewall
Если вы испытываете проблемы при настройке сервера FileZilla при работающем Windows Firewall (в особенности, если клиент, подключающийся к такому серверу получает сообщение об ошибке «Невозможно получить листинг директории»), вам нужно добавить сервер FileZilla в список исключений Windows Firewall. Для этого вам нужно сделать следующие шаги:
- Откройте Windows Firewall из Панели Управления
- Если вы пользуетесь Vista, нажмите «Изменить настройки»
- Выберите вкладку «Исключения»
- Нажмите «Добавить программу..»
- НЕ выбирайте «интерфейс сервера FileZilla» из списка, вам нужно нажать на «Просмотр. «
- Найдите установочную директорию сервера FileZilla (обычно это «C:\Program Files\FileZilla Server\»)
- Выберите «FileZilla server.exe» и нажмите открыть (повторим еще раз, НЕ ВЫБИРАЙТЕ «FileZilla Server Interface.exe»)
- Выберите «FileZilla server.exe» из списка и нажмите «Ok»
- Удостоверьтесь в том, что «FileZilla server.exe» находится в списке исключений и отметьте соответствующий пункт
- Нажмите «Ok» для закрытия окна
Это обеспечивает работу пассивного режима. Если после этого вы все равно испытываете проблемы при подключении (внутри или извне сети), проверьте настройки вашего роутера или попробуйте добавить номер порта в настройках Windows Firewall во вкладке «Исключения».
Network Configuration
Setting up network components for FTP is not trivial for use outside your LAN (Local Area Network). Since so many firewalls and routers exist, it is impractical to give detailed step-by-step instructions suitable for every user. It is important to understand the basics of the FTP protocol in order to configure FileZilla and the routers and/or firewalls involved. This documentation describes the history of the FTP and how some aspects of the protocol work. Reading it carefully will save you a lot of trouble setting up FTP.
Contents
Background
This section provides an overview of the historical and technical background of the FTP protocol. For detailed in-depth information see specifications.
Historical Background
In the fast living world of the internet, the File Transfer Protocol is not just old, it’s ancient. Early drafts of the protocol go back as far as 1971, and the current specifications are from 1985. The protocol might even be older than you!
Back then, the Internet was mainly used by universities and research centers. The community was small, many users knew each other and all were collaborating together. The internet was a friendly, trusting place. Security was not much of a concern.
A lot has changed since then. The Internet is now ubiquitous, with millions of users communicating with each other in many different ways. It is also a more hostile place. The availability and openness has attracted malicious users who exploit design limitations, incomplete implementations, bugs, and the inexperience of other users.
Several attempts have been made to address these problems:
-
(Network Address Translation) routers. Many hosts and routers on the internet use the IPv4 protocol. The number of hosts connected to the internet has reached IPV4’s design limit for the number of addresses (IPv6 is designed to relieve this). NAT routers allow multiple systems within a LAN to connect to the outside world with one external IP address. try to protect personal computers from attacks by malicious users.
Unfortunately, both NAT and personal firewalls conflict with FTP more often than not. To make things worse, some are themselves flawed, causing additional problems regarding FTP.
Technical background
What distinguishes FTP from most other protocols is the use of secondary connections for file transfers. When you connect to an FTP server, you are actually making two connections. First, the so-called control connection is established, over which FTP commands and their replies are transferred. Then, in order to transfer a file or a directory listing, the client sends a particular command over the control connection to establish the data connection.
The data connection can be established two different ways, using active mode or passive mode.
In passive mode, which is recommended (see below), the client sends the PASV command to the server, and the server responds with an address. The client then issues a command to transfer a file or to get a directory listing, and establishes a secondary connection to the address returned by the server.
In active mode, the client opens a socket on the local machine and tells its address to the server using the PORT command. Once the client issues a command to transfer a file or listing, the server will connect to the address provided by the client.
In both cases, the actual file or listing is then transferred over the data connection.
Generally, establishing outgoing connections requires less configuration on the routers/firewalls involved than establishing incoming connections. In passive mode, the connection is outgoing on the client side and incoming on the server side and in active mode this is reversed. Note that the only differences are in establishing a connection. Once established, the connection can be used for uploads or downloads.
A common network setup might look like this:

In passive mode, the router and firewall on the server side need to be configured to accept and forward incoming connections. On the client side, however, only outgoing connections need to be allowed (which will already be the case most of the time).
Analogously, in active mode, the router and firewall on the client side need to be configured to accept and forward incoming connections. Only outgoing connections have to be allowed on the server side.
Since in most cases one server provides a service for many users, it is much easier to configure the router and firewall on the server side once for passive mode than to configure the client’s router/firewall for each individual client in active mode. Therefore, passive mode is recommended in most cases.
NAT routers
Most broadband users will have a NAT (Network Address Translation) router between their computer and the internet. This may be a standalone router device (perhaps a wireless router), or be built into a DSL or cable modem. In a NAT environment, all systems behind the NAT router form a Local Area Network (LAN), and each system in the LAN has a local IP address (recognizable as four small numbers separated by dots. See Private addresses). The NAT router itself has a local IP address as well. In addition, the NAT router also has an external IP address by which it is known to the Internet.
An example system might look like this:

The internal IP addresses are only valid inside the LAN, since they would make little sense to a remote system. Think about a server behind a NAT router. Imagine what might happen if a client requests passive mode, but the server doesn’t know the external IP address of the NAT router. If the server sends its internal address to the client, two things could happen:
- If the client is not behind a NAT, the client would abort since the address is invalid.
- If the client is behind a NAT, the address given by the server might be the same as a system in the client’s own LAN.
Obviously, in both cases passive mode would be impossible.
So if a server is behind a NAT router, it needs to know the external IP address of the router in passive mode. In this case, the server sends the router’s external address to the client. The client then establishes a connection to the NAT router, which in turn routes the connection to the server.
Firewalls
Personal firewalls are installed on many systems to protect users from security vulnerabilities in the operating system or applications running on it. Over the internet, malware such as worms try to exploit these flaws to infect your system. Firewalls can help to prevent such an infection. However, firewalls and other security applications can sometimes interfere with non-malicious file transfers.
Especially if using FTP, firewall users might occasionally see messages like this from their firewall:
In many cases, this is a false alarm. Any program can choose any port it wants for communication over the internet. FileZilla, then, might choose a port that is coincidentally also the default port of a trojan or some other malware being tracked by your firewall. FileZilla is clean of malware as long as it is downloaded from the official website.
Malicious routers, firewalls and data sabotage
Some routers and firewalls pretend to be smart. They analyze connections and, if they think they detect FTP, they silently change the data exchanged between client and server. If the user has not explicitly enabled this feature, this behavior is essentially data sabotage and can cause various problems.
For an example, imagine a client behind a NAT router trying to connect to the server. Let’s further assume that this client does not know it is behind a NAT and wants to use active mode. So it sends the PORT command with the user’s local, un-routable IP address to the server:
This command tells the server to connect to the address 10.0.0.1 on port 12*256+34 = 3106
The NAT router sees this and silently changes the command to include the external IP address. At the same time, the NAT router will also create a temporary port forwarding for the FTP session, possibly on a different port even:
The above command tells the server to connect to the address 123.123.123.123 on port 24*256+55 = 6199
With this behavior, a NAT router allows an improperly configured client to use active mode.
So why is this behavior bad? Essentially, it can cause a number of problems if it is enabled by default, without explicit user consent. The FTP connections in their most basic form appear to work, but as soon as there’s some deviation from the basic case, everything will fail, leaving the user stumped:
- The NAT router blindly assumes some connection uses FTP based on criteria like target ports or the initial server response:
- The used protocol is detected as FTP, yet there is no guarantee that this is true (a false positive). Though unlikely, it is conceivable that a future revision of the FTP protocol might change the syntax of the PORT command. A NAT router modifying the PORT command would then silently change things it does not support and thus break the connection.
- The router’s protocol detection can fail to recognize an FTP connection (a false negative). Say the router only looks at the target port, and if it is 21, it detects it as FTP. As such, active mode connections with an improperly configured client to servers running on port 21 will work, but connections to other servers on non-standard ports will fail.
Therefore, having protocol specific features enabled in a NAT router by default can create significant problems. The solution to all this, then, is to know your router’s settings, and to know the configuration abilities of a router before you set it up. A good NAT router should always be fully protocol-agnostic. The exception is if you as the user have explicitly enabled this feature, knowing all its consequences.
While this section only discussed the combination of a NAT router on the client side with active mode, the same applies to a server behind a NAT router and the reply to the PASV command.
Setting up FileZilla Client
If you’re running FileZilla 3, it’s recommended you run the network configuration wizard. It will guide you through the necessary steps and can test your configuration after set-up.
Obviously, if you want to connect to any server, you need to tell your firewall that FileZilla should be allowed to open connections to other servers. Most normal FTP servers use port 21, SFTP servers use port 22 and FTP over TLS (implicit mode) use port 990 by default. These ports are not mandatory, however, so it’s best to allow outgoing connections to arbitrary remote ports.
Since many servers on the internet are misconfigured and don’t support both transfer modes, it’s recommended that you configure both transfer modes on your end.
Passive mode
In passive mode, the client has no control over what port the server chooses for the data connection. Therefore, in order to use passive mode, you’ll have to allow outgoing connections to all ports in your firewall.
Active mode
In active mode, the client opens a socket and waits for the server to establish the transfer connection.
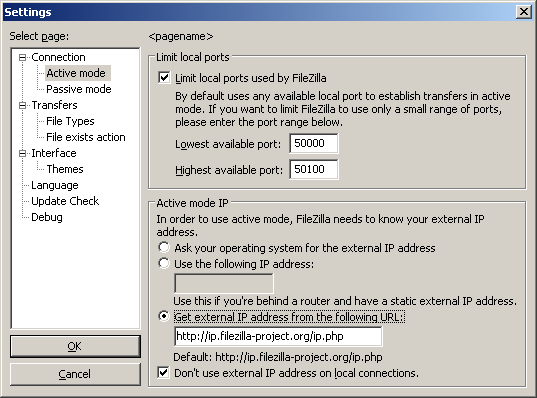
By default, FileZilla Client asks the operating system for the machine’s IP address and for the number of a free port. This configuration can only work if you are connected to the internet directly without any NAT router, and if you have set your firewall to allow incoming connections on all ports greater than 1024.
If you have a NAT router, you need to tell FileZilla your external IP address in order for active mode connections to work with servers outside your local network:
- If you have a fixed external IP address, you can enter it in FileZilla’s configuration dialog.
- If you have a dynamic IP address, you can authorize FileZilla to obtain your external IP address from a special website. This will occur automatically each time FileZilla is started. No information will be submitted to the website (regardless of FileZilla version).
If in doubt, use the second option.
If you do not want to allow incoming connections on all ports, or if you have a NAT router, you need to tell FileZilla to use a specific range of ports for active mode connections. You will have to open these ports in your firewall. If you have a NAT router, you need to forward these ports to the local machine FileZilla is installed on. Depending on your router model, you can either forward a range of ports or you need to forward all ports individually.
Valid ports can be from 1 to 65535; however, ports less than 1024 are reserved for other protocols. It is best to choose ports greater than or equal to 50000 for active mode FTP. Due to the nature of TCP (the underlying transport protocol), a port cannot be reused immediately after each connection. Therefore, the range of ports should not be too small to prevent the failure of transfers of multiple small files. A range of 50 ports should be sufficient in most cases.
Setting up and testing FileZilla Server
Warning: The content of this section is outdated and needs to be adapted to apply to FileZilla Server version 1.x
Setting up the server is very similar to setting up the client, with the main difference being that the roles of active and passive mode are reversed.
A common mistake, especially by users with NAT routers, is in testing the server. If you are within your local network, you can only test using the local IP address of the server. Using the external address from the inside will probably fail, and one of the following may happen:
- It actually works (surprisingly — and it probably means something else is wrong . )
- The router blocks access to its own external address from the inside, due to identifying it as a possible attack
- The router forwards the connection to your ISP, which then blocks it as a possible attack
Even if the test works, there is no guarantee that an external user can really connect to your server and transfer files. The only reliable way to test your server is to try connecting from an external system, outside of your LAN.
Active mode
Make sure FileZilla Server is allowed to establish outgoing connections to arbitrary ports, since the client controls which port to use.
On the local end of the connection, FileZilla Server tries to use a port one less than that of the control connection (e.g. port 20 if server is listening on port 21). However, this is not always possible — so don’t rely on it.
Passive mode
The server configuration is very similar to client configuration for active mode. In passive mode, the server opens a socket and waits for the client to connect to it.
By default, FileZilla Server asks the operating system for the machine’s IP address, and for a free port number. This configuration can only work if you are connected to the internet directly without any NAT router and if you have set your firewall to allow incoming connections on all ports greater than 1024.
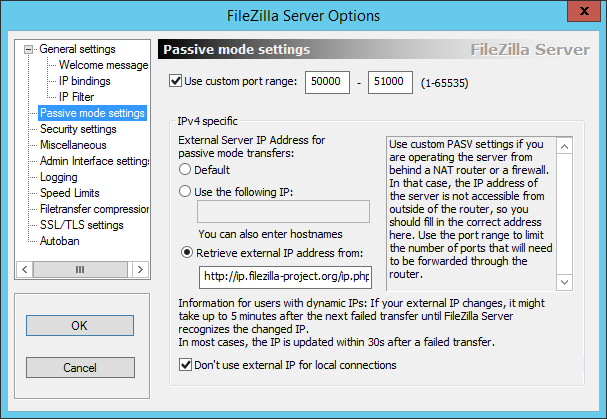
If you have a NAT router, you need to tell FileZilla Server your external IP address or passive mode connections will not work with clients outside your local network:
- If you have a fixed external IP address, you can enter it in the configuration dialog of FileZilla Server.
- If you have a dynamic IP address, you can let FileZilla Server obtain your external IP address from a special website automatically. Except your version of FileZilla Server, no information will be submitted to that website.
If in doubt, use the second option.
If you do not want to allow incoming connections on all ports, or if you have a NAT router, you need to tell FileZilla Server to use a specific range of ports for passive mode connections. You will have to open these ports in your firewall. If you have a NAT router, you need to forward these ports to the local machine FileZilla Server is installed on. Depending on your router model, you can either forward a range of ports or you need to forward all ports individually.
Valid ports can be from 1 to 65535, however ports less than 1024 are reserved for other protocols. It is best to choose ports >= 50000 for passive mode FTP. Due to the nature of TCP (the underlying transport protocol), a port cannot be reused immediately after each connection. Hence the range of ports should not be too small or transfers of multiple small files can fail. A range of 50 ports should be sufficient in most cases.
Troubleshooting
The following are a few troubleshooting suggestions:
Unfortunately, many personal firewalls and consumer routers are flawed or in some cases, even actively sabotage FTP (e.g. SMC Barricade V1.2). First of all, as with all software, you should keep everything updated. This includes the firewall software as well as the firmware version of your router.
If that does not help, you might want to try to uninstall your firewall to see what happens. Simply disabling your firewall might not work, as some firewalls cannot be fully disabled. In particular, most firewalls install virtual device drivers which cannot be disabled other than by uninstalling them. Also check for hidden firewalls. Programs such as virus scanners often have firewall functionality as well.
If possible, try to connect directly to the internet without a router by plugging your computer directly into your modem. If you have a combination modem/router device, try putting it into bridge mode to disable the routing part.
If you are trying to setup a server and it works fine within your LAN but is not reachable from the outside, try changing the listening port. Some ISPs don’t like their customers to host servers and they may block ports with numbers under 1024.
Another issue may occur if you are hosting an FTP server on default port 21. There might be a firewall at the ISP side of your connection which can do odd things like changing the port for PASV commands. Try using another non-default port for your FTP server.
If you encounter «cannot open data connection» on a random basis (i.e., the ftp client can connect to the ftp server without problem for many connections until it encounters this problem), one possible reason may be that your client PC anti-virus software is configured to block outgoing connections on certain ranges of ports. When your ftp connections are running in pasv mode, the client-side outgoing ports are selected randomly and some of those randomly selected ports may be blocked by the anti-virus software. To identify this problem, read your anti-virus log on the client. In general, any software that can block certain ranges of outgoing ports (such as PC firewalls) can cause similar FTP grief.
Timeouts on large files
If you can transfer small files without any issues, but transfers of larger files end with a timeout, a broken router and/or firewall exists between the client and the server and is causing a problem.
As mentioned above, FTP uses two TCP connections: a control connection to submit commands and receive replies, and a data connection for actual file transfers. It is the nature of FTP that during a transfer the control connection stays completely idle.
The TCP specifications do not set a limit on the amount of time a connection can stay idle. Unless explicitly closed, a connection is assumed to remain alive indefinitely. However, many routers and firewalls automatically close idle connections after a certain period of time. Worse, they often don’t notify the user, but just silently drop the connection. For FTP, this means that during a long transfer the control connection can get dropped because it is detected as idle, but neither client nor server are notified. So when all data has been transferred, the server assumes the control connection is alive and it sends the transfer confirmation reply. Likewise, the client thinks the control connection is alive and it waits for the reply from the server. But since the control connection got dropped without notification, the reply never arrives and eventually the connection will timeout.
In an attempt to solve this problem, the TCP specifications include a way to send keep-alive packets on otherwise idle TCP connections, to tell all involved parties that the connection is still alive and needed. However, the TCP specifications also make it very clear that these keep-alive packets should not be sent more often than once every two hours. Therefore, with added tolerance for network latency, connections can stay idle for up to 2 hours and 4 minutes.
However, many routers and firewalls drop connections that have been idle for less than 2 hours and 4 minutes. This violates the TCP specifications (RFC 5382 makes this especially clear). In other words, all routers and firewalls that are dropping idle connections too early cannot be used for long FTP transfers. Unfortunately manufacturers of consumer-grade router and firewall vendors do not care about specifications . all they care about is getting your money (and only deliver barely working lowest quality junk).
To solve this problem, you need to uninstall affected firewalls and replace faulty routers with better-quality ones.
Setting up FileZilla Server with Windows Firewall
If you are having problems with setting up FileZilla Server to run behind Windows Firewall (specifically, it fails on «List» and the client receives a «Failed to receive directory listing» error), you must add the FileZilla Server application to Windows Firewall’s Exceptions list. To do this, follow these steps:
- Open Windows Firewall under Control Panel.
- If using Vista, click «Change Settings»
- Select the «Exceptions» tab.
- Click «Add program. «
- Do NOT select «FileZilla Server Interface» from the list, instead click on «Browse. «
- Locate the directory you installed FileZilla Server to (normally «C:\Program Files\FileZilla Server\»)
- Double click or select «FileZilla server.exe» and press open (Once again, NOT «FileZilla Server Interface.exe»)
- Select «FileZilla server.exe» from the list and click «Ok»
- Verify that «FileZilla server.exe» is added to the exceptions list and that it has a check mark in the box next to it
- Press «Ok» to close the window
- Open a command prompt with administrative rights and execute the following command: netsh advfirewall set global statefulftp disable
Passive mode should now work. If you are still having problems connecting (from another computer or outside the network), check your router settings or try to add the port number in the Windows Firewall settings located in the Exceptions tab.
See the Microsoft kb article 931130 about running FileZilla with the «Routing and Remote Access» or the «Application Layer Gateway» service enabled. http://support.microsoft.com/kb/931130
Setting up FileZilla Server with Windows 8 Firewall
These are the instructions if your operating system is Windows 8 — the interface is slightly different from that described above in Setting up FileZilla Server with Windows Firewall.
Under Windows 8 you must allow the FileZilla Server application through Windows Firewall. To do this, follow these steps:
- Move mouse to upper right corner and click the magnifying glass search icon, and type «firewall» (without the double quotes) in the Search box and then click the «Settings» text. Or, hold down the Windows logo key on the keyboard and press the I key, select the text «Control Panel» and press Enter, in the Search Control Panel area at top right type «firewall». In either case, now click the «Allow an app through Windows Firewall» that should appear.
- Click «Change Settings» and a new button should appear titled «Allow another app. «
- Click «Allow another app. «
- A window titled «Add an app» should appear; do not do anything in this step.
- Do NOT select «FileZilla Server Interface» from the list, instead click on «Browse. «
- Locate the directory you installed FileZilla Server to (normally «C:\Program Files\FileZilla Server\»)
- Double click or select «FileZilla server.exe» and press open (Once again, NOT «FileZilla Server Interface.exe»)
- Your mouse pointer should now return to the «Add an app» window; scroll down the list and select «FileZilla server.exe» and click «Add».
- Your mouse pointer should now return to the Windows Firewall Allowed apps window; verify that «FileZilla server.exe» is added to the allowed apps and features list and that it has a check mark in either the Private box or the Public box. Choose Private if you want the server accessible only from within your local network, and choose Public if you want the server accessible from outside your local network (this might include clients connected wirelessly to your network).
- Press «Ok» to close the Windows Firewall window
- Open a command prompt with administrative rights and execute the following command: netsh advfirewall set global statefulftp disable
If you are still having problems see the advice at the end of section Setting up FileZilla Server with Windows Firewall above or search Microsoft Knowledge base for Firewall related articles.