How to Change WordPress Site Title (4 Simple Methods + a Bonus One)
Outside of your domain name, the WordPress site title serves as the title, face, and identity of your website. After a new WordPress installation, you create a site title, and it gets automatically added to your settings for display on the frontend, used for naming site files, and sometimes called upon to help plugins and themes work properly.
However, you may eventually want to change (or completely remove) your site title for a myriad of reasons. In this article, we cover how to change the WordPress site title with four simple methods:
Why might you want to change the WordPress site title?
Are you wondering why changing the site title might be important? Here are some reasons to consider when looking into your current site title:
- SEO: Search engines index WordPress site titles and use this detail for display on search results pages. The site title and tagline of your site provide the first words people see about your brand, so it’s wise to optimize them.
- Irrelevance: It’s possible your business name changed, or maybe you simply typed in a placeholder title when creating your WordPress site. Either way, it’s important to go back and learn how to change the WordPress site title.
- Display: Some themes automatically display the site title (and tagline) at the top of your website. Sometimes, you must remove the site title, adjust how it looks, or upload a logo to replace the text-based site title with an image.
How to change WordPress site title (four methods and a bonus method)
�� You can change the WordPress site title with four primary methods. We’ll outline each of them below from easiest to most technical.
Method 1: Change WordPress site title through the WordPress Customizer
Built into WordPress by default, the WordPress Customizer is your go-to hub for editing everything from menus to styles, and page layouts to button formats. Since every WordPress user has the Customizer — and since it’s so easy to access — we recommend this method as your first choice when changing the WordPress site title.
Start in the WordPress dashboard. Go to Appearance → Customize.
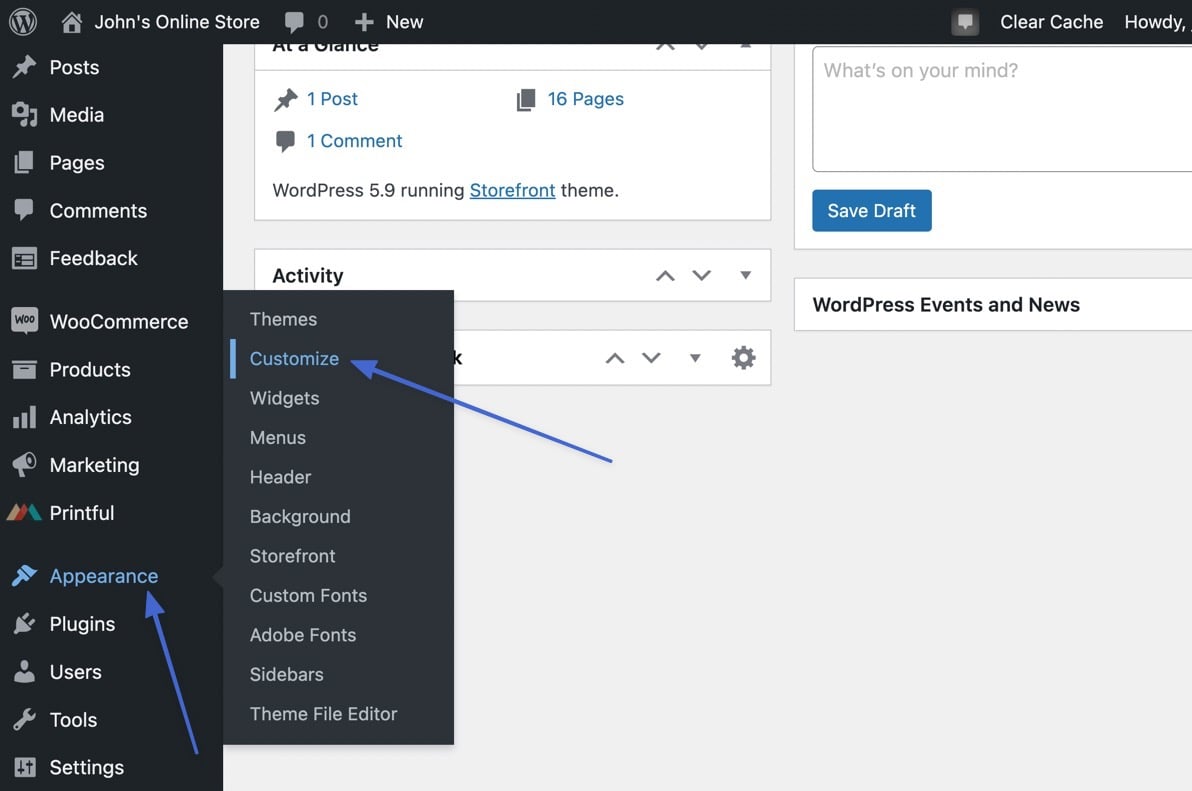
This reveals the WordPress Customizer with a visual preview of your site and several tabs for adjusting just about every part of the site.
Click the Site Identity option.
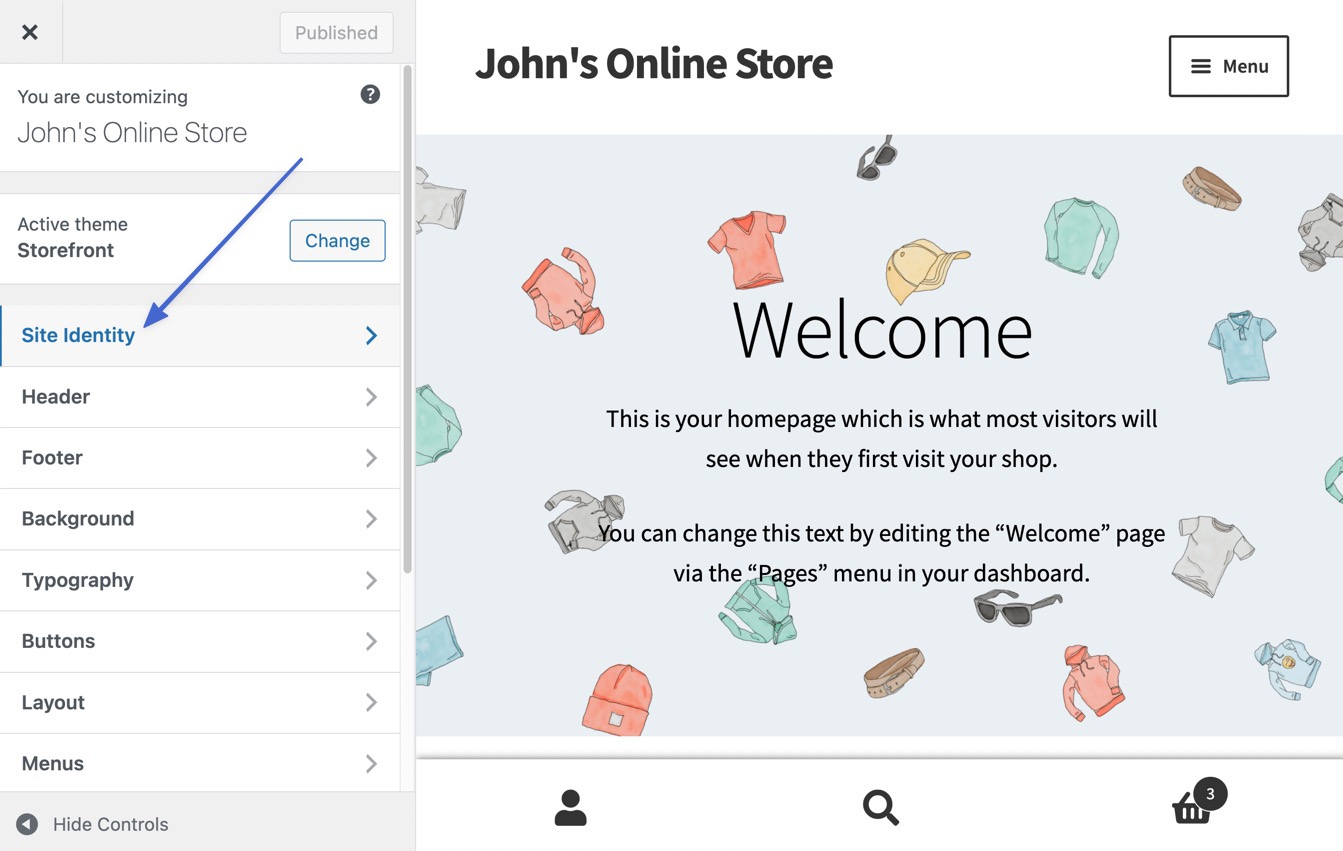
The Site Identity section shows fields for the Site Title and Tagline. To change the WordPress site title, simply adjust what you see in the Site Title field. If your theme displays the site title (and it hasn’t been replaced by a logo), you’ll see the changes take place in the visual preview.
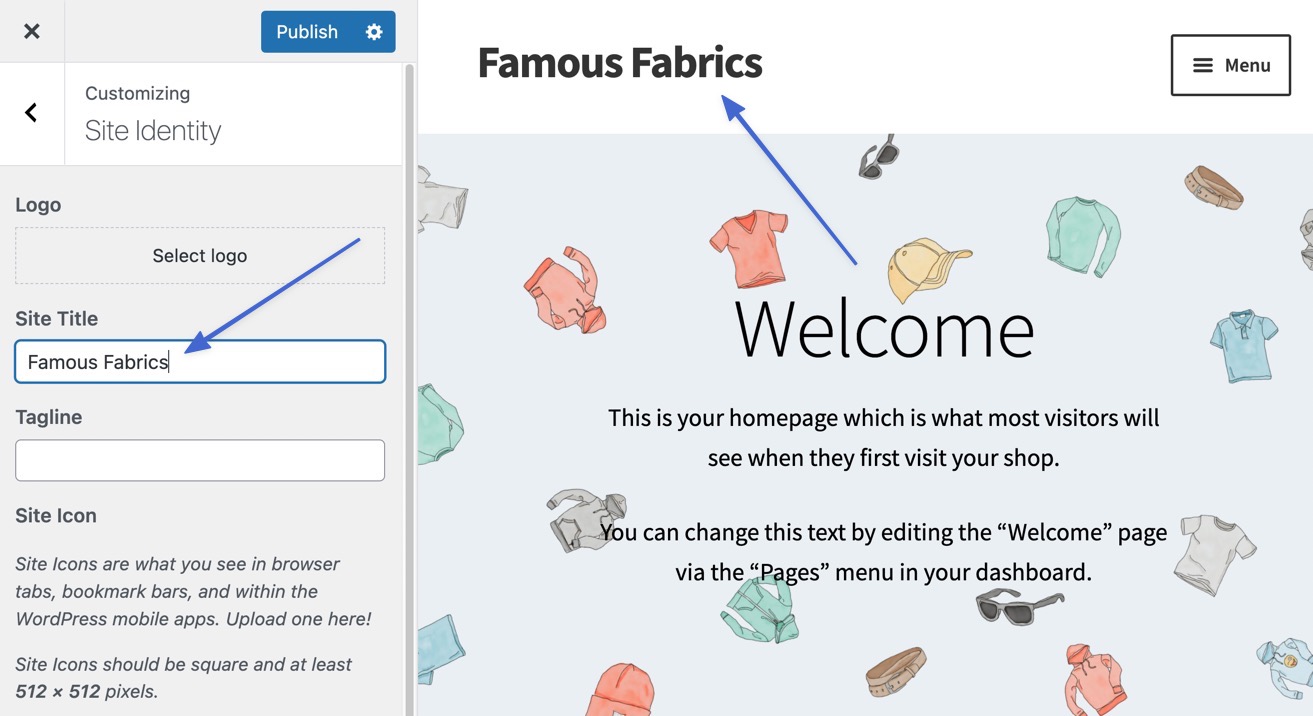
To make the change permanent, click the Publish button.
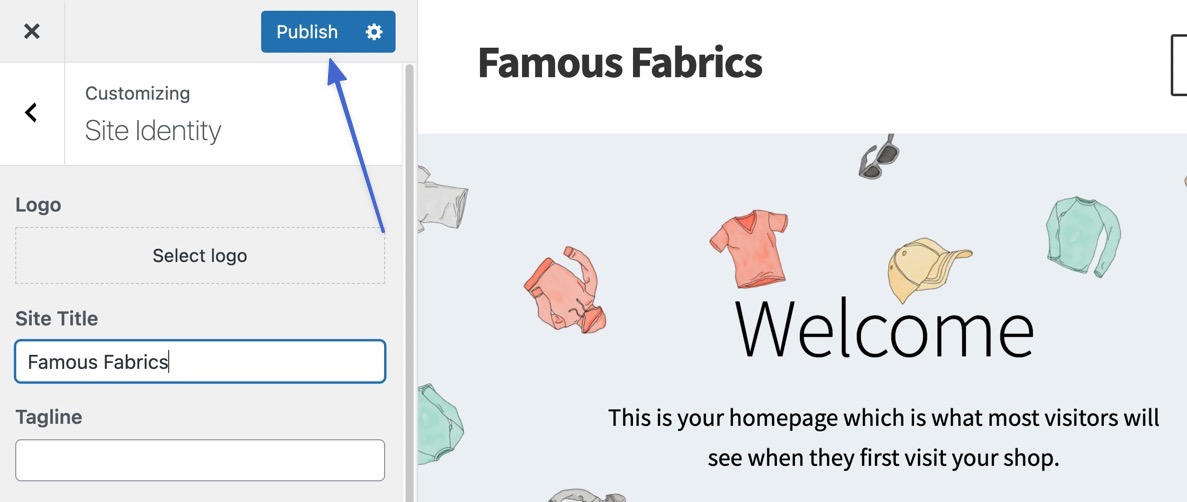
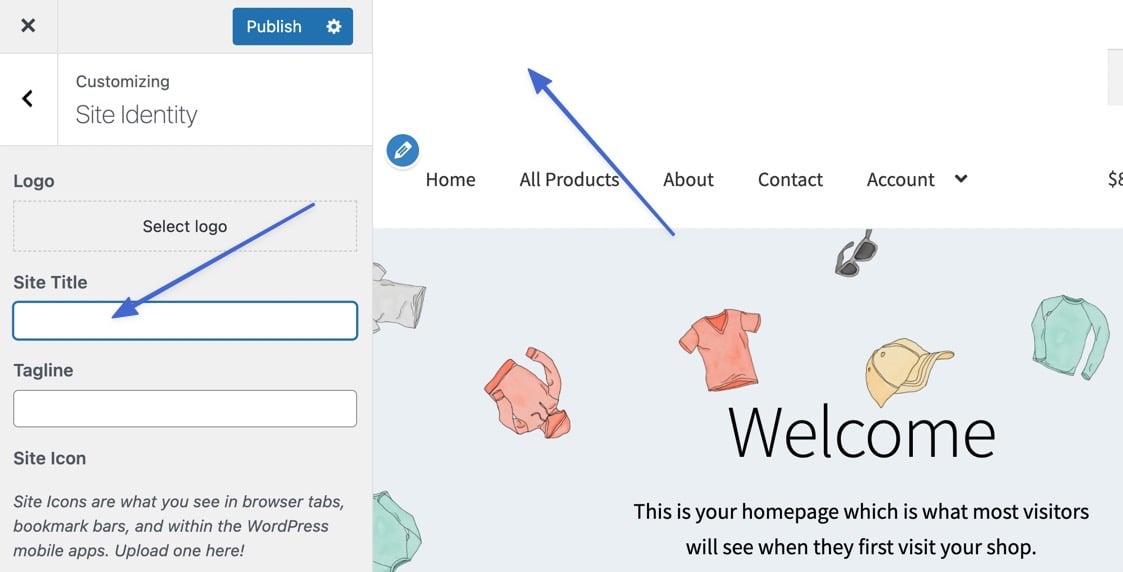
Keep in mind that you can also completely remove the WordPress site title by deleting everything in the Site Title field. A blank Site Title field is necessary for some advanced header customizations, or if you’re having trouble removing the title when uploading a logo for your theme.
Method 2: Change WordPress site title through the WordPress general settings
There’s also a General Settings section inside the WordPress dashboard, and this allows you to change or remove the site titles as well.
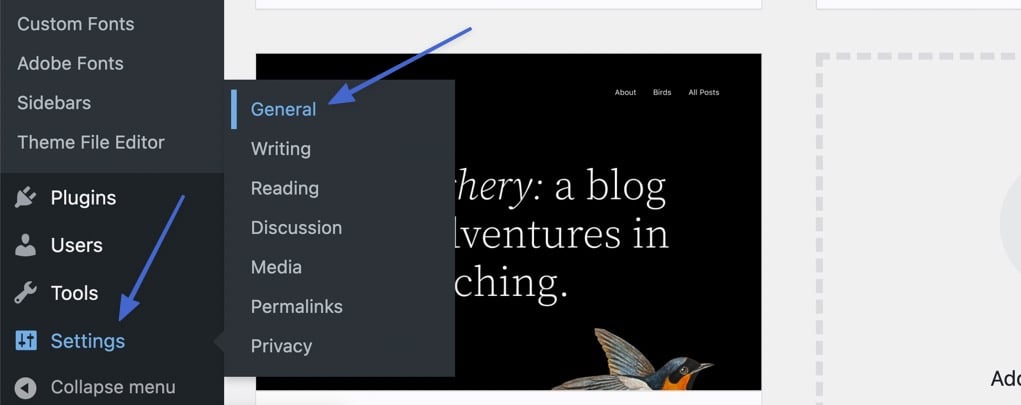
To make your way there, go to Settings → General.
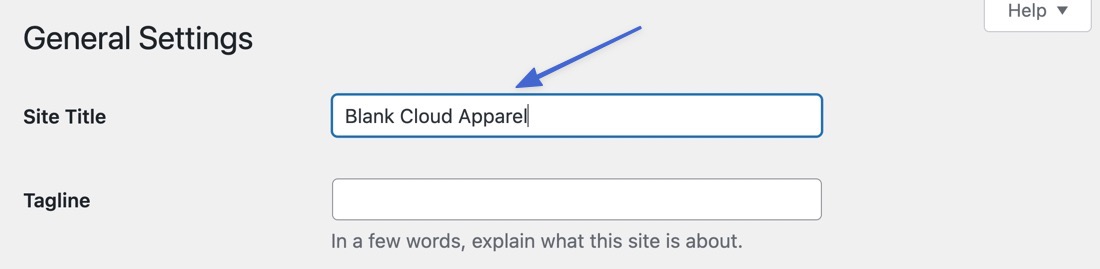
The first fields below the General Settings headline are for Site Title and Tagline.
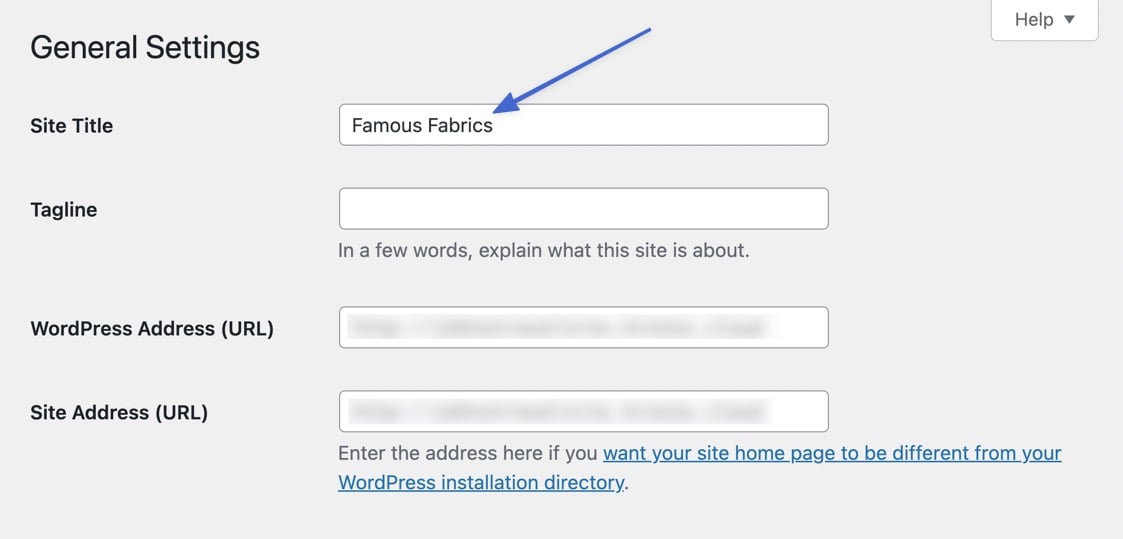
Simply modify what’s in the Site Title field or remove it if you don’t want it at all.
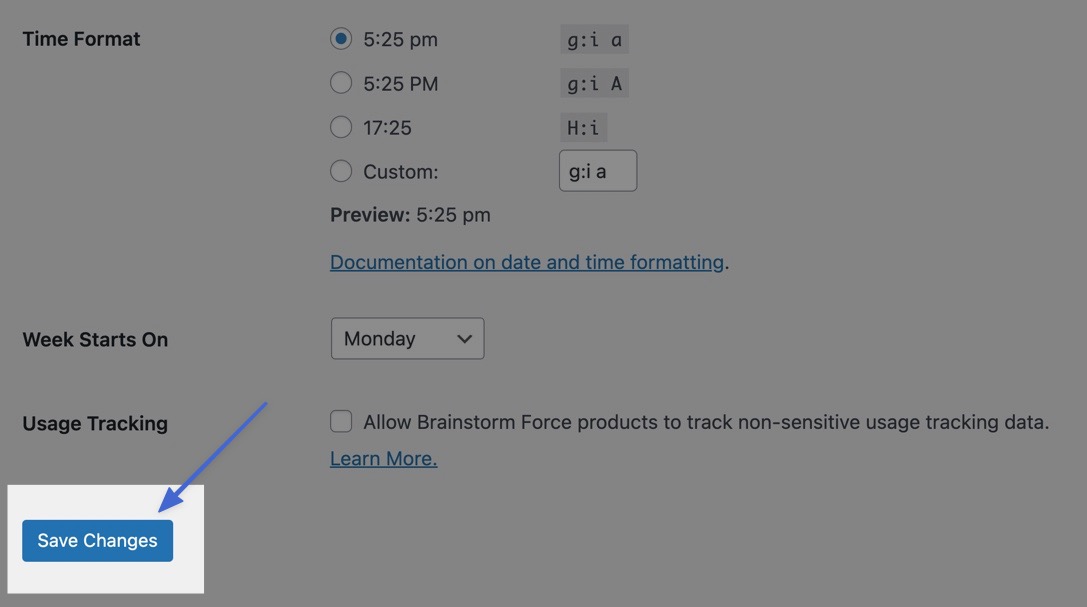
Make sure you scroll to the bottom of the page to click the Save Changes button.
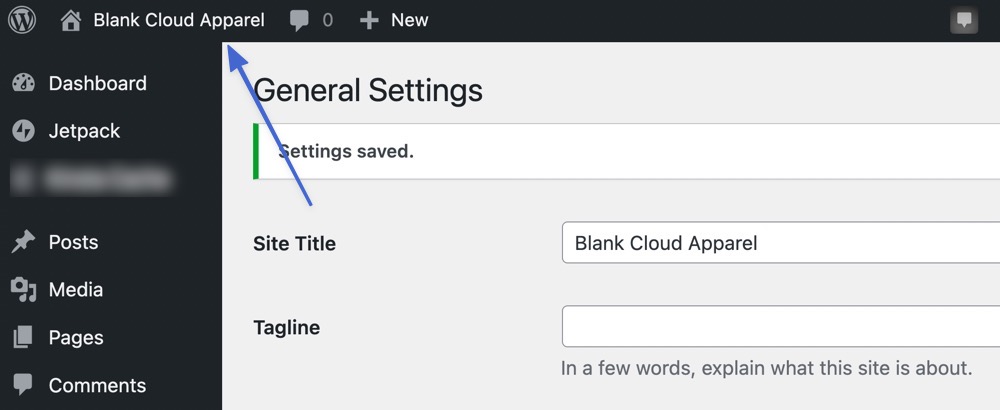
A new site title appears in several areas of your website (most notably the frontend header), but it’s also worth mentioning that the backend WordPress dashboard shows the new title as well. This comes in handy if you’d like to confirm that the change took place.
Method 3: Use a Plugin to change the site title in search results
WordPress auto-generates a search engine title and description tag based on your general settings, but it’s possible to modify how your site title appears in search engines.
Although this method doesn’t technically change the WordPress site title, it ensures that search engines display it properly. You can also make the site title for search engines something entirely different from what you have as your WordPress site title.
This is all done using a plugin called Yoast SEO. Start by installing and activating the plugin on your WordPress site.
Current Version: 20.12
Last Updated: July 25, 2023
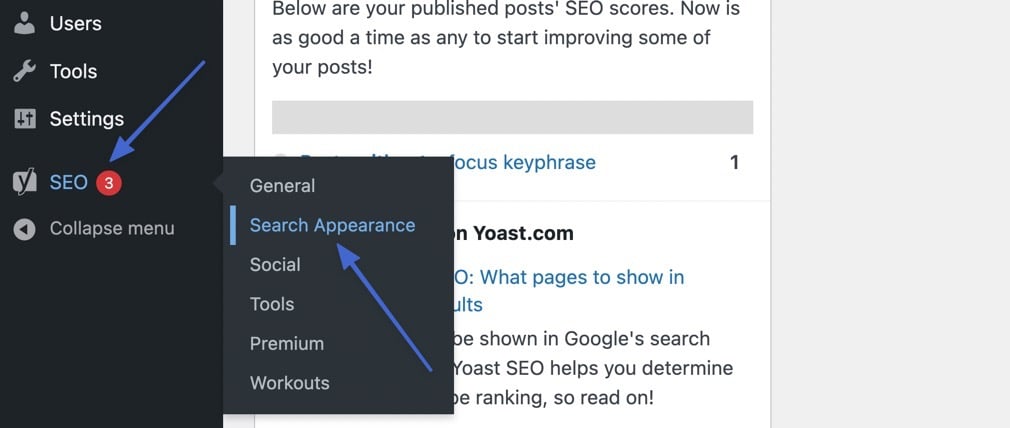
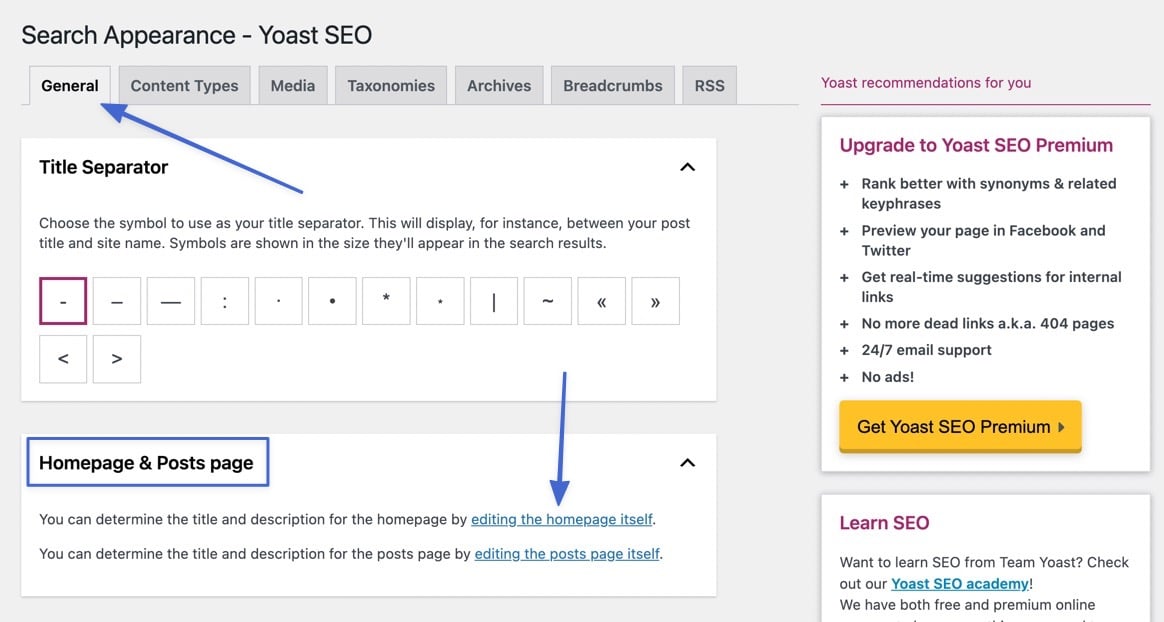
Once activated, Yoast SEO displays a new tab inside the WordPress dashboard called SEO. Go to SEO → Search Appearance to control how search engines show your site title.
In the General tab, scroll to the Homepage & Posts Page section. Click the link for “Editing The Homepage Itself.”
That sends you to the WordPress editor for your homepage. Go to the bottom of the editor to locate the Yoast SEO module. Here, Yoast displays a Google Preview, or a visual of what users see when your site comes up on the search engine.
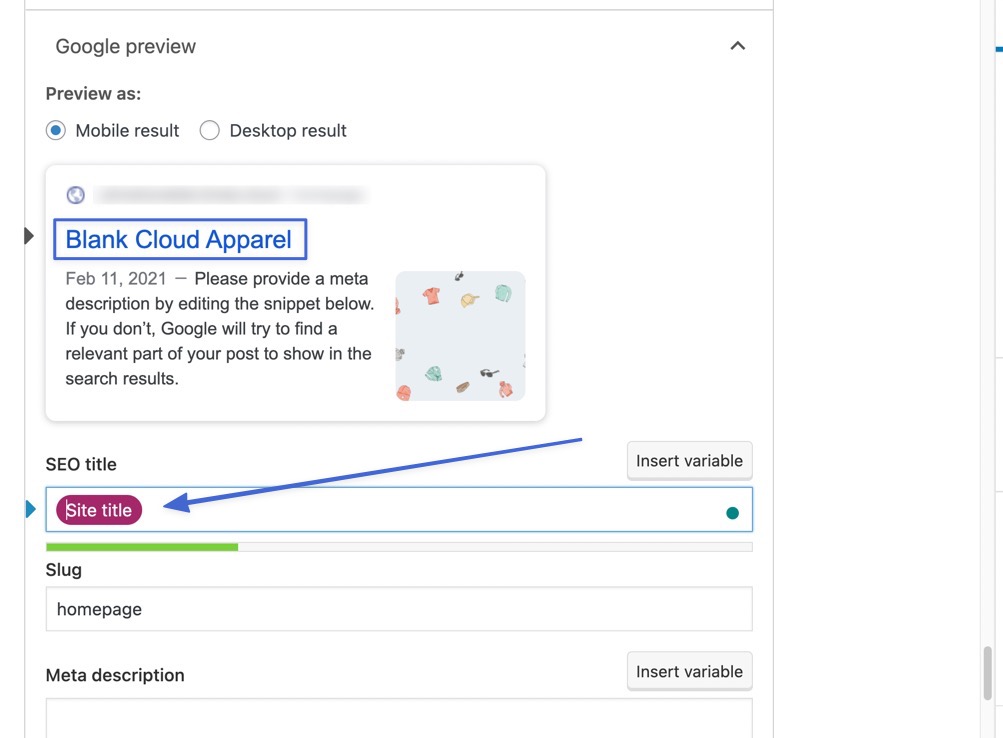
The SEO Title field controls what’s shown as the main title in search engines. As you can see, my test website has some extra elements that may not look that great for the user and might hurt SEO efforts. For instance, there’s not really any reason to say “Homepage” in the search result. Therefore, we can go to the SEO Title field to remove all variables except the Site Title one.
Feel free to customize this field however you want. For example, you may want to show your tagline after the site title, or maybe you’d like a brief description of what you sell.
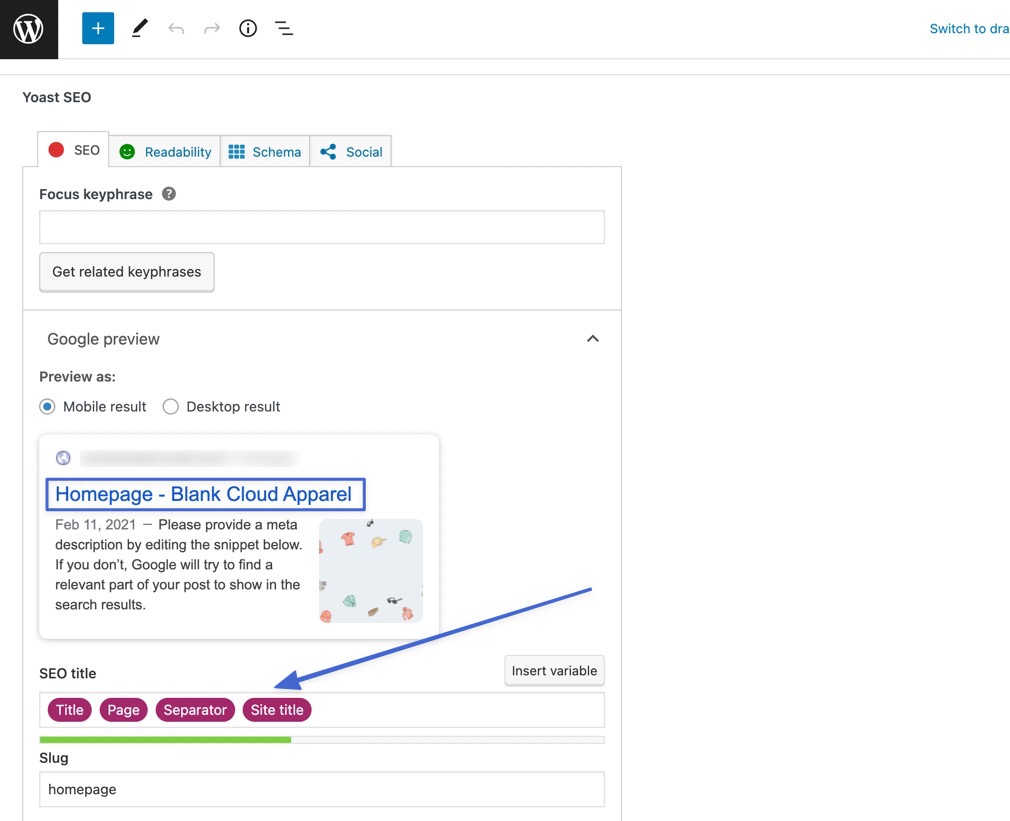
(The Title variable is referring to the page title, not the site title.)
As mentioned, we removed all variable except for the Site Title. Now, that’s the only element shown for search engines and everyone searching for the website online.
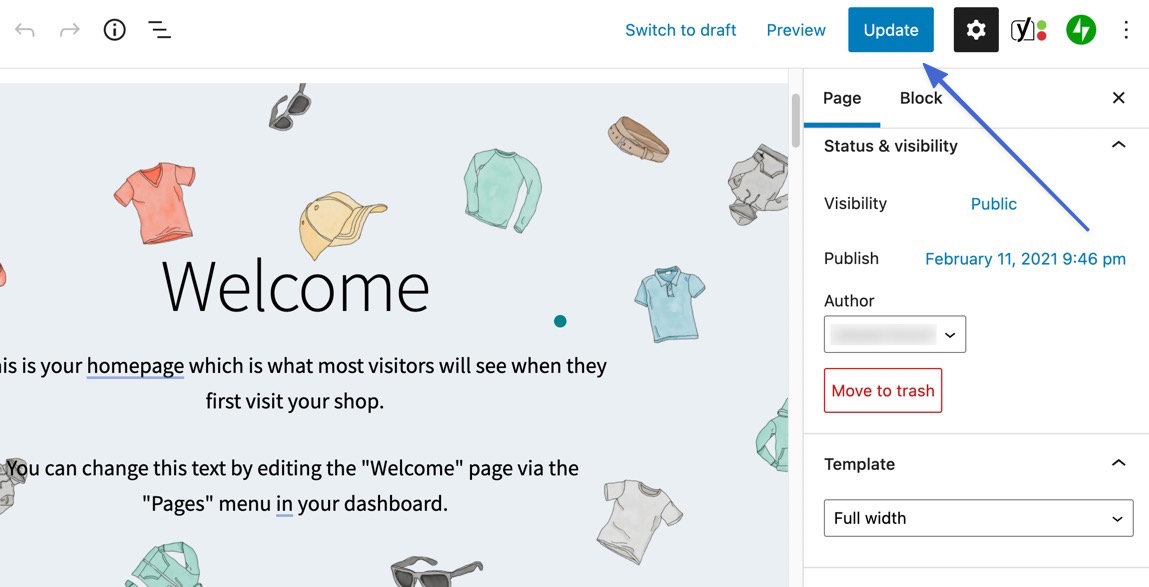
As your last step, make sure to click the Update or Publish button to ensure these changes take place.
Method 4: Change the WordPress site title by editing the database
Although not the easiest method, everyone should know that the WordPress site title is actually stored inside your site database.
Most hosting companies use the phpMyAdmin database administration tool to gain access to your database. In order to enter phpMyAdmin, log into your hosting account and search for a button, link, or icon that says “phpMyAdmin”. You can also ask your hosting provider for help on this.
Once inside phpMyAdmin, click on the primary database used for your website. It’s most likely named after your original site title. Click wp_options underneath that database directory.
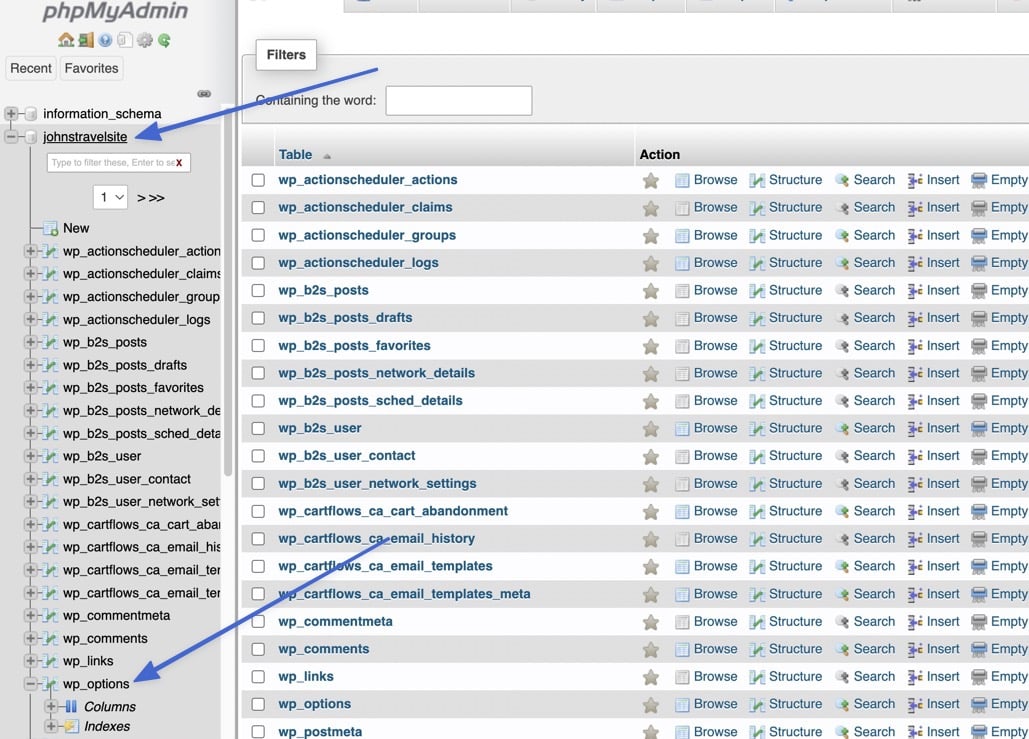
The wp_options file contains data for your site URL, home, blog name, blog description, and much more.
Under the option_name column, look for blogname. Click the Edit button for that one.
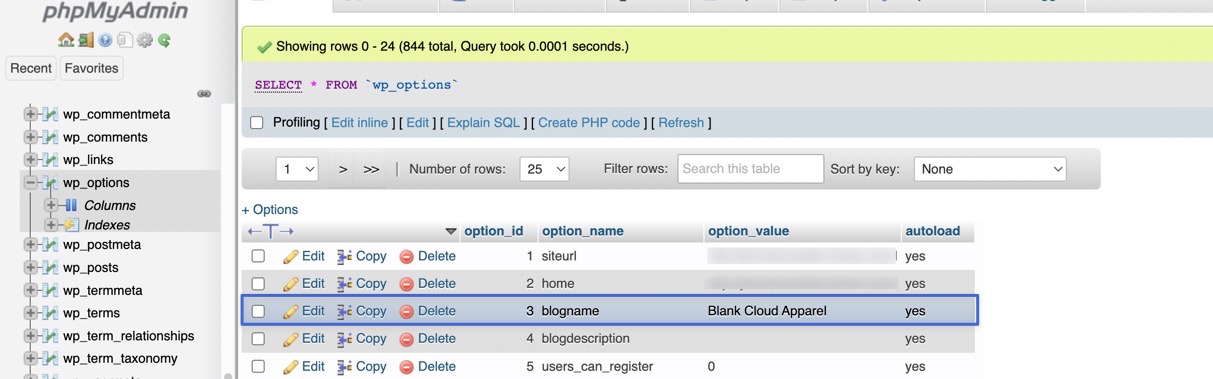
The option_name is called blogname, but you’re more interested in the option_value, seeing as how that’s the field you’ll use to change the WordPress site title. If you already have a site title, you should see it in the Value field. Feel free to change what’s in the field or leave it blank (depending on what you’re trying to achieve).
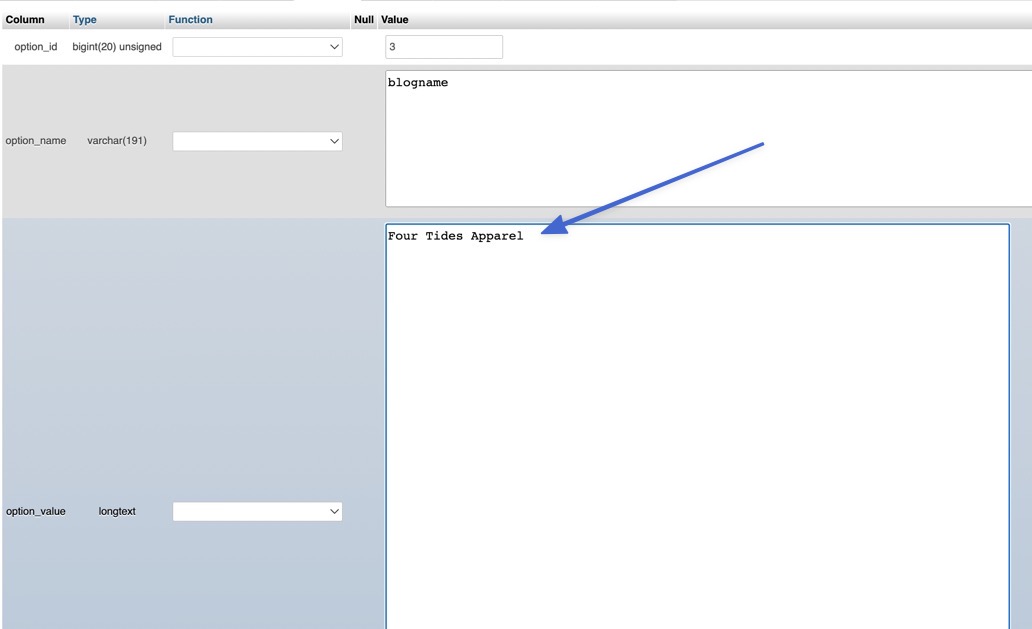
Make sure the left-side drop-down menu is set to Save at the bottom of phpMyAdmin. Click the right-side Go button to save this change to your WordPress database.

The option_value for blogname has now changed.
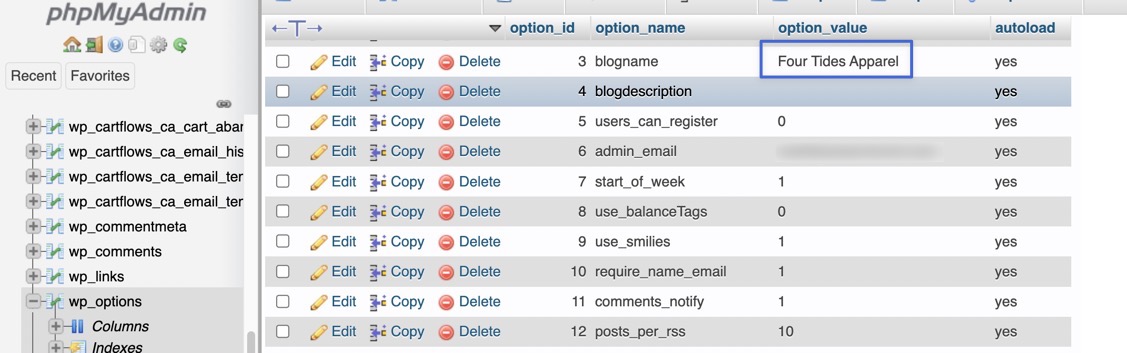
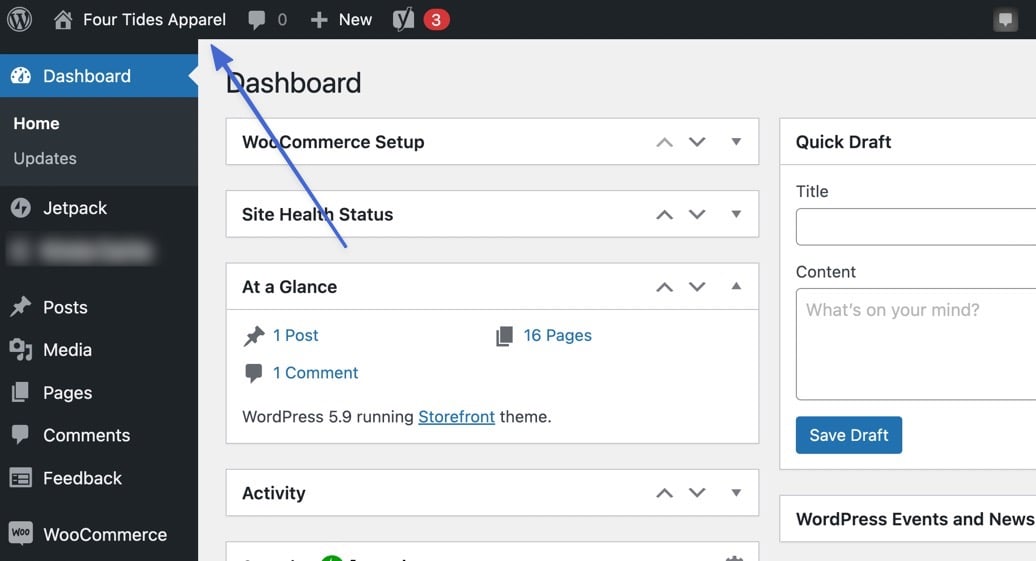
As always, you can check if the site title change worked by looking at the frontend or backend of your WordPress site. For example, the WordPress dashboard shows the site title in the upper left corner.
Bonus method: Use page builders and/or themes
Some themes and page builders add their own unique backend sections to change the WordPress site title. So, we recommend checking your theme and page builder settings to see if there’s a method you find more preferable for adjusting the site title.
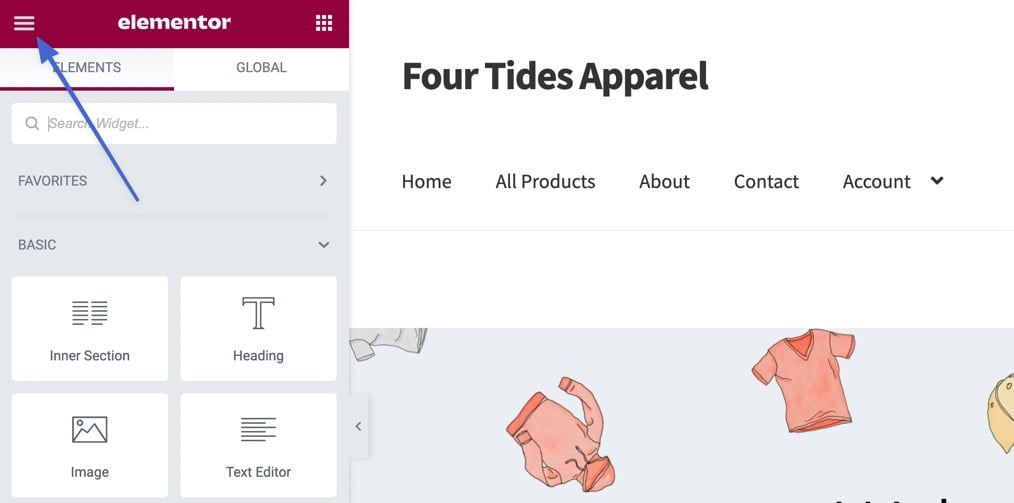
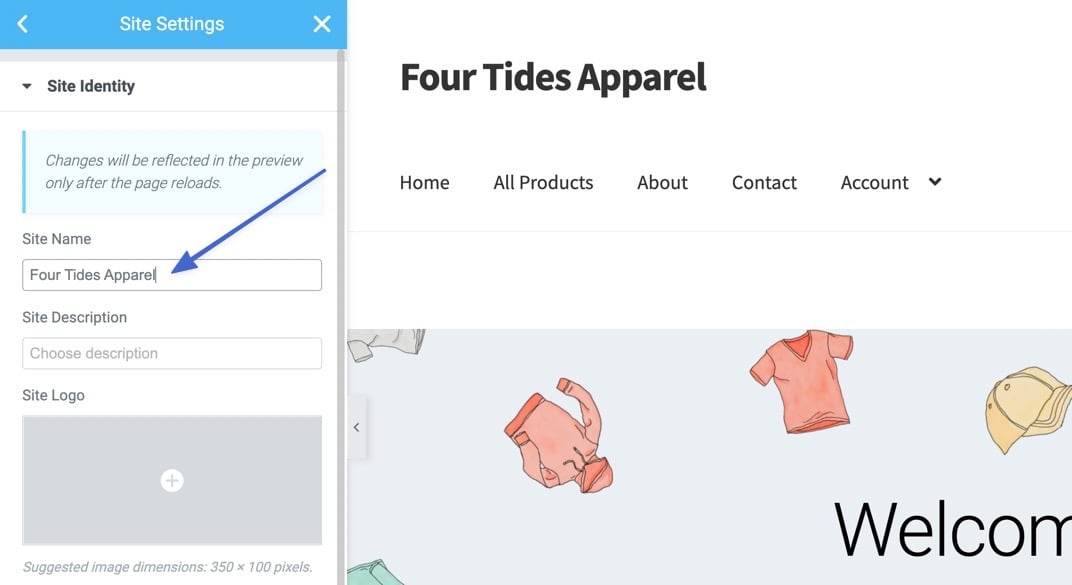
To give you an example, the Elementor page builder lets you change the WordPress site title whenever you’re in the visual page builder (regardless of which page you’re editing).
It’s done by going to the hamburger button (three stacked lines).
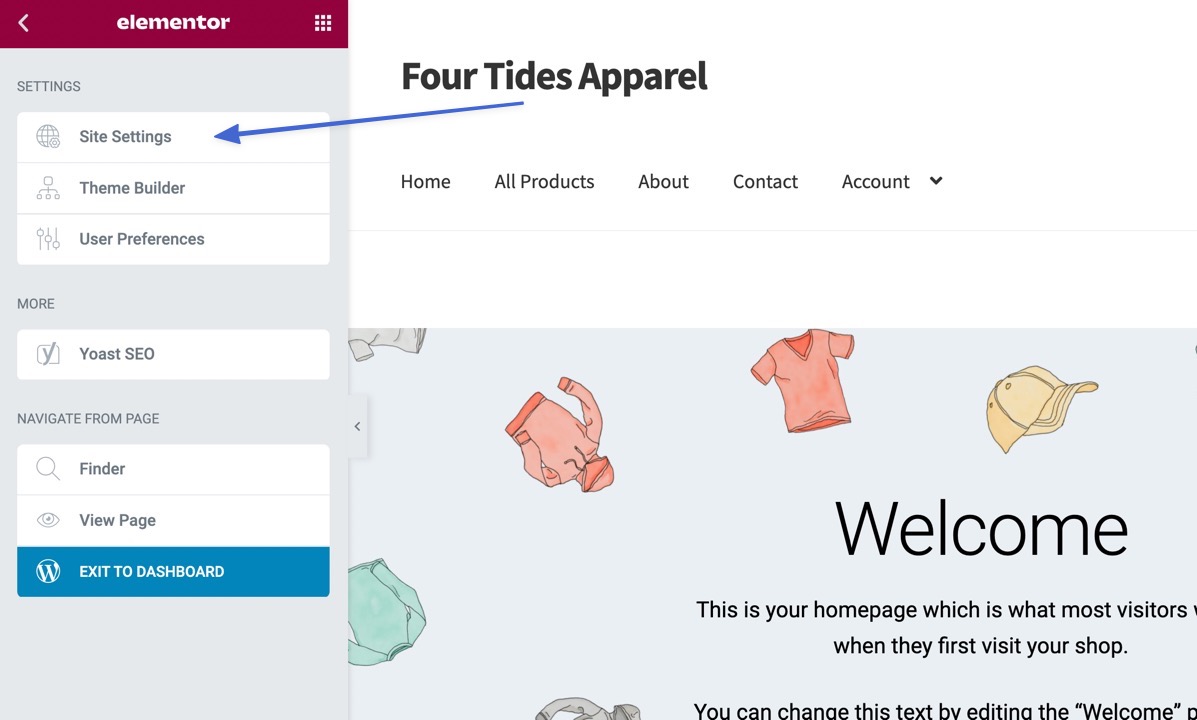
Then go to Site Settings.
And click on Site Identity.
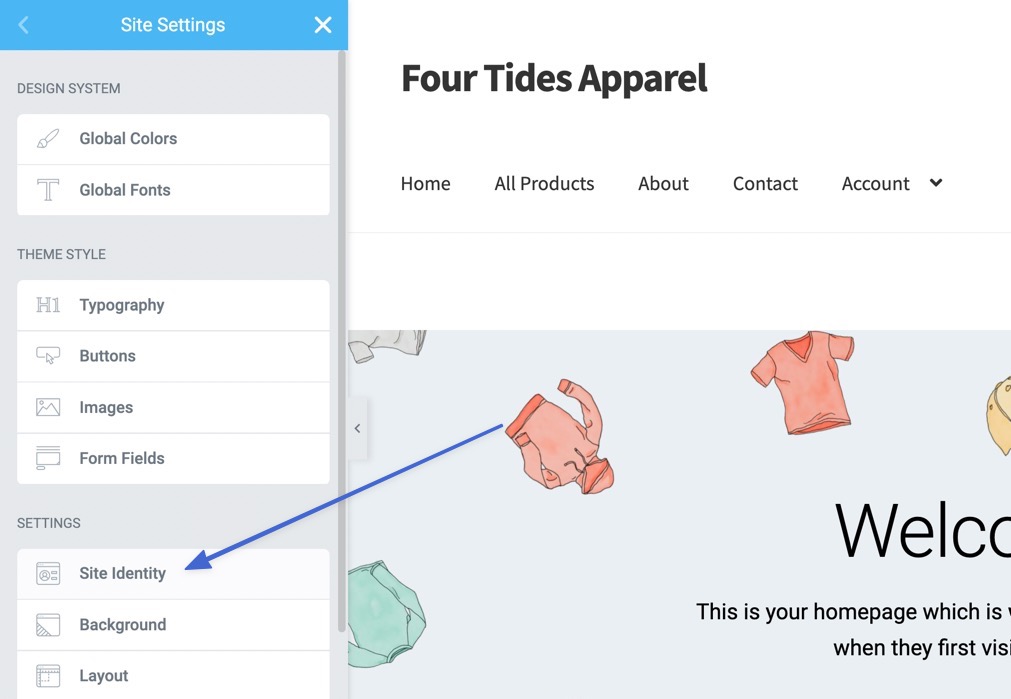
The Site Identity section provides a field to change the Site Name.
Summary
���� Learning how to change the WordPress site title allows you to:
- Optimize for search engines
- Potentially change a site title that’s no longer relevant
- Adjust the site title display or completely remove it to make way for a logo or a blank header
�� If you currently use a page builder like Elementor, Beaver Builder, or Divi, you may have some built-in settings to adjust the site title text or swap it out for a logo. Otherwise, the best methods to change the WordPress title include:
- Using the WordPress Customizer
- Going through the WordPress settings panel
- Using a plugin to change the site title for the search engines
- Adjusting the title in your site database
If you have any further questions about how to change WordPress site title with these methods, let us know in the comments!
Как изменить title в WordPress?
Это популярнейший плагин, который появился еще в 2007 году. Что может это расширение?
— поддерживает Google Analytics;
— поддерживает карты сайта;
— оптимизирует заголовки для поисковой системы Google;
— следит за дублированием контента;
— поддерживает SEO для публикаций;
— в автоматическом режиме может генерировать мета теги и многое другое.
Смена title WordPress вручную
Итак, вы уже в панели управления WordPress. Перейдите во Внешний вид — Редактор темы.

В правом боковом меню найдите файл title.php и кликните по нему. В окне редактора вы увидите код, который отвечает за работу заголовков на сайте.
В этом файле необходимо найти следующую строчку кода:
Вместо Blog можно вставить любое название. Например, News.
Не забываем после всех изменений обновить файл.
Далее откройте свой WordPress сайт и обновите его страницу. Теперь на ней будет отображаться введенный вами в файле title.php заголовок. Теперь вы знаете, где находится title в WordPress.
Встречаются случаи, когда заголовок может задаваться названием страницы. Для этого необходимо перейти в Страницы — Все страницы.
В списке страниц выберите нужную вам страницу и введите заголовок в поле «Заголовок». Теперь осталось только обновить страницу и посмотреть на результат. Эти действия касаются заголовков, например, на странице блога или любой другой странице.
Редактирование title в виджетах WordPress
Теперь рассмотрим случай, когда необходимо отредактировать title в виджетах, которые добавлены в админку WordPress. Дело в том, что многие из них не позволяют выводить без заголовка информацию в блоках. Также большой процент подобных виджетов не имеет функционала для смены такого заголовка. Однако такая ситуация вполне поправима. Для этого нужно немного разбираться в CSS. Если навыков в этом никаких нет, сейчас мы постараемся подробно описать все действия.
Итак, отправляемся в админку WordPress во Внешний вид — Редактор темы.
Справа в боковом меню находим файл functions.php, в котором и будем вводить все необходимые изменения. Кликаем по нему и в зависимости от ваших задач используем ниже приведенные кусочки кода в открывшемся поле.
Чтобы изменить непосредственно заголовок виджета:
function change_widget_title($title, $instance, $wid)<
return $title = str_replace(‘Мета’, ‘Управление’, $title);
add_filter(‘widget_title’, ‘change_widget_title’, 10, 3);
Если сохранить такие изменения, виджет Мета изменится на Управление.
Чтобы совсем удалить заголовок виджета:
function change_widget_title($title, $instance, $wid)<
return $title = str_replace(‘Мета’, », $title);
add_filter(‘widget_title’, ‘change_widget_title’, 10, 3);
Заголовок виджета больше не будет выводиться совсем.
Чтобы придать заголовку виджета другого стиля:
function change_widget_title($title, $instance, $wid)<
return $title = str_replace(‘Мета’,
add_filter(‘widget_title’, ‘change_widget_title’, 10, 3);
Этот кусочек кода позволит изменить сам виджет с Мета на Управление. Текст виджета станет красным, его можно заменить на необходимый вам, просто в коде прописав его вместо red.
Все способы эффективны, однако если опыта у вас в настройке сайта и его тайтла не так много, мы все же рекомендуем воспользоваться плагином, который был упомянут в начале статьи. Нужные значения достаточно просто ввести в настройках этого плагина и дальше он все сделает самостоятельно. Вам не нужно будет искать, куда вставить отдельные кусочки кода, чтобы достичь желаемого результата. Все просто и эффективно. Установить это расширение прямо из админки очень просто: Плагины — Добавить новый. В после поиска вводим название плагина и устанавливаем его в свою панель управления. Не забудьте перед работой активировать его на специальной странице, где отображается список установленных в админке плагинов.
Site Title Block
Use the Site Title block to display the name of the site on the page or to edit the site name.
Note: Updating this block and saving the template will apply the changes wherever the Site Title name is used including the browser title bar, search results and the Site Title text field in Settings > General.
To add a Site Title block, click the Block Inserter icon when editing the page template. Search for the Site Title block. Click on it to add the block to your page template.
Video showing how to add the Site Title block
The Site Title block is primarily used when editing the Template files in the Site Editor.
You can also type /site-title and hit enter in a new paragraph block to add the Site Title block quickly.

How to add Site Title block quickly
Block Toolbar
To view the block toolbar, click on the block and the toolbar will be displayed.
Every block comes with unique toolbar icons. These block-specific controls allow you to manipulate the block right in the editor.
The Site Title block shows six buttons in the block toolbar:
- Transform to
- Drag icon
- Move arrows
- Change heading level
- Change text alignment
- More options
Transform to:

Transform options for Site Title Block
Click on the “Transform” button to convert the Site Title block into a “Group” block, “Columns” block or “Site Logo” block.
Drag icon:

Drag icon in the Site Title Block
To drag and drop the block to a new location on the page template, click and hold the rectangle of dots, then drag to the new location. The blue separator line indicates where the block will be placed. Release the left mouse button when you find the new location to place the block.
Move arrows:

Move arrows in the Site Title Block
The left and right arrow icons can be used to move the block left or right inside the group of nested blocks.
Change heading level
 Change heading level for the Site Title Block
You can choose the heading level for the Site title from H1-H6 or to a paragraph.
Change text alignment:

Change text alignment for the Site Title Block
Click the “Change alignment” button in the Block toolbar to display the alignment drop-down. You can align the block text to the left, make it center-aligned or align it to the right.
More options
These controls give you the option to copy, duplicate, and edit your block as HTML.
Block Settings
In addition to the block toolbar, every block has specific options in the editor sidebar.
If you do not see the sidebar, click the ‘cog’ icon next to the Save button.

How to turn on the Block Settings sidebar Block Settings in the Site Title Block
Link Settings
Turn on ‘Make title link to home’ button in the Link Settings to make the site title, a link to the site’s homepage.
Turn on ‘Open in new tab’ button to make the site title’s link to the home page open in a new tab.

Site Title Block Link settings
Color
Text and background colors can be set on a per-block basis, allowing you to call attention to important content. Pick a color from the suggestions, or add a custom color using the color picker or by adding a color code.

Color Settings in the Site Title Block
Typography
Typography settings allow you to change a block’s font size, appearance, line height, letter casing, and spacing.
Dimensions
Dimension controls are used to control how groups of blocks are placed alongside one another, by changing the values for padding, and margin.

Dimension settings in the Site Title block
Advanced
The “Advanced” tab lets you add CSS class(es) to your block. This will allow you to write custom CSS and styles to the block.
Advanced option in the selected Block
Changelog
- Created 2022-04-04
Was this article helpful? How could it be improved? Cancel reply
Log in to submit feedback. If you need support with something that wasn't covered by this article, please post your question in the support forums.
How to change site title and tagline in WordPress? (UPDATE 2021)

Let’s settle this topic once and forever: site title and tagline are not the same thing.
Let’s take them one by one.
Site title: is the name of your site. It’s how your brand gets identified. Now, each page from your site will have its own title. Don’t confuse it with the “site title”, which is the “title of all titles” :).
Site tagline: represents a short description of your entire website. It resembles a statement or a slogan.

Why are titles and the tagline important on a website?
There are 3 main reasons here:
- They increase the relevancy of the website content to users. Visitors can easily understand what the website or a particular page is about.
- They reinforce the power of the brand. Together with other elements on the website, the title and tagline can give the force of expression and define the personality of the brand.
- They increase relevancy for search engine bots. Depending on the quality of the title and tagline (e.g. inclusion of a keyword might be a sign of quality), search engines might decide to rank the website higher in search engine results pages. Also, a good tagline increases the click-through rate (clicks for opening the website link) in search engine results.
WordPress title tags and taglines
As mentioned earlier, the title represents the name of your site/blog/online shop.
Now, let’s take Colibri’s blog as an example. I’m going to right-click on the page, then choose View Page Source. Let’s now hit CTRL F and look for “title”:

<title> is an HTML title tag, which we can also call the SEO title. The title above is the one that shows up in organic results when looking for “Colibri blog” or related terms. The SEO title is followed by the page URL and a meta description.

All your website pages and blog posts should have relevant title tags. There’s one difference though. In the case of your website’s homepage, the HTML title tag encompasses both the title and the tagline. The rest of the pages will not contain a tagline.
The site title and tagline also show up in the tab where you open the site.

Now, let’s see how to make changes to your WordPress title and tagline.
Methods to change the site title and tagline in WordPress
Method 1: from the WordPress Admin Dashboard
Log in to the WordPress Admin Dashboard with the username and password you set for the new website.
In the left-hand menu, go to Settings -> General Settings.

In the dashboard area, Site Title and Tagline are the first sections you have to customize:

The site title should represent your brand. The tagline should reflect what you do and set up expectations for your website’s visitors. Further down the article, we’ll show you how to make sure the title and tagline are catchy enough to keep your readers hooked.
Method 2: from the theme Customizer
In the WordPress Admin Dashboard, go to Appearance in the left-hand menu. Next, go to Customize.
Access the Customizer of the theme you installed for the new website. 


Go to General Settings -> Site Identity. From this subsection, you can customize the site title and tagline.
Fill in the blank spaces with the site title and tagline of your own.
One note: you might be as creative as you like, in composing your title and tagline. The more you go creative in crafting these short phrases, the likelier it will be you’ll attract visitors to read more and discover more of your website. This means relevant traffic to the website.
Here are some examples of creative taglines used by companies in different industry areas.
WordPress page titles
Remember when I mentioned above that only the homepage has a tagline? The rest of the pages and posts on your site have just a title. This title should be relevant to the topic on the page. Some of these titles might include the brand in the title, some of them, not.
Now, the moment you create a new WordPress blog post, you will have to give it a name. That name is your title but it can differ from your SEO title. If you use a plugin such as Yoast SEO, you can assign an SEO title, that will show up in the organic search results. Why would you have a separate SEO title? Because you might consider making it more SEO-friendly than the actual title.

How can you write catchy taglines and page titles in WordPress?
Use keywords when you change the site title in WordPress.
It’s important to integrate relevant keywords in the site title and tagline. This is the place you should benefit from using the main keyword representative of the whole website. Use the keyword once, and add context to it, accordingly.
Try to use semantically related keywords, so the main keyword should have more weight for search engines.
Avoid keyword stuffing when you change the site title in WordPress.
It’s useful to have the main keyword in the site title, however, don’t overuse keywords. Otherwise, too many keywords in the site title will be considered as spam. This might result in your website being penalized by Google.
The best way to avoid keyword stuffing is to make sure the site title has the coherence of a phrase. Instead of enumerating key expressions, you have to ensure this title is an explicit sentence that sets users’ expectations correctly, right off the bat.
Place the keywords at the beginning of your title.
It’s recommended that you place your main keyword at the beginning of the site title. This is a signal that your title focuses on the expression best defining your activity. Also, by its placement, the keyword will be the first element search engine bots crawl in the source code of your website.
So, think of formulating the phrase in such a way that it emphasizes the main keyword corresponding to the website pages.
Here is a study on how the presence of a keyword in title influences the website rankings:

When you change the site title, use an optimal length.
You should pay attention to the length of your title. If it’s too long, it will be “cut” by search engines and it won’t display properly in search engine results. As a result, this area won’t be fully used to transmit to visitors what’s important about your website. If it’s too short and only consists of an expression, it will not explain enough to visitors what the website is about.
According to SEO rules, the website title should not exceed 70 characters-length. This is the maximum you can extend the title to and ensure web surfers fully visualize it in search engine results pages.
Optimized website title: 
Differentiate between the title of your homepage and the titles of all the other pages.
If you really want to benefit from optimized titles, you should think of customizing them for every page in the website. So, make unique page titles for all pages in the website, and differentiate them from the main website title (that appears for the homepage).
In this way, every page will have its corresponding title. It’s a good place where you can use a keyword that sums up what that webpage is all about. Also, creating different titles for different pages, you avoid duplicate content that’s penalized by search engines.
Do I need to brand the site title?
It might be of use to include the brand name in the title. However, do it carefully and place (if possible) the brand name at the end of your phrase.
Also, Google might automatically add the company name at the end of the sentence which represents your title.
This branding element makes the title easy to be recognized as belonging to your website and company. It ensures your website is remembered by visitors, so they can easily come back to your pages.
Complete site identity customizations in website
Besides formulating a website title, you can also add other customizations that shape the website identity.
Among them, we can mention:
- Using a favicon
A favicon is an image representative for the website, that users will see in the browser tab where they open your website pages. It should be carefully chosen, and it has to be easy to associate with the specificities of your website/business. Due to a favicon, the website will be recognized quickly and remembered as simple as that.
- Using an image logo
For a more professional look of the website, you might consider including an image logo. Together with the site title, the company logo will speak volumes about your business and its value on the market.
- Using a certain color scheme for branding purposes
Together with a site title and a logo, a professional color scheme will help your website stand out from the crowd. All these elements should be tweaked and refined until they best represent your business and brand.