Tips to Get Started With WPBakery Page Builder for WordPress
WPBakery Page Builder is the most popular WordPress page builder that powers over 2 million sites worldwide and one of the best-selling plugins in 2018. This drag & drop frontend and backend editor, previously known as Visual Composer Page Builder, comes with a wide array of features that will help you create any layout you want with complete ease.
In this detailed WPBakery Page Builder article you will learn about:
- Benefits and functionalities of the WPBakery plugin
- WPBakery plugin installation
- How to activate WPBakery page builder
- WPBakery basic settings
- How to use WPbakery page builder for WordPress
- WPBakery Templates
Benefits and Functionalities of the WPBakery plugin
Besides the fact that it’s trusted by millions over the world, this plugin brings a wide scope of professional options. The great thing is that you can access Frontend editor or backend editor depending on your needs. This means you can choose your preferred view – either you can manage the elements with backend schematic editor or see your results live.
Great Responsiveness
If you want your website to look great on any device type or screen size, WPBakery will help you manage it easily. With it you will have full control over responsiveness. This basically means that this plugin comes with everything it takes to create a responsive website. WPBakery Page Builder Responsive Preview is available for fast and practical adjustments.
Shortcode Mapper
In a case you need to add 3rd party shortcodes to your website, and you can’t or don’t want to code, WPBakery Page Builder offers Shortcode Mapper. This is how you can edit params, values and descriptions effortlessly.
Works With Any Theme
Another amazing benefit of using this plugin is that it works with any WordPress theme. Unlike page builders made for specific themes, WPBakery Page Builder works perfectly with every theme type and every design type.
Custom Post Types Support
If you run a WordPress site you’re probably familiar with the fact that you can create custom post types. You can either do it manually or with a help of a plugin. The good thing about WPBakery Page builder is that it works with any post type, even with custom ones. Furthermore, you can control the look of every element including borders, margins, and background with just a few clicks. You can, as well, set the colors as you please.
Multi-Language and WooCommerce Support
You can’t imagine your business without a WooCommerce powered e-shop? No problem. First install WooCommerce plugin, and then manage options to fit your needs. All of the WooCommerce plugins are available in the WPBakery Page Builder Element Menu, so you can make the most of them. Also, WPBakery Page Builder is compatible with WPML plugin so you can run a website in any language you want.
Video and Parallax Background
Parallax effect is a great way to make your website content more playful and fun. So if you considering adding it to your stories, the good news is you can easily add parallax background to WPBakery Page Builder rows and columns. For the best result and captivating website look, combine video and parallax background to create more advanced layouts. Simple insert YouTube videos into row background and surprise website visitors with appealing effects.
WPBakery Plugin Installation
If you want to specifically use WPBakery Page Builder for WordPress, the first thing you need to do is to install it. Although the WPBakery plugin can’t be installed directly via the WordPress plugin directory, it can be easily done in just a few clicks.
Actually, this installation process works the same for all premium plugins that don’t build on the free plugin versions. In this case, after you purchase the desired premium plugin you will get a zip file with everything you need for a successful, stress-free installation. You don’t have to know anything about zip’s structure and its elements – all you have to do is to add it to your WordPress website. Follow these simple steps to install WordPress plugin with no effort.
Column Settings in WPBakery Page Builder
In this article we will talk about Column Settings in WPBakery Page Builder. We will give detailed information about the responsive options available in column settings. For more information about WPBakery Page Builder click here.
Column Settings
You can add columns for the Row and Page Section shortcodes in WPBakery Page Builder. The width of the columns can be set proportionally by small chunks adding up to 12 count. (to find out more about why 12 columns, please check this out) Each Column then has separate options available which you can use to fine tune different aspects of it. You will need to click on the Pencil icon for the specific column you want to change. The following is a detailed breakdown of each option for columns in WPBakery Page Builder.
General Tab
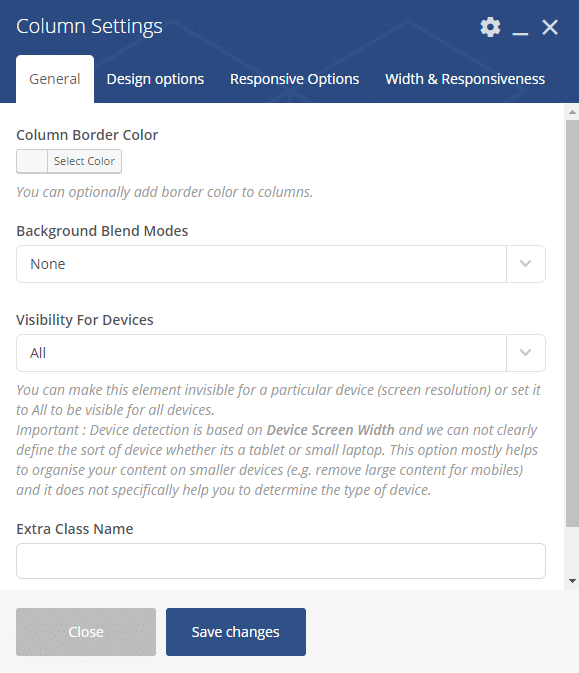
Use this option to set the color of the surrounding border for this particular column.
Use this option to set the blend mode you prefer for the background of this column. Available options are:
- None
- Multiply
- Screen
- Overlay
- Darken
- Lighten
- Soft Light
- Luminosity
Use this option to hide the column when viewed by devices with a certain width. Available options are:
- All
- Hidden on Phones (Screens smaller than 765px)
- Hidden on Tablets (Screens in the range of 768px and 1024px)
- Hidden on Mega Tablets (Screens in the range of 768px and 1280px)
- Hidden on Desktops (Screens wider than 1224px)
- Hidden on Mega Desktops (Screens wider than 1290px)
- Visible on Phones (Screens smaller than 765px)
- Visible on Tablets (Screens in the range of 768px and 1024px)
- Visible on Mega Tablets (Screens in the range of 768px and 1280px)
- Visible on Desktops (Screens wider than 1224px)
- Visible on Mega Desktops (Screens wider than 1290px)
If you wish to style a particular content element differently, then use this field to add a class name and then refer to it in Custom CSS settings inside Theme Options > Advanced > Custom CSS.
Design Options
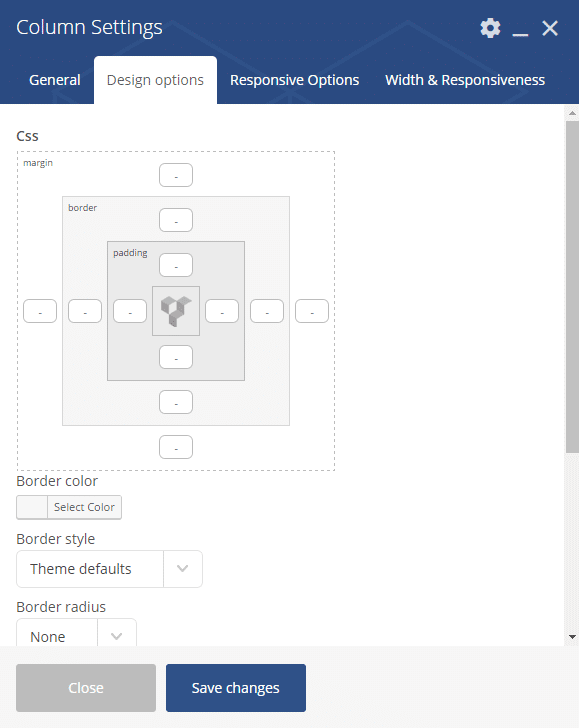
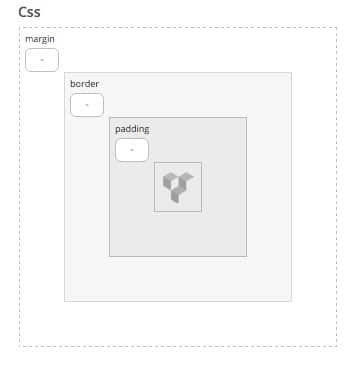
This option provides a graphical user tool to set the Margin, Padding and Border width for this particular column.
Use this option to set the border color for the column. The Column Border Color option in General Tab will override this option if set.
Use this option to set the border style of this column. Available options are:
- Theme Defaults
- Solid
- Dotted
- Dashed
- None
- Hidden
- Double
- Groove
- Ridge
- Inset
- Outset
- Initial
- Inherit
Use this option to set the border radius for this column. It will set the intensity of the curve which border corners will have. Available options are:
- None
- 1px
- 2px
- 3px
- 4px
- 5px
- 10px
- 15px
- 20px
- 25px
- 30px
- 35px
Use this option to set the background color and/or add a background image for the column. On this very same option you have a choice to select how you want the background image layout in the column. Available options are:
- Theme Defaults
- Cover
- Contain
- No Repeat
- Repeat
Enable the Simplify Controls option if you want to have same width for all 4 sides of the column regarding the Margin, Padding or Border. The option will change the CSS options graphical user interface to different mode.
Responsive Options

Use this option to set the default width for column in all browser window sizes. (to find out more about what are these columns, please check this out) This option will be the default option for the next series of options in the Width and Responsiveness tab. The option works proportionally and you can set fractures of the whole column width which contains 12 portions. Available options are:
- 1 column – 1/12
- 2 columns – 1/6
- 3 columns – 1/4
- 4 columns – 1/3
- 5 columns – 5/12
- 6 columns – 1/2
- 7 columns – 7/12
- 8 columns – 2/3
- 9 columns – 3/4
- 10 columns – 5/6
- 11 columns – 11/12
- 12 columns – 1/1
Width and Responsiveness
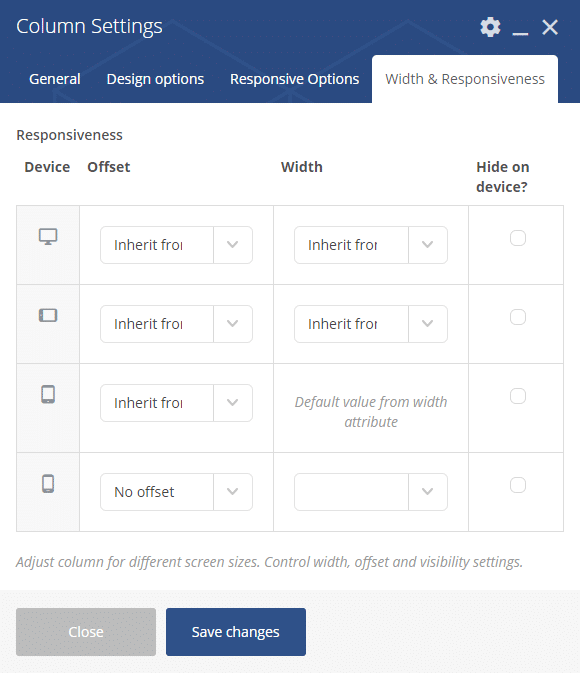
In this settings section you can adjust column for different screen sizes. You can control width, offset and visibility settings.
Device allows you to set different column behavior on different screen sizes:
- Desktop – for screen sizes bigger than 1280px.
- Tablet – Landscape – for screen sizes from 1280px to 1024px.
- Tablet – Portrait – for screen sizes from 1024px to 800px.
- Mobile – for screen sizes smaller than 800px.
- Offset – allows you to set the offset for the column. You may use columns to specify the offset value. It means the amount of space to the edge of the page.
- Width – allows you to set the different width for the column on different screen sizes to restructure the content properly.
- Hide on device? – tick it to hide the elements on certain screen sizes.
The options available on Offset and Width settings are like the ones available in the Width option in the Responsive Options Tab.
Preventing Columns from Stacking Up on Mobile
To illustrate the usage of the responsive options in column settings we discuss a case scenario in which you want to prevent columns from stacking up on mobile which is the default behavior of responsive themes including Jupiter and The Ken.
In this case we have two columns in the default positioning of the Row and we want to have the same two columns in mobile view. Follow the steps below:
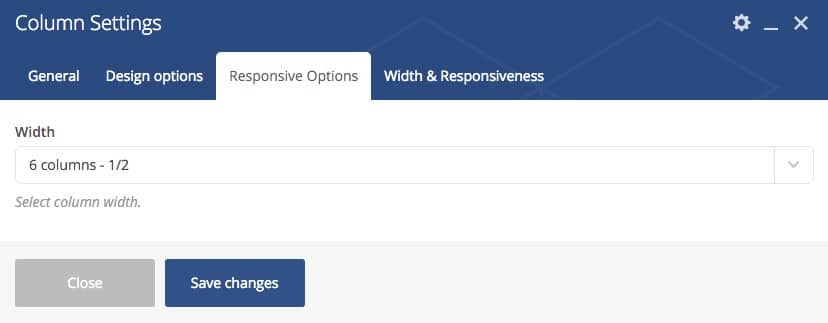
Click on the Pencil icon of each column and go to the Responsive Options tab and set the 6 Columns – 1/2 option. This will make the columns take up half of the row each.
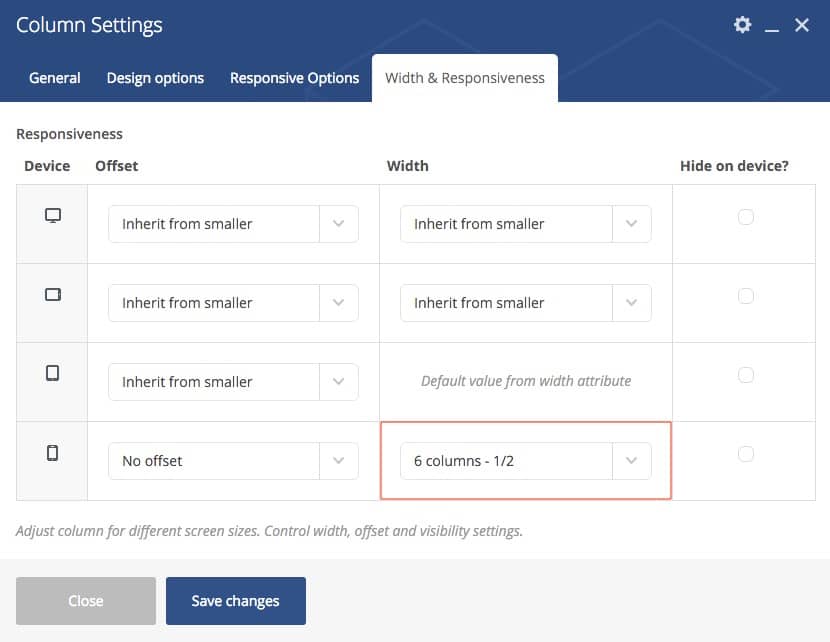
Switch to the Width and Responsiveness tab for each column and set the Width option for Mobile view to 6 Columns – 1/2. This will force the columns to take up half the width of the row and prevent the columns from stacking up.
If you have any questions, please contact our support team creating a ticket via your Artbees Dashboard.
How to Create WPBakery Custom Elements
WPBakery is one of the best plugins to build a web page in WordPress thanks to various useful features. These features grant you the chance to modify the frontend effectively. However, adding and creating WPBakery custom elements is not a task that many people are familiar with.
If you are on the same page with these users, fret not, we are here to help you out. This article will guide you on how to create WPBakery custom elements. These elements let you use customized code and build the website your way. Let’s go!
What Is an Element in WordPress?
In WordPress, an element is an abstraction layer on top of React. Its job is to underlie the third-party code or your customized code. The purpose is to maintain the interface and protect dependent code when there is a change or replacement in the underlying implementation.
An element allows developers to avoid potential risks by skipping unproven features. In addition, it facilitates the avoidance of version incompatibilities by requiring all plugins to run on the same code.
Benefits of Custom Elements
There are several benefits custom elements can bring to your website:
- They give you full control from designing to making elements functional.
- They allow you to build your own design and apply in the different projects.
- You can create add-ons with various elements and earn some money from selling them.
- You are able to incorporate WPBakery in your themes and add custom elements.
How to Create WPBakery Custom Element
Before jumping into creating WPBakery custom elements, keep in mind that this plugin will cost you a few bucks. You can not get this plugin in a conventional way by accessing WordPress plugin storehouse. Instead, you have to visit the WPBaker’s official website to download it.
In addition, WPBakery custom element is a shortcode. That’s why we must arm ourselves with some knowledge about WordPress shortcodes before processing any further steps.
What Is Shortcode in WordPress?
In general, shortcodes are small pieces of code, put inside square brackets that execute specific tasks on your webpage. Your page, article, or other materials will get a specialized feature when you insert it wherever you want. Gallery, video, and playlist embeds are all possible via the use of shortcodes.
In WordPress, shortcodes help you develop your page without underlying code knowledge.

In most cases, the function of a shortcode is immediately apparent. If you want to embed a video on your site, you can do so using the code [ video ]. By inserting the shortcode into a page/post, it will make changes to both your site’s frontend and backend instantly.
Where Should You Put the Code?
WPBakery Page Builder comes with a built-in feature named Shortcode Mapper. This function authorizes you to insert a 3rd-party shortcode to the element list for easy reuse. You can refer to our example of adding an external shortcode to password protect content sections with WPBakery.
If this method is not your choice, you can move all your code into functions.php file. This helps you place the code in the theme section. However, it can cause a lot of troubles and confusion.
For that reason, we recommend creating a new folder, naming it vc-components. Then you can create a file indicating the elements you are going to add.

Step-by-Step Guidance
#1 Generate WPBakery Custom Element
First, you need to create VcSodaBlockquote class, WPBakeryShortCode extend, and the structure of the element.
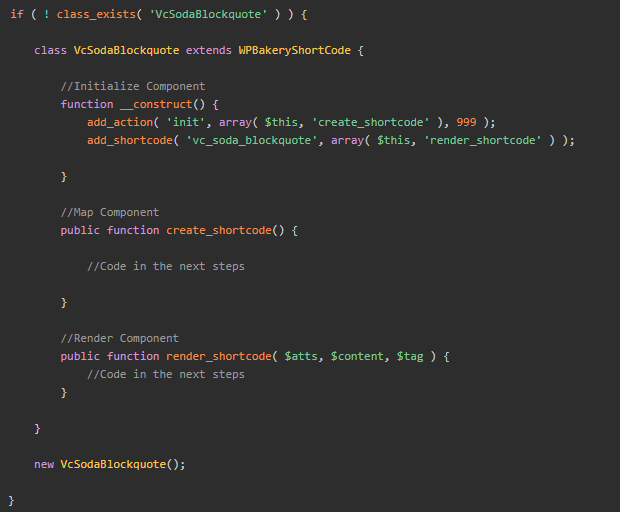
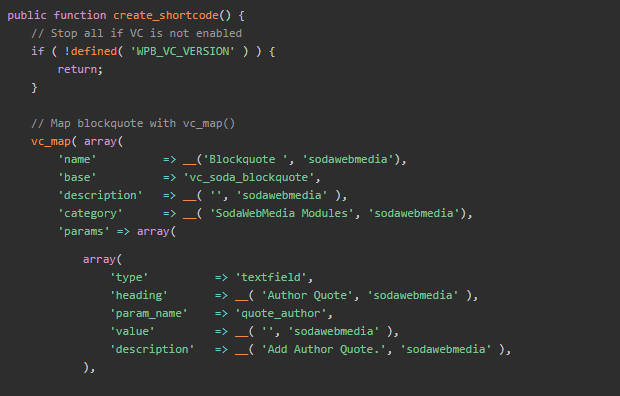
#2 Create Shortcode
With the help of vc_map, a WPBakery-provided function lets you add additional fields to your element. You can create a shortcode here.
#3 Render Shortcode
With the render_shortcode function, you can extract the values and put them in separate variables for further usage.

Go back to the WordPress dashboard and enjoy your result.
Parameter
Instructions for “mapping” in WPBakery are stored in this associative array.
| Name | Type | Description |
| admin_enqueue_js | String/Array | Will be fulfilled in the edit mode of js_composer. |
| admin_enqueue_css | String/Array | Add customized CSS. |
| base | String | Tag for shortcodes. |
| category | String | Default: Structure, Social, Content. You can add and modify if you want to just by entering a fresh category title. |
| class | String | Assign CSS classes to the shortcode’s content elements in the backend edit mode on WPBakery. |
| custom_markup | String | Have the shortcode appear in the editor. |
| description | String | Describe your element. |
| front_enqueue_css | String/Array | The front-end editing mode of the js_composer will load this js. |
| front_enqueue_js | String/Array | The front-end editing mode of the js_composer will load this css. |
| group | String | Organize parameters into many tabs inside the element editing box by grouping them. |
| icon | String | Add, change, or modify icons. |
| params | Array | A compiled set of shortcodes identifying characteristics. An array containing the parameters for your shortcode. They can be modified by shortcode settings. |
| show_settings_on _create | Boolean | Show or hide the content elements on the settings page. |
| weight | Integer | Priority is given to the elements with the highest weights when it comes to rendering content elements. |
Type Values
| Type | Description |
| attach_image | Select image. |
| attach_images | Select numerous images. |
| checkbox | Create a checkbox. |
| colorpicker | Choose the color. |
| dropdown | Create a dropdown field. |
| exploded_textarea | Space for text; commas will collapse lines (,). |
| loop | Build a loop. Users can build a loop used for shortcode’s output. |
| posttypes | Create checkboxes with ready-for-use post types. |
| textarea | Text area field. |
| textarea_html | Create a WordPress tinyMCE Editor. It is used to create added content areas. |
| textfield | Add field. |
| vc_link | Select the link. |
Create Your Own WPBakery Custom Element Today!
That’s how you can add a WPBakery custom element and the benefits it can bring to your website.
In general, you have to spend some of your time familiarizing yourself with shortcode before jumping into creating your custom element.
With our guide at hand, you surely can easily create and add your custom element. Thank you for reading, and don’t forget to subscribe to our website for more helpful information!
Subscribe to Get our Latest Updates
Wanna get the latest WordPress news and product updates from our team? Simply enter your email below.
wpbakery page builder
Расширьте возможности WPBakery Page Builder и добавьте ему еще больше возможностей! Этот плагин добавляет несколько премиальных элементов в ваш конструктор страниц WPBakery поверх встроенных элементов, предоставляемых WPBakery. Каждый элемент в упаковке создан с максимальным вниманием к деталям и простой целью, чтобы предоставить вам максимальный опыт. Мы потратили много времени и усилий, чтобы все элементы были гибкими, чтобы они открывали для вас безграничные возможности, сохраняя при этом простоту в основе. Этот плагин является надстройкой для WPBakery Page Builder. Дополнительные элементы – Иконки. Вы можете использовать этот элемент, чтобы интегрировать простой значок (шрифт и изображение, оба вида) на свою страницу и использовать его по своему усмотрению. Или вы можете использовать сетки WPBakery Page Builder и отображать список логотипов ваших клиентов, партнеров, спонсоров и т. д.
Этот плагин является надстройкой для WPBakery Page Builder.
Дополнительные элементы (addons) –
Иконки. Вы можете использовать этот элемент, чтобы интегрировать простой значок (шрифт и изображение, оба вида) на свою страницу. И использовать его по своему усмотрению. Или вы можете использовать сетки WPBakery Page Builder и отображать список логотипов ваших клиентов, партнеров, спонсоров и т. д.
Информационное окно
Пожалуй, самая популярная тенденция на данный момент. Информационные окна действительно выделяют ваш веб-сайт, помогая вам выделить важные вещи, которые вы предлагаете.
Информационный список.
Традиционные HTML-списки скучны, не так ли? Этот элемент просто переосмысливает списки. Вы можете воспользоваться возможностью и использовать его классный дизайн. Чтобы показать какой-то процесс или просто выделить свои самые популярные / связанные продукты, услуги и функции.
Flip Box
Этот элемент сочетает в себе мощь блока «Информационное окно» и «Призыв к действию». Спереди это выглядело бы как обычное информационное окно. Но когда посетитель наводит курсор на блок, оно переворачивается с классным эффектом CSS3. И показывает раздел «Призыв к действию», провоцируя его принять звонок.
Счетчик — Хотите показать свои вехи, достижения и любую другую числовую статистику с анимированными числами? Этот элемент поможет!
Интерактивный баннер
Во многих случаях баннеры с изображениями пригодятся. Поскольку они являются очень удобным и очевидным способом точно донести ваше сообщение. Этот элемент будет отображать эти блоки изображений более приятным и интерактивным способом.
Модальное всплывающее окно
Это один из очень полезных элементов, который может быть на любом веб-сайте. Создавайте модальные всплывающие окна и вставляйте все, что пожелаете, во всплывающее окно с помощью простого редактора WYSIWYG.
Временная шкала
Отобразите временную шкалу в стиле Facebook или просто продемонстрируйте свои функции. Обработайте или подчеркните немного творчески. Мы приложили особые усилия с помощью пользовательских кодов JavaScript и CSS, чтобы сделать его как можно более совершенным.
Расширенные карты Google
Расширенные карты Google — WPBakery Page Builder по умолчанию поставляется с элементом Google Maps. Но наш расширенный элемент Google Maps addon использует новейшие API и позволяет вам делать с ним больше. Загружайте изображения маркеров, пишите собственный HTML-код в поле информации о карте и контролируйте все, что связано с картой.
Ряд фонов
Креативные фоны действительно задают тон вашему сайту. Поэтому мы предлагаем вам простые инструменты, которые помогут вам быстро их использовать.
Фиксированный фон изображения
- Фиксирует изображение на своем месте, в то время как другой контент перемещается при прокрутке.
Вертикальный и горизонтальный параллакс
- Фон движется с разной скоростью и направлением от вашего контента при прокрутке.
Параллакс при наведении
- Фон творчески перемещается при движении курсора.
- Воспроизведение видео в фоновом режиме. Поддерживает размещенные видео, а также видео на YouTube.
Многослойный параллакс при наведении —
- Создайте настоящий 3D-параллакс. Вперед – произведите впечатление на своих пользователей ��
Хотя мы считаем, что перечисленные выше шесть элементов сразу принесут пользу вашему сайту, на самом деле это еще не все!
Мы уже работаем над еще несколькими элементами, которые мы надеемся включить в этот плагин по мере их завершения. Мы хотим сделать этот плагин «идеальным» источником, чтобы вы могли получить большинство основных элементов дополнения WPBakery Page Builder в одном пакете.
Наконец-то подошло к концу долгое ожидание…
Представляем вам WordPress Icon Fonts Manager!
Особенности диспетчера шрифтов значков —
Настройте свои собственные шрифты значков. Мы понимаем, что вы не используете все те сотни готовых ненужных значков, которые поставляются с любой из этих популярных библиотек, таких как Font Awesome, Entypo и т. д.; но вы больше заботитесь только о тех немногих, которые больше относятся к вашему бизнесу.
Вот почему мы сделали наш диспетчер шрифтов значков очень совместимым со знаменитыми API-интерфейсами IcoMoon, где вы можете создать свой собственный индивидуальный шрифт, выбрав свои любимые значки из более чем 2500 значков! Если этих 2500+ значков по-прежнему недостаточно, IcoMoon по-прежнему предоставит вам свою удивительную функцию, которая поможет вам преобразовать ваши проекты SVG в шрифты значков.
Поиск значков в реальном времени. Хорошо, многим из нас нужны большие числа и больше вариантов значков, не так ли? Хотя этот выбор действительно очень причудливый, он, безусловно, сопряжен с болью, поскольку мы не можем легко найти иконку, которую ищем, когда она нам нужна. И именно поэтому мы интегрировали функцию поиска в реальном времени, которая может помочь вам очень разумно отсортировать все иконочные шрифты, которые есть в вашей библиотеке.
Больше возможностей на подходе! Как было сказано ранее – Icon Fonts Manager – это наш индивидуальный долгосрочный проект; и мы надеемся, что со временем добавим в него больше функций, таких как интеграция с меню WordPress, редактор TinyMCE и т. д. Когда эти функции будут разработаны, они также будут представлены в этом плагине.
После такой напряженной работы над этим плагином в течение последних нескольких недель мы считаем, что «прибили его» и придумали действительно важное решение, которое принесет пользу всем пользователям WPBakery Page Builder addons. Нам также очень нравится компонент Icon Fonts Manager в этом плагине, и мы надеемся, что вам он понравится так же сильно, как и нам!
Минимальные требования
WordPress 4.3 и выше
WPBakery Page Builder 4.8 или отличная версия (рекомендуется последняя версия)
Если у вас есть WPBakery Page Builder как часть вашей темы, убедитесь, что плагин Core WPBakery Page Builder не сильно изменен.