How to Properly Change WordPress URL (4 Methods)

You might be changing to a new domain name, updating your site to use HTTPS, or any number of other scenarios.
In this post, we’ll discuss some of the most common reasons that you might want to change your site’s URL. Then, we’ll show you four easy-to-follow ways to change your WordPress URL.
Table of contents:
Why you may want to change your WordPress URL
Deciding to change your WordPress URL shouldn’t be taken lightly. After all, the domain name helps with brand recognition. People get used to a particular domain when seeking out your content.
However, you may find that there are reasons to completely shift to a new domain or maybe add some extra SEO or security power to the URL.
Here are some of the instances you may want to change the WordPress URL:
Scenario 1: Completely shifting to a new domain name
It’s not uncommon for website owners to have a little buyer’s remorse after configuring domains. Sometimes you have a shift in the brand name or you realize that another domain is available that sounds catchier than the one you currently own.
Regardless of the reason, this means that you’re trying to completely change the URL and move all website files to a new domain.
This process involves moving your entire WordPress installation to a new domain.
An example of this migration would be from myexamplesite.com to thebestsiteintheworld.com , where the primary domain is changed.
Scenario 2: Adding security with the help of an HTTPS domain
Using HTTPS helps make your site more secure and can even give you a rankings boost in Google.
To move your site from HTTP to HTTPS, you’ll first need to install an SSL certificate. Most hosts offer free SSL certificates and make it easy to use them.
Then, you’ll need to change your site’s URL to use the new HTTPS version.
Scenario 3: Moving content from a subdirectory
Here’s a situation where you may have placed all, or a portion of your website, on a subdirectory. However, some subdirectories begin getting more attention than what’s on the primary domain’s page.
Therefore, the website owner might decide to shift all content from the subdirectory to the homepage URL.
An example of this would be:
- Shifting from myexamplesite.com/blog to myexamplesite.com .
- Moving from blog.myexamplesite.com to myexamplesite.com .
- You may also consider moving from the primary domain to a subdirectory.
The primary, or parent, domain is situated as the “face” of your website. This tends to be one of the most common reasons to change the WordPress URL, considering some subdirectories become super popular and should become the main page.
How to change WordPress URL in all scenarios
⚠️ Important: This is a big change, so we’d highly encourage you to back up your site before implementing any of these methods. That way, you’ll always have a working copy in case something goes wrong.
After examining the reason you may want to change your WordPress URL, now it’s time to walk through the process of doing so. Luckily, there are a handful of methods to get the job done.
Method 1: Change WordPress URL in your WordPress dashboard
It’s best to focus on this method first before getting into anything more technical. You may find that adjusting your WordPress URL in the admin dashboard may be all you need to shift from a subdirectory or change the address altogether.
However, some sites may have the URL hardcoded in the wp-config.php file. In those cases, you’ll have to use Method 2 below.
Having said that, here’s how to change the WordPress URL in the admin dashboard:
In your WordPress dashboard, click on Settings → General.

Locate the following fields:
- WordPress Address (URL)
- Site Address (URL)
The WordPress Address is where users go to find the primary blog or website.
The Site Address indicates the location of your site files.
In the vast majority of situations, both of these fields should be the same.
However, you can change these fields if you already own the domain and need to shift from a temporary domain or from something you previously chose.
Make sure you clear your site cache after changing these URLs. Your site will only be accessible from the new URLs in these fields.
Method 2: Use the wp-config.php file
A WordPress site may have a hardcoded URL in the wp-config.php file. If this is the case, the WordPress Admin and Site Address fields are grayed out and not editable from Method 1. In short, the hardcoded URL in the wp-config.php file overrides whatever is in the Settings module.
Begin by accessing the wp-config.php file. You can do this with:
- FTP
- SSH
- WP-CLI
Our primary suggestion is to connect to your site files using FTP (file transfer protocol). Our FTP guide is here to walk you through the process.
Once you’ve connected to your server, open the wp-config.php file, which is most often located at the root of your WordPress site.
Paste the following code at the top of the file. Make sure you insert your actual domains, instead of the examples below.
If these are already in the wp-config.php file, you’ll need to change them to reflect what you want. Otherwise, the new code in this file hardcodes the domains. You can always go in and remove the code.
Method 3: Use the database to change WordPress URL
Here, you’ll change the WordPress URL directly in your site database. This is done with phpMyAdmin. The phpMyAdmin tool is found in your host’s dashboard or cPanel.
⚠️Warning: Making changes to your site’s database could cause your site to break if not done properly. If you don’t feel comfortable, we’d recommend hiring a developer or using one of the other methods.
Go to phpMyAdmin and select your site’s database from the list on the left side. Go down on the page until you see the wp_options table. Some sites may have different names for this, but most of the time it ends in “ _options “.

This file lets you enter a new siteurl and home .
All you have to do is select those values and type in the new domains. Click Go to save them.

Remember, this modification means that your site is now only accessible through the new URL.
Method 4: Change WordPress URL using WP-CLI
Only complete this method if you’re a developer with experience. The process involves using command lines to run specific tasks.
If you’re a developer–or you hired one–use the following command to update your URL site values:
Replace the “myexamplesite” text with your actual domain to get this done!
An important final step: handling old links and URLs
You’ve changed your WordPress URL for the future, but what about the old page URLs and links in your articles? Chances are you’ll stumble upon broken links after this process, so it’s important to resolve this issue.
This applies no matter which method you use from above.
To fix your existing links after changing your WordPress site URL, you can use the free Velvet Blues Update URLs plugin.
Как изменить URL WordPress 6.2.2
 WordPress
Возможно, вы переходите на новое доменное имя, обновляете свой сайт для использования HTTPS или вам нужно просто изменить свой WordPress URL? В этой статье я распишу некоторые из наиболее распространенных причин, по которым нужно изменить URL сайта. Затем покажу четыре простых способа изменить URL WordPress.
Причины чтобы изменить WordPress URL
Решение изменить WordPress URL не следует воспринимать легкомысленно. В конце концов, доменное имя помогает с узнаваемостью бренда. Люди привыкли к определенному домену при поиске контента.
Тем не менее, есть причины полностью перейти на новый домен или добавить дополнительные возможности SEO или безопасности в URL. Вот несколько примеров, когда необходимо изменить URL-адрес WordPress:
Полный переход на новое доменное имя
Владельцы сайтов нередко испытывают угрызения совести после выбора доменов. Иногда вы меняете название бренда или понимаете, что доступен другой домен, который звучит более привлекательно, чем тот, которым вы владеете в настоящее время.
Независимо от причины это означает, что вы пытаетесь полностью изменить URL-адрес и переместить все файлы веб-сайта на новый домен. Этот процесс включает перенос всей вашей установки WordPress на новый домен.
Пример такой миграции может составлять от myexamplesite.com до newdomainsite.com , где изменяется основной домен.
Подключение сертификата HTTPS
Использование HTTPS помогает сделать ваш сайт более безопасным и даже может повысить рейтинг в поисковых системах.
Чтобы переместить сайт WordPress с HTTP на HTTPS, вам сначала нужно установить сертификат SSL. Большинство хостингов предлагают бесплатные SSL-сертификаты и упрощают их использование .
Затем вам нужно изменить URL своего сайта, чтобы использовать новую версию c HTTPS.
Перемещение контента из подкаталога
В некоторых случаях бывает что вы разместили все или часть веб-сайта в подкаталоге. Однако некоторые подкаталоги начинают получать больше внимания, чем то, что находится на странице основного домена.
Поэтому вы можете решить перенести весь контент из подкаталога на URL-адрес домашней страницы.
Примером этого может быть:
- Переход от myexamplesite.com/blog к myexamplesite.com .
- Переезд из blog.myexamplesite.com в myexamplesite.com .
- Вы также можете рассмотреть возможность перехода из основного домена в подкаталог.
Добавление или удаление www
В некоторых случаях вам может потребоваться изменить URL-адрес WordPress, если вам нужно удалить www или добавить его в домен.
Основной или родительский домен расположен как «лицо» вашего сайта. Это, как правило, является одной из наиболее распространенных причин для изменения URL-адреса WordPress. Учитывая, что некоторые подкаталоги становятся очень популярными и должны стать главной страницей.
Как изменить URL WordPress во всех случаях
⚠️ Важно : Это большое изменение, поэтому настоятельно рекомендую сделать резервную копию сайта перед применением любого из этих методов. Таким образом, у вас всегда будет рабочая копия на случай, если что-то пойдет не так.
После установление причины, по которой вам нужно изменить свой URL-адрес WordPress, пришло время пройти через весь процесс самостоятельно. К счастью, есть несколько методов, чтобы проделать это самому.
Способ 1: Изменить URL WordPress из панели инструментов
Лучше сосредоточиться на этом методе, прежде чем углубляться во что-то более техническое. Вы можете обнаружить, что настройка WordPress URL в админ-панели — это все, что вам нужно, чтобы перейти из подкаталога или полностью изменить адрес.
Однако на некоторых сайтах URL-адрес может быть жестко задан в файле wp-config.php . В этих случаях вам придется использовать 2 метод.
Перейдем к вопросу — как же изменить URL-адрес WordPress на панели администратора.
На панели инструментов WordPress нажмите Настройки → Общие .

Найдите следующие поля:
- Адрес WordPress (URL)
- Адрес сайта (URL)

WordPress Адрес — по нему пользователи находят ваш сайт и посещают его.
Адрес сайта — указывает на расположение файлов сайта.
В большинстве ситуаций оба эти поля должны быть одинаковыми. Однако вы можете изменить эти поля, если вы уже являетесь владельцем домена и хотите перейти с временного домена или с того, что вы выбрали ранее.
Обязательно очистите кеш сайта после изменения этих URL. Ваш сайт будет доступен только с новых URL-адресов в этих полях.
Способ 2: Использовать файл wp-config.php
Сайт WordPress может иметь жестко закодированный URL в файле wp-config.php . В этом случае поля адрес WordPress (URL) и адрес сайта (URL) будут выделены серым и недоступны для редактирования из метода 1. Короче говоря, жестко заданный URL-адрес в файле wp-config.php переопределяет все, что находится в модуле «Настройки».
Итак, следующий вариант — изменить URL-адрес WordPress в вашем файле wp-config.php .
Начните с получения доступа к файлу wp-config.php и его редактированию. Вы можете сделать это с помощью:
- FTP
- SSH
- WP-CLI
Основная задача — подключиться к файлам вашего сайта с помощью FTP (протокол передачи файлов). После подключения к серверу откройте файл wp-config.php , который находится в корне вашего сайта WordPress.
Вставьте следующий код вверху файла. Убедитесь, что вы вставили свои фактические домены, а не примеры ниже.
Если они уже есть в файле wp-config.php, вам нужно изменить их, чтобы они отражали то, что вы хотите. В противном случае новый код в этом файле жестко кодирует домены. Вы всегда можете зайти и удалить код.
Срособ 3: Использовать базу данных MySQL для изменения URL WordPress
Здесь вы измените URL WordPress непосредственно в базе данных вашего сайта. Это делается с помощью phpMyAdmin. Инструмент phpMyAdmin находится на панели управления вашего хостинга или cPanel.
⚠️ Предупреждение . Внесение изменений в базу данных вашего сайта может привести к поломке вашего сайта, если он не будет выполнен правильно. Если вам непонятно, мы рекомендуем нанять разработчика или использовать один из других методов.
Перейдите в phpMyAdmin и выберите базу данных вашего сайта из списка слева. Спускайтесь по странице, пока не увидите wp_options таблицу. Некоторые сайты могут иметь разные названия для этого, но в большинстве случаев заканчивается на « _options «.

Этот файл позволяет вам ввести изменения новых siteurl и home . Все, что вам нужно сделать, это выбрать эти значения и ввести новые домены. Нажмите Ok , чтобы сохранить их.

Помните, эта модификация означает, что ваш сайт теперь доступен только через новый URL.
Способ 4: Изменить URL-адрес WordPress с помощью WP-CLI
Завершите этот метод, только если вы опытный разработчик. Процесс включает в себя использование командных строк для запуска определенных задач.
Если вы разработчик или наняли его, используйте следующую команду для обновления значений вашего URL-адреса сайта:
Замените текст «myexamplesite» на ваше доменное имя!
Способ 5: WordPress изменить URL страниц путем редактирования файла functions.php
Этот метод удобен, когда нет возможности войти в панель администратора. Вы можете отредактировать URL-адреса WordPress с помощью файла functions.php вашей темы. В качестве дополнительного преимущества после того, как вы вставите код в файл functions.php, URL-адреса будут автоматически изменены в базе данных.
Подключитесь к серверу, используя свои учетные данные FTP, и найдите корневой каталог WordPress. Перейдите в /wp-content/themes и щелкните каталог своей темы, чтобы открыть его. Найдите файл functions.php и откройте файл с помощью текстового редактора и вставьте приведенный код:
После этого нажмите кнопку « Сохранить изменения » . Затем посетите свой сайт еще раз, чтобы убедиться, что все работает. Потом можете просто удалить две ранее вставленные строки кода, поскольку они сделали свою работу.
Изменение старых ссылок и URL адресов
Вы изменили свой WordPress URL, но как насчет старых страниц URL и ссылок в ваших статьях? Скорее всего, вы наткнетесь на неработающие ссылки после этого процесса, поэтому важно решить эту проблему.
Это применяется независимо от того, какой метод вы использовали из описания выше.
Чтобы исправить существующие ссылки после изменения URL-адреса вашего сайта WordPress, вы можете использовать бесплатный плагин Velvet Blues Update URLs.
Current Version: 3.2.10
Last Updated: 18.10.2020
⚠️ Важно : Обязательно сделайте резервную копию вашего сайта, прежде чем использовать плагин. Поскольку вы будете изменять контент в базе данных вашего сайта, вы можете случайно что-то сломать. Поэтому, если вы этого еще не сделали, сделайте последнюю резервную копию, прежде чем продолжить.
После установки и активации плагина перейдите в Инструменты → Update URL .

Заполните одно поле вашим старым URL, затем введите новый (нужный) URL в другое поле. Отметьте, какие экземпляры URL вы хотите изменить. Скорее всего, это будет включать в себя URL-адреса в содержимом страницы и большинство других разделов.
Нажмите кнопку Обновить URL-адреса сейчас , чтобы завершить процесс.

Затем вы можете удалить плагин Velvet Blues.
Как в WordPress изменить url страницы?
В зависимости от того, какую версию редактора страниц WordPress вы используете, вам нужно будет выполнить шаги немного по-другому. Изменение URL-адрес WordPress займет всего несколько простых шагов.
В версии WordPress без Gutenburg Active (с использованием классического редактора)
- Войдите в WordPress.
- Откройте существующую страницу или создайте новую страницу.
- При необходимости введите заголовок.
- Сохраните страницу, это автоматически создаст URL.
- Посмотрите прямо под полем заголовка, вы увидите постоянную ссылку: за которой следует URL.
- Нажмите кнопку « Изменить » за ссылкой.
- Введите новый URL-адрес и нажмите ОК.
- Сохраните страницу или запись.
В версии WordPress с использованием редактора Гутенберга
- Введите заголовок для своей записи в области заголовка страницы вверху страницы.
- Чтобы изменить постоянную ссылку, вам нужно будет либо сохранить страницу как черновик, либо опубликовать страницу, чтобы увидеть параметры. Нажмите « Сохранить черновик », если вы не готовы опубликовать страницу.
- Теперь снова щелкните заголовок записи. После того, как вы нажмете на заголовок, над заголовком появится постоянная ссылка с кнопкой редактирования.
- Нажмите кнопку редактирования постоянной ссылки, переименуйте ярлык и нажмите « Сохранить ». Слаг — это ваш URL.
- Щелкните « Сохранить черновик » в своей записи, чтобы убедиться, что все снова сохранено, и продолжайте работу.
Изменить URL-адрес входа в WordPress
Иногда может потребоваться изменить URL-адрес для входа в WordPress, но не для действующего сайта.
URL-адрес для входа — это обычно ваше доменное имя, за которым следует /wp-admin или /wp-login . Но можно изменить его на что-то более простое, чтобы обеспечить лучший пользовательский интерфейс для ваших пользователей и клиентов.
Существует множество плагинов WordPress, которые изменят URL-адрес для входа. Самый простой способ изменить URL-адрес входа в WordPress — это использовать плагин WPS Hide Login. Этот плагин просто заставляет ваши существующие URL-адреса для входа администратора вести к 404, позволяя вам установить собственный URL-адрес для входа в WordPress.
Более технический способ изменить или скрыть URL-адрес страницы входа в WordPress — это отредактировать файл .htaccess .
Вывод
Для самых простых изменений требуется только перейти в панель инструментов WordPress или в файл wp-config.php . Помимо этого, советую обратиться к разработчику при настройке вашей базы данных или с помощью командной строки. Вы также можете изменить URL-адрес для постоянных ссылок сайта WordPress.
Все еще есть вопросы о том, как изменить URL WordPress? Дайте знать в комментариях ниже.
How to Change Your WordPress URL (4 Easy Methods)

Your WordPress address and site address (or URL) are very important as they reference both the address of your site on the web and the location of your site’s files and admin screens.
There are many reasons why you might need or want to change your WordPress URL. Perhaps you’re changing domains, moving to a subdomain, updating from www to non-www, moving files around, or even migrating from HTTP to HTTPS.
Whatever the case may be, there are a few options you have when it comes to changing the URL, some more advanced than others.
In this guide, we’ll show you the different methods you can use to change the URL of your WordPress installation and your WordPress site URL, which are two different things.
Prefer to watch the video version?
Change WordPress URL via the Admin Dashboard
The first and most common method is to change your WordPress URL directly from within the admin dashboard. In the admin menu, go to Settings > General to access the general settings screen. You can then update the following:
- WordPress Address (URL): The address to reach your site.
- Site Address (URL): The address of your WordPress core files.
Both should match unless you are giving WordPress its own directory. Remember that after you click Save Changes, your WordPress dashboard is now only accessible via the new URL. So be sure to check that you’ve entered the right URL.
If you do accidentally enter the wrong URL, you can override the settings in the admin screens by editing your wp-config.php file (was see the next method below).
Note: If the fields above are grayed out, it is most likely because you already have hard-coded values in your wp-config.php file. In which case, jump to the next method.
If you’re creating a fresh WordPress installation on Kinsta hosting, you will be given a temporary URL, such as sitename.kinsta.cloud. You can use the directions above to update the address.
You might also need to clear your WordPress cache after updating the URLs, otherwise you might receive a redirect error. If you’re a Kinsta client, you can clear your cache from the MyKinsta dashboard under the Tools section for your site.
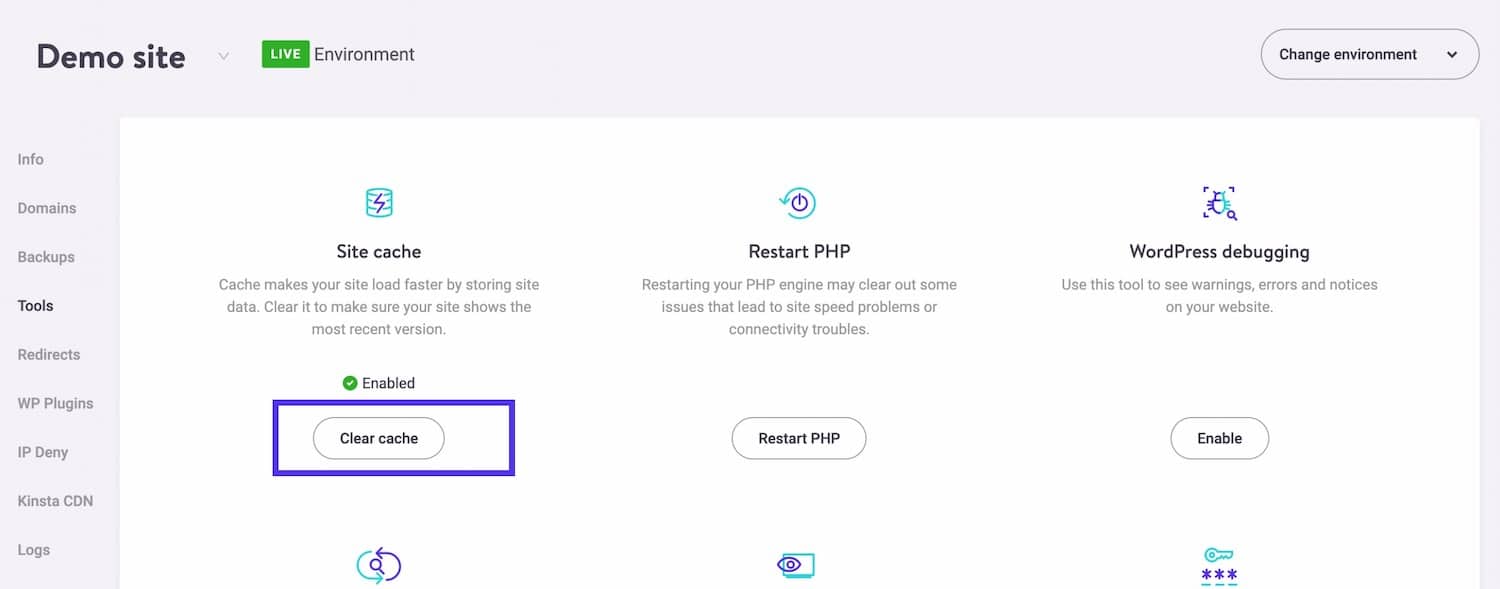
MyKinsta – clear cache
Change WordPress URL in wp-config.php File
The second most common way to change your WordPress URL is in your wp-config.php file. It is important to note that values in wp-config.php override the settings in your WordPress admin screens.
If the fields aren’t editable (as seen below), it is most likely because they are hard-coded in this file.
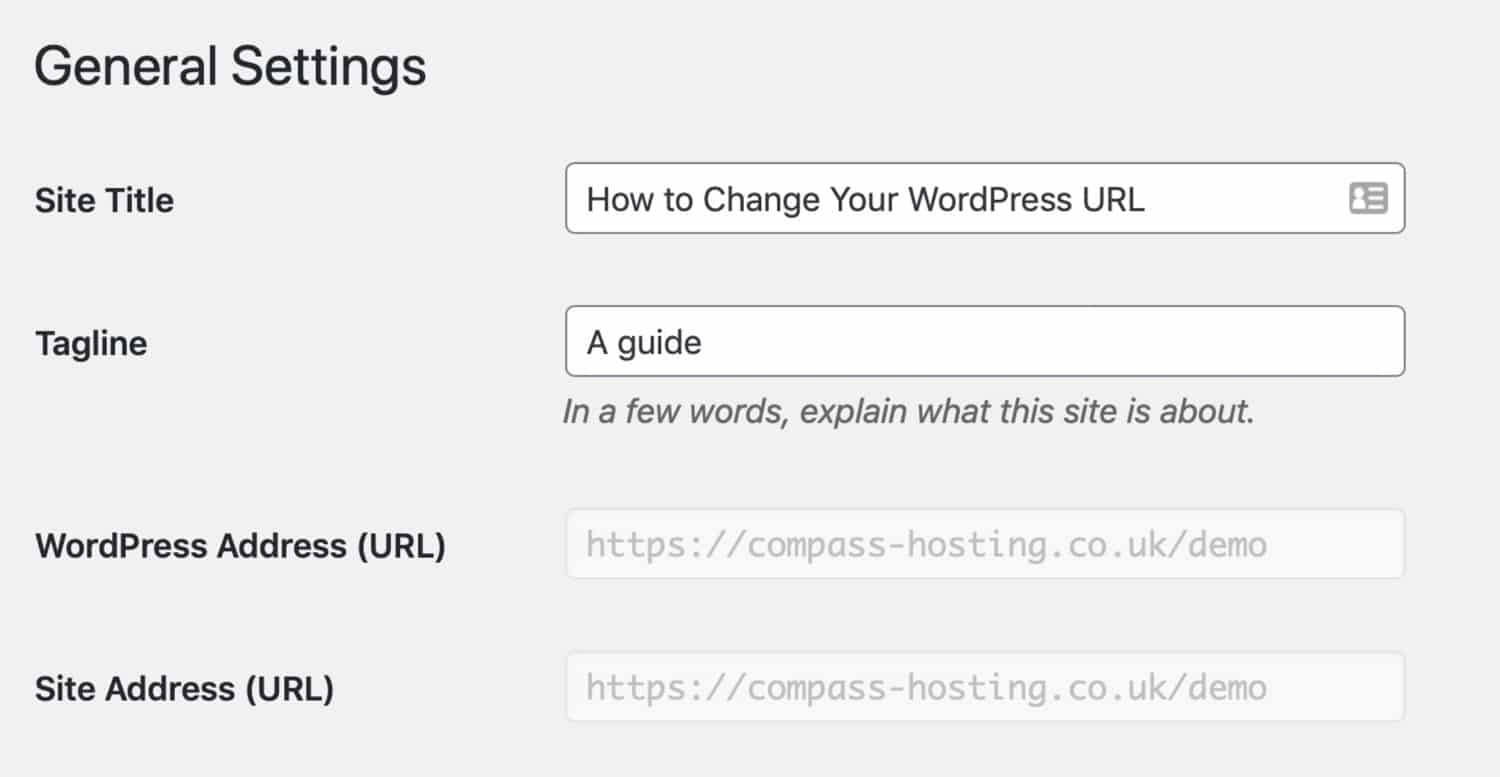
General settings URL grayed out
The wp-config.php file is typically located in the root directory of your WordPress site and can be accessed via FTP, SSH, or WP-CLI.
In your wp-config.php file, add these two lines somewhere above the line that tells you to stop editing:
Save your wp-config.php file and close it.
When you go to the General settings screen in your WordPress admin, you’ll see that those two fields are now grayed out. You can’t edit them unless you remove those two lines from wp-config.php.
If you want access to those settings in your dashboard again, all you need to do is remove them from your wp-config.php file.
Change WordPress URL Directly in Database
A third method you can use to change your WordPress URL is directly in the WordPress database. To do this, you use phpMyAdmin (which is accessible from your MyKinsta dashboard). This is usually done as a last resort.
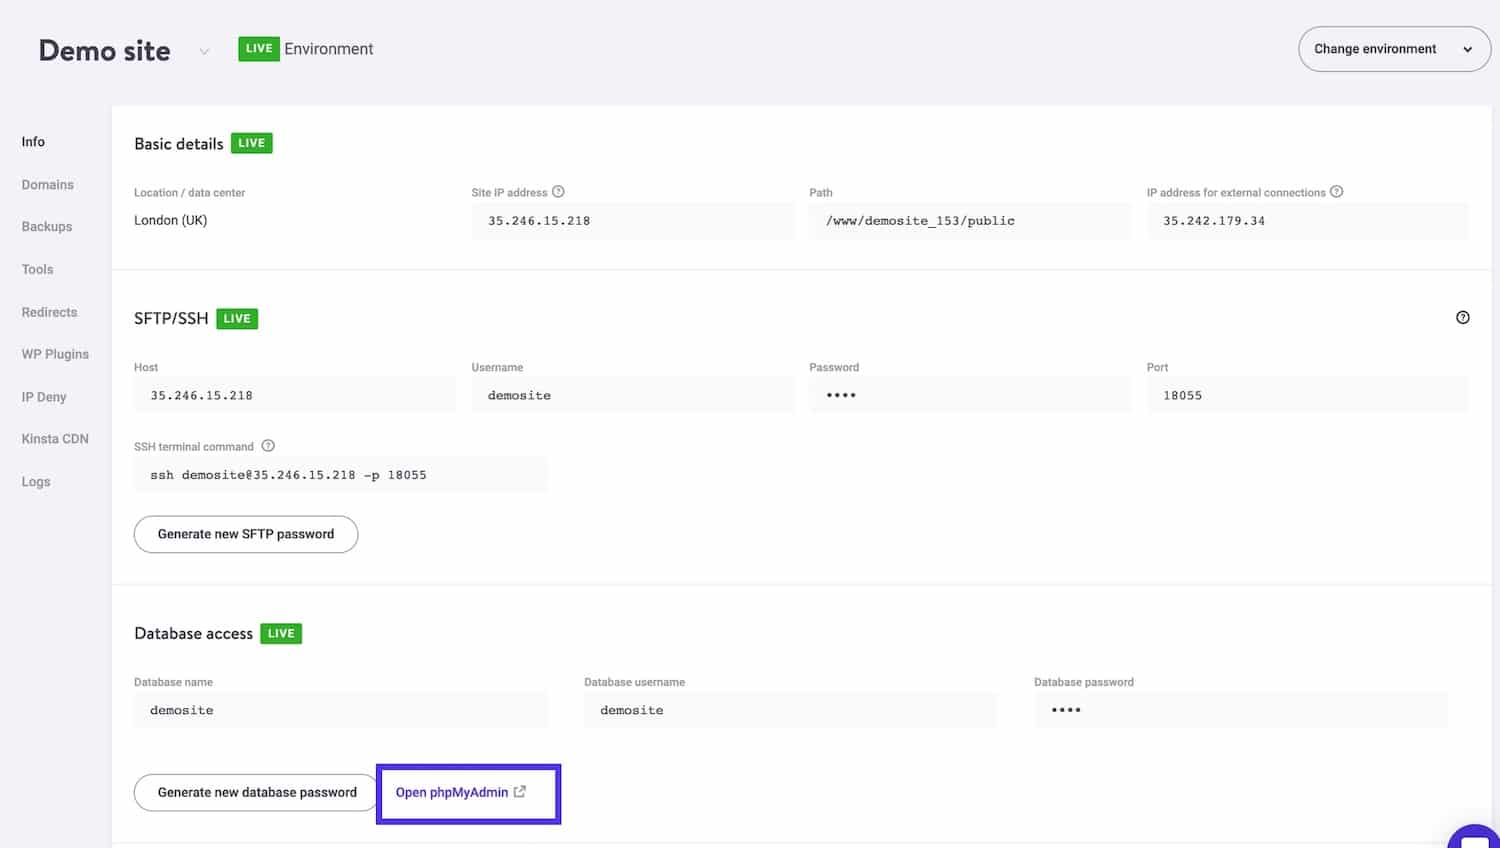
Accessing phpMyAdmin in MyKinsta
Important
Editing and manipulating database tables directly from phpMyAdmin could break your site if not done correctly. If you are not comfortable doing this, please check with a developer first. And make sure your site is backed up before you edit your database.
In phpMyAdmin, click on your database on the left-hand side. Then scroll down and click on the “wp_options” table. If your database has a different prefix it might be named slightly differently, such as wp56_options.
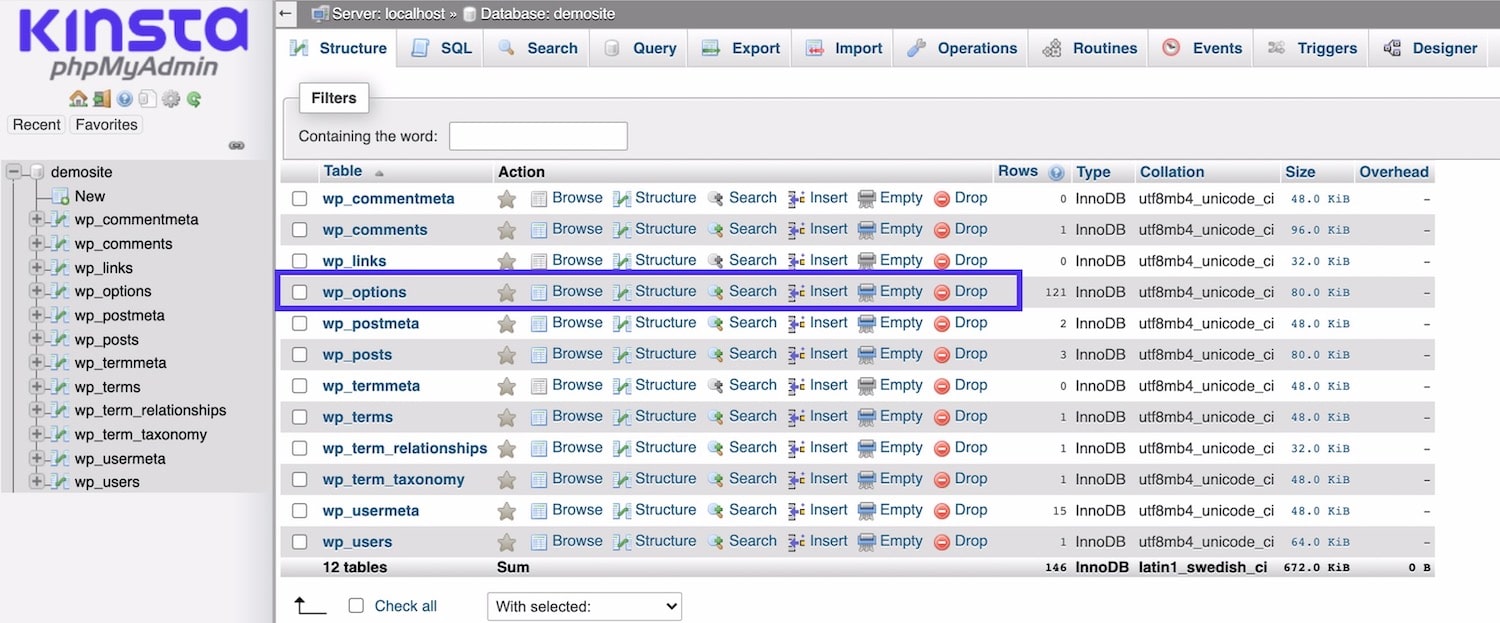
phpMyAdmin – wp_options table
Then find the site url and home fields. Double click in the option_value field for each and type in the new URL.
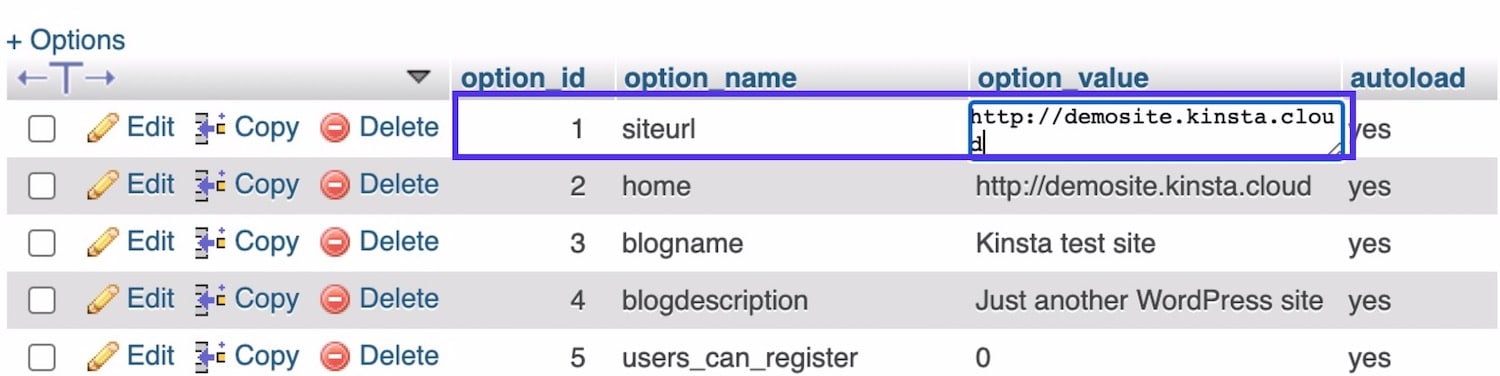
phpMyAdmin – editing URL
Your changes will automatically be saved.
SSH access to your site (which is provided to all Kinsta customers) and you’ll need to be familiar with the process for accessing your site using WP-CLI.
If you are unfamiliar with WP-CLI you can check out our in-depth post on managing WordPress from the terminal.
The commands to edit your URL are as follows:
Change WordPress Login URL
Sometimes you might want to change the URL for your WordPress login but not for the live site.
Your login URL is normally your domain name followed by /wp-admin or /wp-login. But it’s possible to change it to something simpler to provide a better user experience for your users and clients or to brand your site admin and remove obvious reference to WordPress.
Redirection After Changing WordPress Urls
After you change your WordPress URLs, you need to make sure that anyone using the old URL is redirected to the new URL and doesn’t get an error.
If you’re with Kinsta, you can set up redirection using MyKinsta. Follow our knowledgebase guide to redirection to learn how to do it and read our guide to redirect best practices to avoid redirect errors like ‘too many redirects‘ and find out how to set it up so it doesn’t impact your site’s performance.
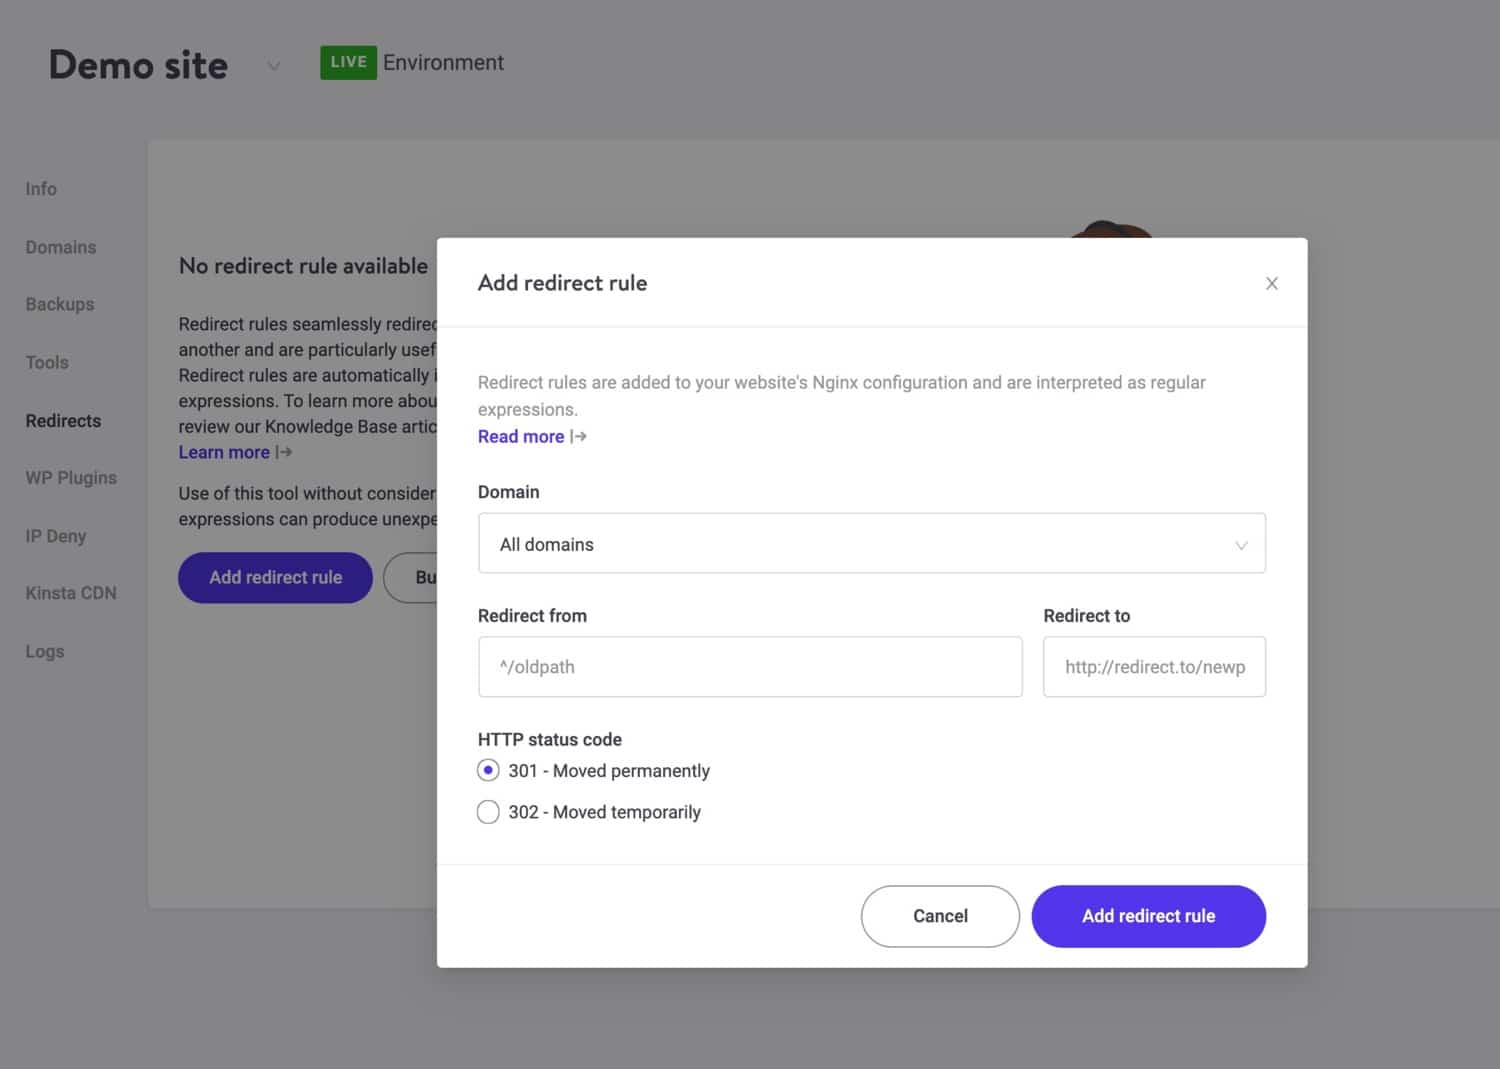
Creating wildcard redirects in MyKinsta
You might also need to add redirects for individual posts or pages, although wildcard redirection is more likely.
If you’re not with Kinsta, find out if your hosting provider lets you set up wildcard redirection in your control panel.
Alternatively, you could use a plugin like Redirection to set up a wildcard redirection from your old domain name to your new one.
If you’re running Yoast premium on your site and you need to edit the URL of individual posts or pages, the plugin will automatically set up redirects for you, so you don’t need to do this manually. It also allows you to set up Regex redirects which you can use when you change your site URL, if you know what you’re doing. Our in-depth guide to redirects explains how Regex redirects work.
Summary
If you need to change your WordPress URL because you’ve switched domains or you’re transferring to HTTPS, you have a number of methods you can use to do it.
You can change the settings in the WordPress admin, hardcode them in your wp-config.php file, edit the database, or use WP-CLI. Work through the methods above to find the one that works for your site, and you’ll have your new WordPress URL working in no time.
Save time and costs, plus maximize site performance, with $275+ worth of enterprise-level integrations included in every Managed WordPress plan. This includes a high-performance CDN, DDoS protection, malware and hack mitigation, edge caching, and Google’s fastest CPU machines. Get started with no long-term contracts, assisted migrations, and a 30-day money-back guarantee.
Check out our plans or talk to sales to find the plan that’s right for you.
Get 4 Months Off
Enjoy 4 months of free hosting with an annual WordPress plan. 30-day money-back guarantee.
Changing The Site URL
On the Settings -> General screen in a single site installation of WordPress, there are two fields named “WordPress Address (URL)” and “Site Address (URL)”. They are important settings, since they control where WordPress is located. These settings control the display of the URL in the admin section of your page, as well as the front end, and are used throughout the WordPress code.
- The “Site Address (URL)” setting is the address you want people to type in their browser to reach your WordPress blog.
- The “WordPress Address (URL)” setting is the address where your WordPress core files reside.
Note: Both settings should include the http:// part and should not have a slash “/” at the end.
Every once in a while, somebody finds a need to manually change (or fix) these settings. Usually this happens when they change one or both and discover that their site no longer works properly. This can leave the user with no easily discoverable way to correct the problem. This article tells you how to change these settings directly.
Additional information is presented here for the case where you are moving WordPress from one site to another, as this will also require changing the site URL. You should not attempt to use this additional information if you’re only attempting to correct a “broken” site.
Alert! These directions are for single installs of WordPress only. If you are using WordPress MultiSite, you will need to manually edit your database.
Changing the Site URL
There are four easy methods to change the Site URL manually. Any of these methods will work and perform much the same function.
Edit wp-config.php
It is possible to set the site URL manually in the wp-config.php file.
Add these two lines to your wp-config.php, where “example.com” is the correct location of your site.
This is not necessarily the best fix, it’s just hard-coding the values into the site itself. You won’t be able to edit them on the General settings page anymore when using this method.
Edit functions.php
If you have access to the site via FTP, then this method will help you quickly get a site back up and running, if you changed those values incorrectly.
- FTP to the site, and get a copy of the active theme’s functions.php file. You’re going to edit it in a simple text editor and upload it back to the site.
- Add these two lines to the file, immediately after the initial “<?php” line:
Use your own URL instead of example.com, obviously.
3. Upload the file back to your site, in the same location. FileZilla offers a handy “edit file” function to do all of the above rapidly; if you can use that, do so.
4. Load the login or admin page a couple of times. The site should come back up.
Important! Do not leave this code in the functions.php file. Remove them after the site is up and running again.
Note: If your theme doesn’t have a functions.php file create a new one with a text editor. Add the <?php tag and the two lines using your own URL instead of example.com:
Upload this file to your theme directory. Remove the lines or the remove the file after the site is up and running again.
LAN-based site to externally accessible site
Here are some additional details that step you through transferring a LAN-based WordPress site into an externally accessible site, as well as enabling editing the wordpress site from inside the LAN.
Two important keys are router/firewall modifications and the “wait 10+ minutes” after making the changes at the end.
using ssh to log into your server (nano is a server preinstalled text editor)
add lines just after <?php
refresh your web browser using your external site URL:
remove those lines you just added (or comment them out)
access your router, these steps are for pfSense, other routers should have similar settings to look for/watch out for)
add to firewall/nat table a line like this
add to firewall/rules table a line like this
uncheck the box at System/advanced/network address translation/Disable NAT Reflection
«Disables the automatic creation of NAT redirect rules for access to your public IP addresses from within your internal networks. Note: Reflection only works on port forward type items and does not work for large ranges > 500 ports.»
Then go do something for ten minutes and when you get back see if the external url http://your.site.url:port/yourblog from a LAN browser brings the page up correctly.
Relocate method
WordPress supports an automatic relocation method intended to be a quick assist to getting a site working when relocating a site from one server to another.
Code function
When RELOCATE has been defined as true in wp-config.php (see next chapter), the following code in wp-login.php will take action:
Steps
- Edit the wp-config.php file.
- After the “define” statements (just before the comment line that says “That’s all, stop editing!”), insert a new line, and type: define(‘RELOCATE’,true);
- Save your wp-config.php file.
- Open a web browser and manually point it to wp-login.php on the new server. For example, if your new site is at http://www.yourdomainname.com , then type http://www.yourdomainname.com/wp-login.php into your browser’s address bar.
- Login as per normal.
- Look in your web browser’s address bar to verify that you have, indeed, logged in to the correct server. If this is the case, then in the Admin back-end, navigate to Settings > General and verify that both the address settings are correct. Remember to Save Changes.
- Once this has been fixed, edit wp-config.php and either completely remove the line that you added (delete the whole line), comment it out (with // ) or change the true value to false if you think it’s likely you will be relocating again.
Note: When the RELOCATE flag is set to true, the Site URL will be automatically updated to whatever path you are using to access the login screen. This will get the admin section up and running on the new URL, but it will not correct any other part of the setup. You’ll still need to alter those manually.
Important! Leaving the RELOCATE constant in your wp-config.php file is insecure, as it allows an attacker to change your site URL to anything they want in some configurations. Always remove the RELOCATE line from wp-config.php after you’re done.
Changing the URL directly in the database
If you know how to access phpMyAdmin on your host, then you can edit these values directly to get your site up and running again.
-
and save the copy off-site.
- Login to phpMyAdmin.
- Click the link to your Databases.
- A list of your databases will appear. Choose the one that is your WordPress database.
- All the tables in your database will appear on the screen.
- From the list, look for wp_options . Note: The table prefix of wp_ may be different if you changed it when installing.
- Click on the small icon indicated as Browse.
- A screen will open with a list of the fields within the wp_options table.
- Under the field option_name , scroll down and look for siteurl .
- Click the Edit Field icon which usually is found at the far left at the beginning of the row.
- The Edit Field window will appear.
- In the input box for option_value , carefully change the URL information to the new address.
- Verify this is correct and click Go to save the information.
- You should be returned to your wp_options table.
- Look for the home field in the table and click Edit Field. Note There are several pages of tables inside wp_options . Look for the > symbol to page through them.
- In the input box for option_value , carefully change the URL information to the new address.
- Verify this is correct and click Go to save the information.
Moving Sites
When moving sites from one location to another, it is sometimes necessary to manually modify data in the database to make the new site URL information to be recognized properly. Many tools exist to assist with this, and those should generally be used instead of manual modifications.
This is presented here as information only. This data may not be complete or accurate.
You should read the Moving WordPress article first, if attempting to move WordPress from one system to another.
Altering Table Prefixes
Like many WordPress administrators, you may be running several WordPress installations off of one database using various wp-config.php hacks. Many of these hacks involve dynamically setting table prefixes, and if you do end up altering your table prefix, you must update several entries within the prefix_usermeta table as well.
As in the above section, remember that SQL changes are permanent and so you should back up your database first:
If you are changing table prefixes for a site, then remember to alter the table prefix in the usermeta tables as well. This will allow the new site to properly recognize user permissions from the old site.
Changing Template Files
In your WordPress Theme, open each template file and search for any manually entered references to your old domain name and replace it with the new one. Look for specific hand coded links you may have entered on the various template files such as the sidebar.php and footer.php . WordPress uses a template tag called bloginfo() to automatically generate your site address from information entered in your Administration > Settings > General panel. The tag in your template files will not have to be modified.
Changing the Config file
You will need to update your WordPress configuration file if your database has moved or changed in certain ways.
- You will only need to modify the config file if:
- your database has moved to another server and is not running on your localhost
- you have renamed your database
- you have changed the database user name
At this point, your WordPress blog should be working.
Verify the Profile
- In your Administration > Settings > General panel, you will verify that the changes you made in Changing the URL above, are correct.
- Verify that the reference in your WordPress Address (URL) contains the new address.
- Verify that the reference in your Site Address (URL) contains the new address.
- If you have made changes, click Save Changes.
Changing the .htaccess file
After changing the information in your Administration > Settings > General panel, you will need to update your .htaccess file if you are using Permalinks or any rewrites or redirects.
- Make a backup copy of your .htaccess file. This is not a recommendation but a requirement.
- Open the .htaccess file in a text editor.
- Review its contents, looking for any custom rewrites or redirects you entered. Copy these to another text file for safe keeping.
- Close the file.
- Follow the instructions on the Permalinks SubPanel for updating your Permalinks to the .htaccess file.
- Open the new .htaccess file and check to see if your custom rewrites and redirects are still there. If not, copy them from the saved file and paste them into the new .htaccess file.
- Make any changes necessary in those custom rewrites and redirects to reflect the new site address.
- Save the file.
- Test those redirects to ensure they are working.
If you make a mistake, you can Restoring Your Database From Backup from your backup and try this again. So make sure it is right the first time.
Additional items of note
There are other things you may wish to change in order to correct URLs when moving sites.
- Images link: image links are stored in “post_content” in the wp_posts table. You can use the similar code above to update image links.
- wp_options: Besides the “siteurl” and “home” items mentioned above, there are other option_value which also need revision, such as “upload path”, and some plugin items (depends on what you’ve installed, such as widgets, stats, DMSGuestbook, sitemap, etc.)
- To fix widgets that contain outdated URL’s, you may edit them in Dashboard / Appearance / Widgets.
- Do a FULL database search for any items left. MAKE SURE you know what you are changing. and go through each item for possible improper replacement.
- If you a running a network / have multiple sites, you will need to replace instances of the URL in the database. They are stored in many tables, including each one of the sites (blogs). Be careful in what you replace and be sure you know the meaning of the field before changing it. See the Important GUID note below for an example of what not to change.
- Note, if you find your old url in the database options table under ‘dashboard_incoming_links’, you can ignore or delete that option. It’s unused since WP 3.8.
Using the Export/Import feature to move a blog to a new domain.
Important GUID Note
When doing the above and changing the URLs directly in the database, you will come across instances of the URL being located in the “guid” column in the wp_posts tables. It is critical that you do NOT change the contents of this field.
The term “GUID” stands for “Globally Unique Identifier”. It is a field that is intended to hold an identifier for the post which a) is unique across the whole of space and time and b) never, ever changes. The GUID field is primarily used to create the WordPress feeds.
When a feed-reader is reading feeds, it uses the contents of the GUID field to know whether or not it has displayed a particular item before. It does this in one of various ways, but the most common method is simply to store a list of GUID’s that it has already displayed and “marked as read” or similar.
Thus, changing the GUID will mean that many feedreaders will suddenly display your content in the user’s reader again as if it was new content, possibly annoying your users.
In order for the GUID field to be “globally” unique, it is an accepted convention that the URL or some representation of the URL is used. Thus, if you own example.com, then you’re the only one using example.com and thus it’s unique to you and your site. This is why WordPress uses the permalink, or some form thereof, for the GUID.
However, the second part of that is that the GUID must never change. Even if you shift domains around, the post is still the same post, even in a new location. Feed readers being shifted to your new feeds when you change URLs should still know that they’ve read some of your posts before, and thus the GUID must remain unchanged.
Never, ever, change the contents of the GUID column, under any circumstances.
If the default uploads folder needs to be changed to a different location, then any media URLs will need to be changed in thepost_content column of the posts table. For example, if the default uploads folder is changing from wp-content/uploads to images: