VIDEO-SAM.RU

Подпишитесь на почтовую рассылку по созданию видеороликов.
В любой момент вы cможете отказаться от подписки, если она вас не устроит.
Популярные статьи

Свежие статьи
Как создать проект видео с нестандартным разрешением
При создании видео пользователи иногда сталкиваются с проблемой: в видеоредакторе нет подходящего разрешения. Все монтажные программы при создании проекта предлагают набор стандартных настроек.
Например, Adobe Premiere при создании нового проекта по умолчанию открывает окно Загрузка предварительных настроек, где предлагаются проекты для стандартных видео: DV-PAL, DV-NTSC, HDV, Mobile&Devices.
Это удобно, если вы снимаете видео на камеру, и знаете, в каком формате она снимает. Вам достаточно выбрать нужный шаблон проекта, и программа задаст все нужные параметры: разрешение, число кадров, соотношение пикселя (Pixel Aspect Ratio), интерлейсинг.
Если вы выбрали шаблон проекта правильно, то видео точно соответствует размеру экрана.
В случае, когда вы сделали неправильный выбор, у вас на экране будут черные полосы сверху и снизу, или справа и слева, или со всех сторон. Бывает, что видео занимает весь экран, но деформировано по вертикали или горизонтали.
Если вы затрудняетесь точно определить, какой именно шаблон вам нужен, необходимо получить информацию о вашем видео до создания проекта.
Для этого существует множество программ, например, VideoInspector, но можно воспользоваться самим редактором AdobePremiere.
В меню Файл выбираем Получить свойства для — Файл. В открывшемся окне указываем путь к видеофайлу на вашем компьютере.
После этого появляется окошко с полной информацией о нем: тип, размер, разрешение, число кадров в секунду, длительность, соотношение сторон пикселя, формат звука.
Теперь, когда вы точно знаете параметры вашего видео, можно создавать соответствующий проект.
Но случаются ситуации, когда для вашего видео нет подходящего шаблона, т.е. он не является стандартным. Такое бывает, если вы снимали видео, например, на фотоаппарат, или скачали его в Интернете, или делали захват с экрана.
Скажем, у вас видеофайл имеет разрешение 640х360 (16:9) или 800х600 (4:3). Был случай, когда ко мне обратились с вопросом, как сделать вертикальный экран (не альбомной, а книжной ориентации) для рекламного видео.
Таких шаблонов проекта вы не найдете. Как поступить в такой ситуации?
Некоторые выбирают какой-то стандартный проект и потом пытаются изменить видео в соответствии с ним — растягивают или обрезают. Естественно, ничего хорошего не получится, видео будет или деформированным или обрезанным.
В такой ситуации нужно создать нестандартный проект по параметрам вашего видео. В AdobePremiere на этапе создания нового проекта выбираем вкладку Особые параметры (см. картинку ниже).
На первой вкладке Главные в строке Тип правки из выпадающего списка стандартных проектов выбираем Desktop:
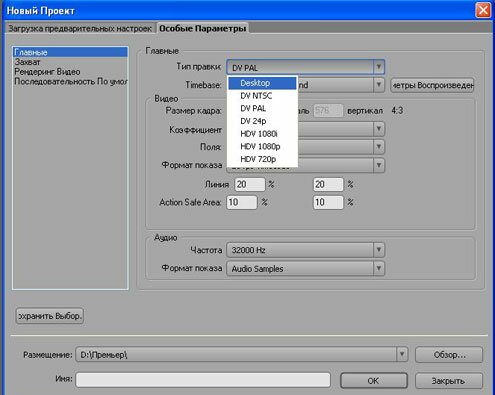
После этого становятся активными окошки Размер кадра, в которых вы можете ввести любое разрешение.
Также обязательно нужно выбрать из выпадающих списков значения для полей Timebase — число кадров в секунду, Коэффициент, Поля, Частота для звука:
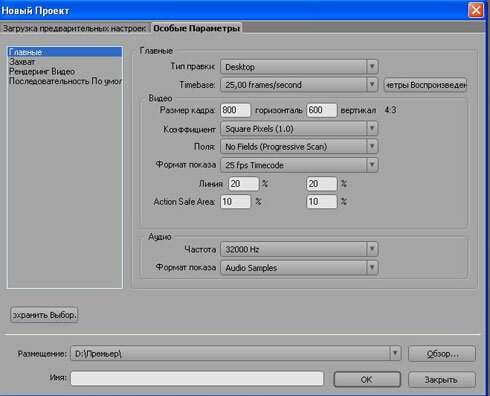
Тут подставляем значения, которые мы получили в свойствах вашего видеофайла.
Особенно будьте внимательны с полем Коэффициент, в котором выбирается соотношение сторон пикселя. Если в видео пиксель квадратный, а вы выберете прямоугольный (или оставите значение по умолчанию), то ваше видео неизбежно деформируется.
Многие начинающие монтажеры не учитывают эту характеристику и потом долго и безуспешно пытаются привести видео к нормальному виду.
Итак, последовательность действий при создании нестандартного проекта: узнаем характеристики видео — создаем соответствующий проект в разделе Особые параметры.
Если вам не совсем понятно, что делать, посмотрите небольшой видеоурок, в котором мы учимся создавать проект с особыми параметрами.
Пусть вас не смущает небольшое отличие в окнах AdobePremiere в статье и видеоуроке: в статье скрины окон версии 3 (русскоязычная), а в видеоуроке — версия 5.5 (англоязычная).
Никакой принципиальной разницы в разных версиях Премьера нет, в версии 5.5 просто больше шаблонов и настроек в окне Особые параметры.
Видеоурок «Как создать нестандартный проект в AdobePremiere»
Размер экрана видеоурока маленький. Вы можете скачать видеоурок в хорошем качестве MP4 с разрешением 1024х768, размер 34 Мб с DepositFiles.
Working with aspect ratios
An aspect ratio specifies the ratio of width to height. Video and still picture frames have a frame aspect ratio. The pixels that make up the frame have a pixel aspect ratio (sometimes referred to as PAR). Different video recording standards use different aspect ratios. For example, you record video for television in either a 4:3 or 16:9 frame aspect ratio. For more information, see Frame aspect ratio.
When a project is created in Premiere Pro, you set the frame and pixel aspect. Once these ratios are set, you cannot change them for that project. However, you can change the aspect ratio of a sequence. You can also use assets created with different aspect ratios in the project.
Premiere Pro automatically tries to compensate for the pixel aspect ratio of source files. If an asset still appears distorted, you can manually specify its pixel aspect ratio. Reconcile pixel aspect ratios before reconciling frame aspect ratios, because an incorrect frame aspect ratio can result from a misinterpreted pixel aspect ratio.
Types of aspect ratios
Commonly used aspect ratios are:
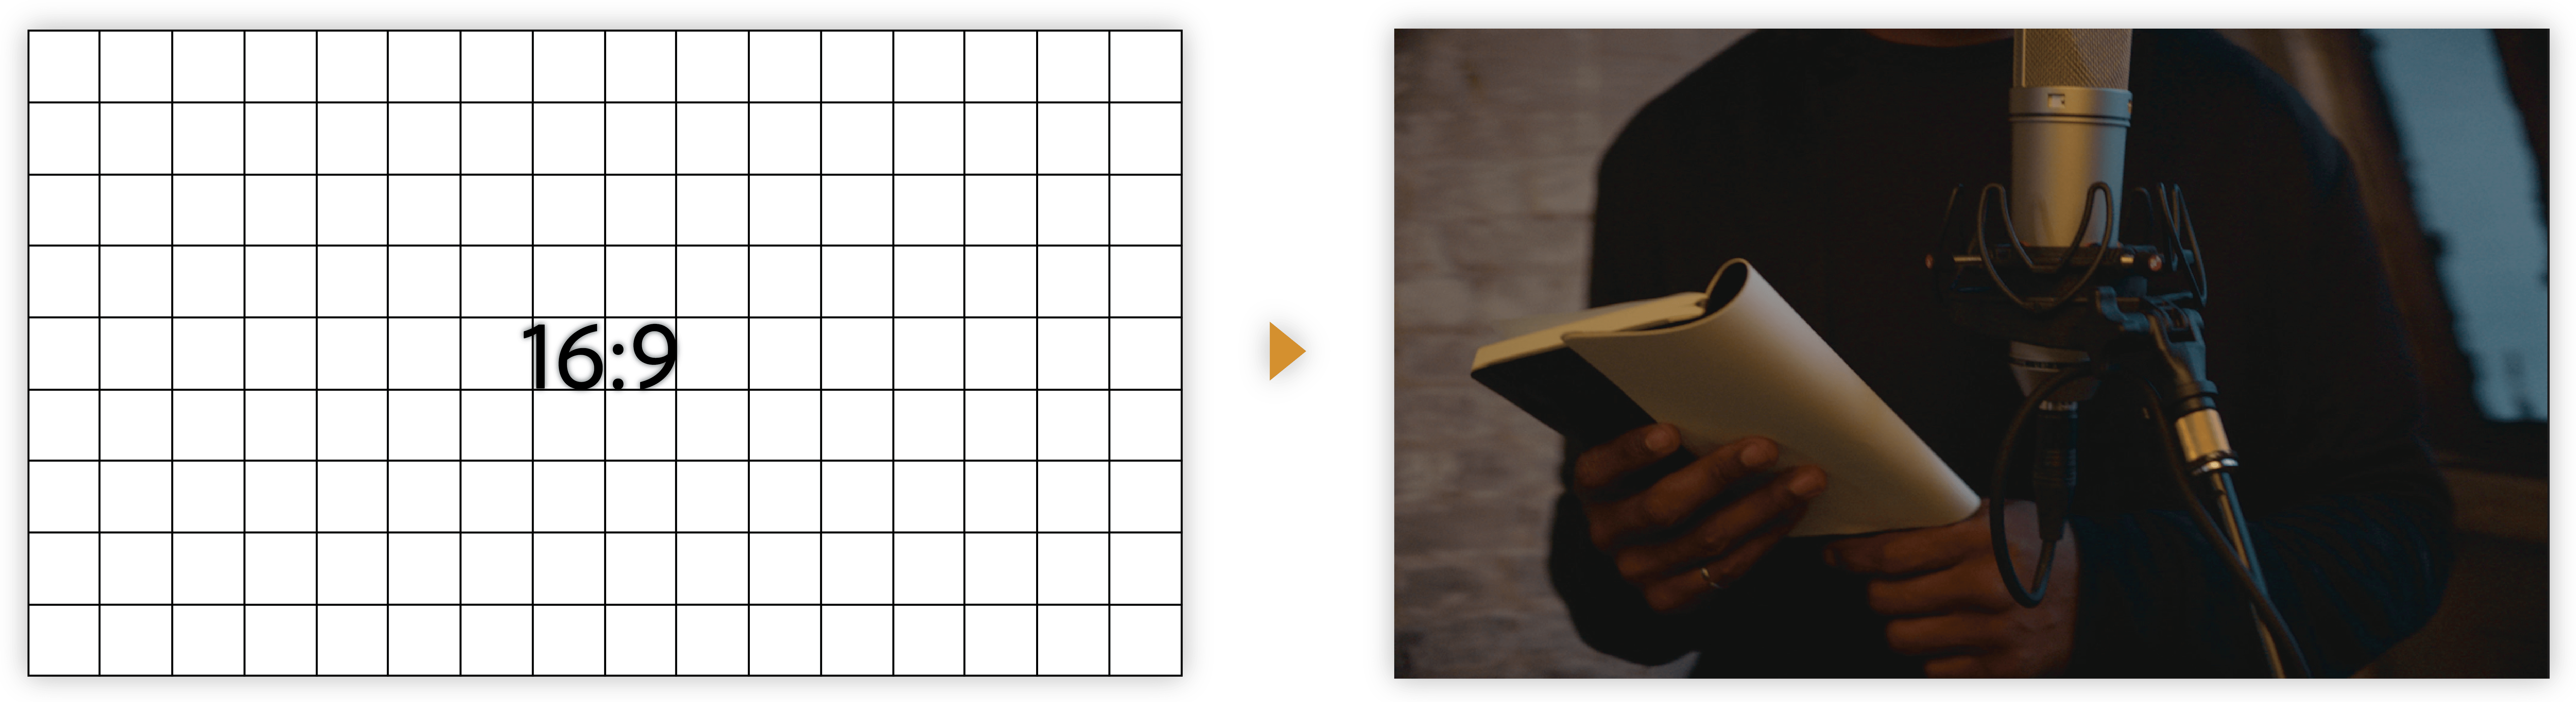
Widescreen (16:9)
It is the standard aspect ratio commonly shared by online videos, documentaries, and films. It captures a large amount of data with details.
Vertical (9:16)
It is the video recorded on your phone.

Fullscreen (4:3)
It is the aspect ratio that was used on television before widescreen was used. It focused on a particular element at a time.

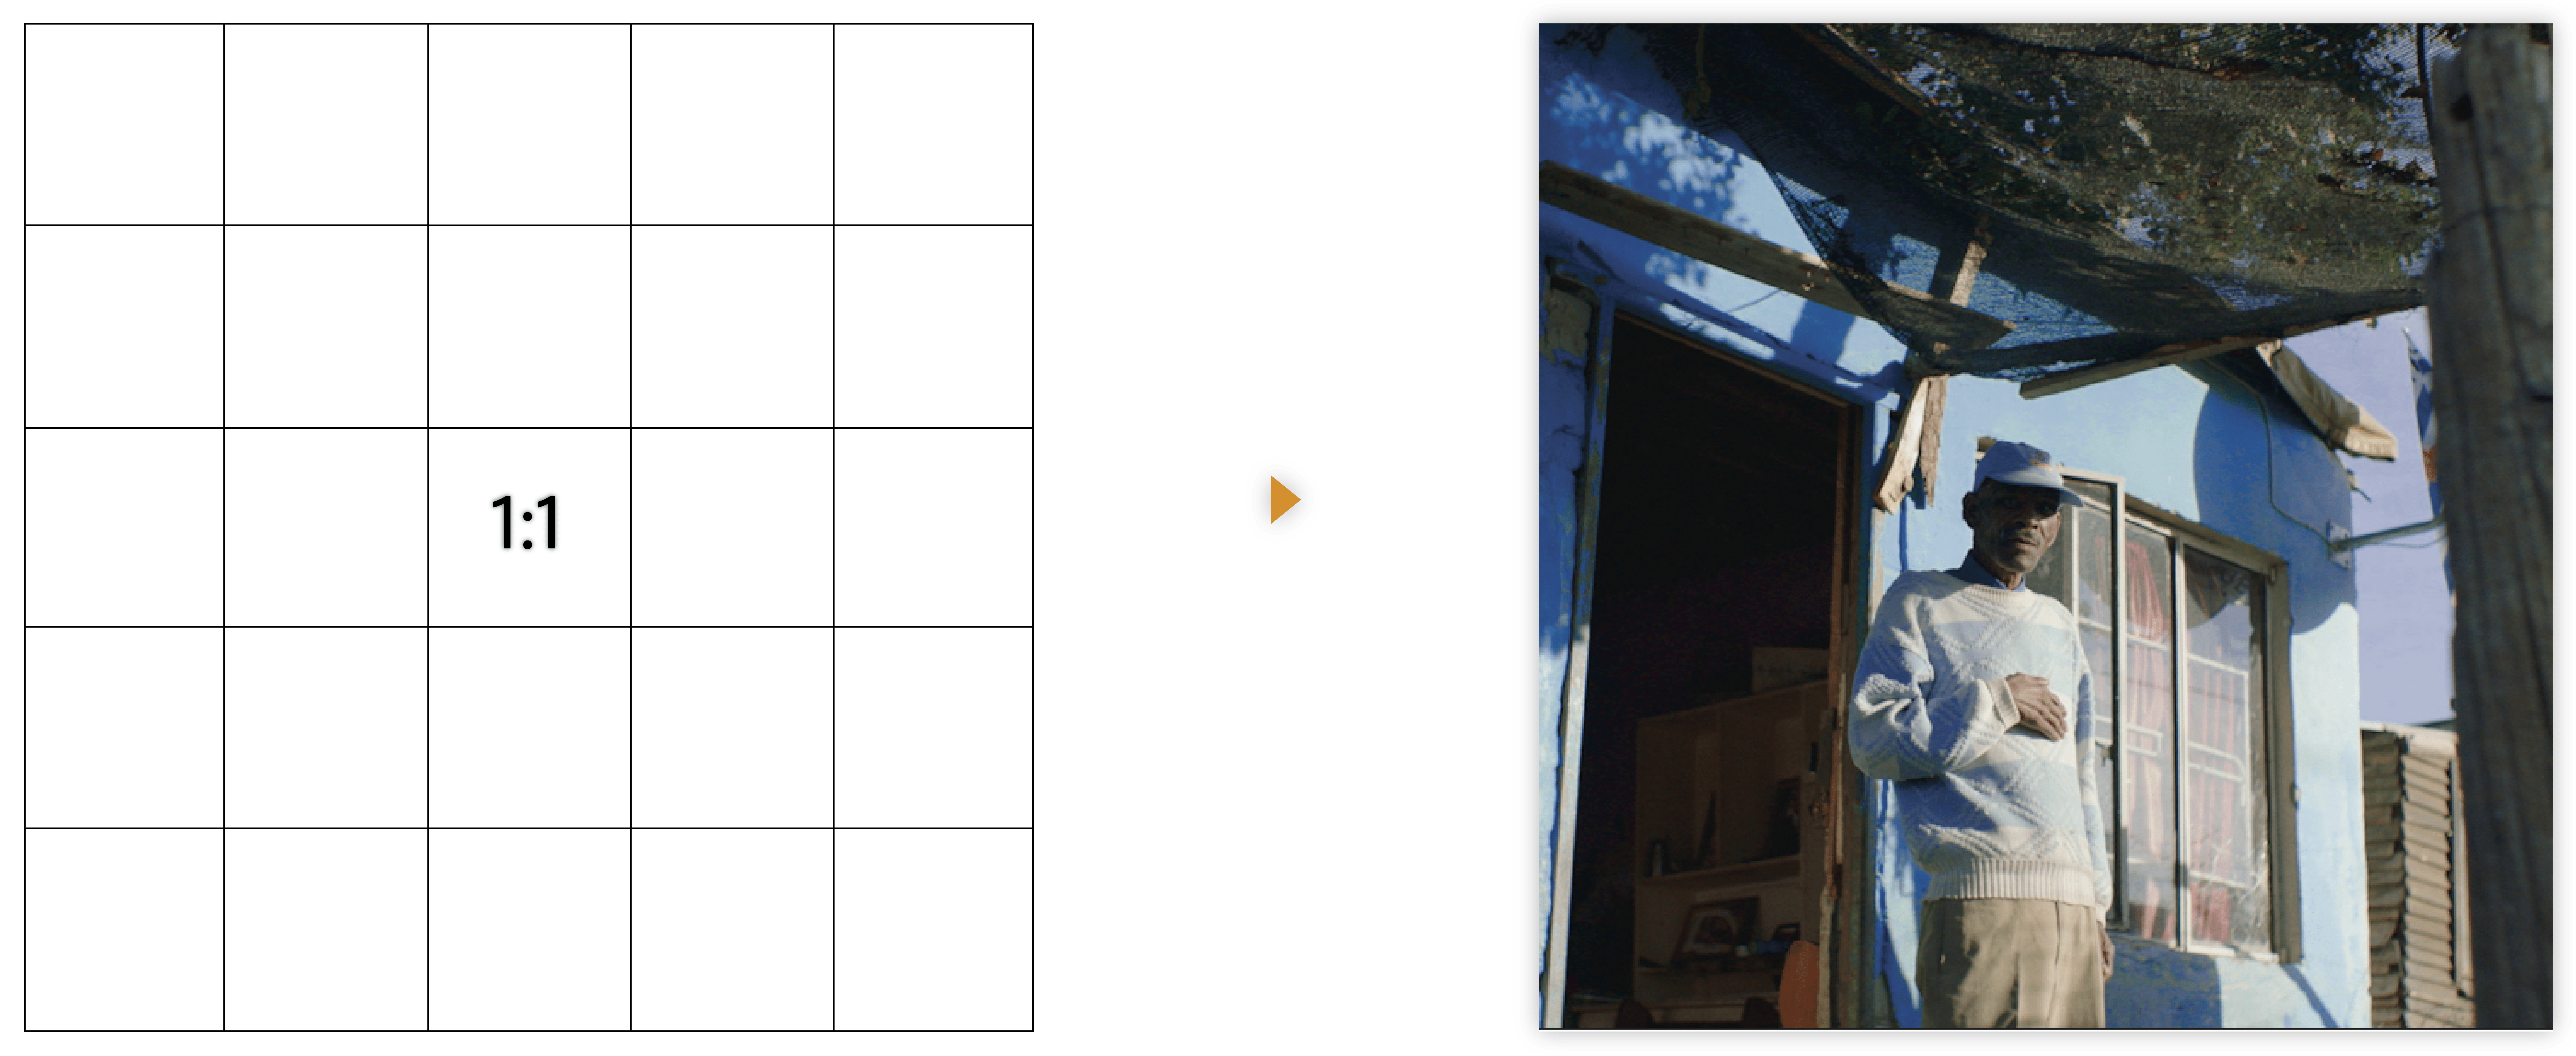
Square (1:1)
It is a perfect square ratio that is commonly used on Instagram.
Anamorphic (2.40:1)
It is a wide widescreen often used in movies. It is similar to 16:9 but the top and bottom are cropped. This effect gives it a cinematic feel.

Set the aspect ratio
To set the aspect ratio of a sequence:
Create a new sequence. Select File > New > Sequence.
Go to the Settings tab of the New Sequence dialog box.
Go to the Settings tab.
Under Video, enter the Frame Size(height) and horizontal(width). Premiere Pro automatically generates the aspect ratio.
Fill out the respective fields, name the sequence, and click OK.
The aspect ratio for the sequence has been set.
Frame aspect ratio
Frame aspect ratio describes the ratio of width to height in the dimensions of an image. Video and still picture frames have a frame aspect ratio.
For example, DV NTSC has a frame aspect ratio of 4:3 (or 4.0 width by 3.0 height). A typical widescreen frame has a frame aspect ratio of 16:9. Many cameras that have a widescreen mode can record using the 16:9 aspect ratio. Many films have been shot using even wider aspect ratios.

In Premiere Pro, you can implement the letterboxing or the pan and scan technique by using Motion effect properties such as Position and Scale.
Letterboxing
When you import clips shot in one frame aspect ratio into a project that uses another frame aspect ratio, you decide how to reconcile the different values. This placement leaves black bands above and below the movie frame, called letterboxing.
For example, two common techniques are used for showing a 16:9 movie on a 4:3 standard television. You can fit the entire width of the 16:9 movie frame within the 4:3 television frame.
Pan and scan
Pan and scan is an alternative method to use a project with another frame aspect ratio. Only a part of the frame is retained, while the rest is lost.
For example, another technique to show a 16:9 movie on a 4:3 standard television is to fill the 4:3 frame vertically with the entire height of the 16:9 frame. Then, you pan the horizontal position of the 16:9 frame within the narrower 4:3 frame so that important action always remains inside the 4:3 frame.

Pixel aspect ratio
Pixel aspect ratio describes the ratio of width to height of a single pixel in a frame. The pixels that make up a frame have a pixel aspect ratio (sometimes referred to as PAR). Pixel aspect ratios vary because different video systems make various assumptions about the number of pixels that are required to fill a frame.
For example, many computer video standards define a 4:3 aspect ratio frame as 640×480 pixels high, which results in square pixels. The computer video pixels have a pixel aspect ratio of 1:1 (square). Video standards such as DV NTSC define a 4:3 aspect ratio frame as 720×480 pixels, which result in narrower, rectangular pixels. The DV NTSC pixels have a pixel aspect ratio of 0.91 (nonsquare). DV pixels, which are always rectangular, are vertically oriented in systems producing NTSC video and horizontally oriented in systems producing PAL video. Premiere Pro displays clip pixel aspect ratio next to the clip image thumbnail in the Project panel.

A. 4:3 square-pixel image displayed on 4:3 square-pixel (computer) monitor B. 4:3 square-pixel image interpreted correctly for display on 4:3 non-square pixel (TV) monitor C. 4:3 square-pixel image interpreted incorrectly for display on 4:3 non-square pixel (TV) monitor
The clean aperture is the portion of the image that is free from artifacts and distortions that appear at the edges of an image. The production aperture is the entire image.
Distorted images
If you display rectangular pixels on a square-pixel monitor without alteration, images appear distorted. For example, circles distort into ovals. However, when displayed on a broadcast monitor, the images appear correctly proportioned because broadcast monitors use rectangular pixels. Premiere Pro can display and output clips of various pixel aspect ratios without distortion. Premiere Pro attempts to automatically reconcile them with the pixel aspect ratio of your project.
You could occasionally encounter a distorted clip if Premiere Pro interprets pixel aspect ratio incorrectly. You can correct the distortion of an individual clip by manually specifying the source clip pixel aspect ratio in the Interpret Footage dialog box.

Use assets with various aspect ratios
When an asset is imported, Premiere Pro attempts to preserve the frame aspect ratio, pixel aspect ratio, and frame dimensions so the asset does not appear cropped or distorted.
For assets that contain metadata, these calculations are automatic and precise. For example:
- When you capture or import NTSC footage with the ATSC frame size of 704×480, the D1 frame size of 720×486, or the DV frame size of 720×480, the pixel aspect ratio is set to D1/DV NTSC (0.91).
- When you capture or import footage with the HD frame size of 1440×1080, the pixel aspect ratio is set to HD 1080 Anamorphic (1.33).
- When you capture or import PAL footage with the D1 or DV resolution of 720×576, the pixel aspect ratio is set to D1/DV PAL (1.094).
For other frame sizes, Premiere Pro assumes that the asset was designed with square pixels and changes the pixel aspect ratio and frame dimensions to preserve the image aspect ratio. If the imported asset is distorted, you can change the pixel aspect ratio manually.
Assets in a sequence
When you drag an asset into a sequence, the asset is placed at the center of the program frame by default. Depending on its frame size, the resulting image could be too small or over cropped for the needs of the project. Premiere Pro can change its scale automatically when you drag an asset into a sequence, or you can change it manually.
It is always important to interpreted files correctly. You can read asset frame dimensions and pixel aspect ratio near the preview thumbnail and in the Video Info column of the Project panel. You can also find this data in the asset Properties dialog box, the Interpret Footage dialog box, and the Info panel.
Aspect ratio distortion in sequences
The sequence settings preset you choose when you create a sequence sets the frame and pixel aspect ratios for the sequence. You can’t change aspect ratios after you create the sequence, but you can change the pixel aspect ratio that Premiere Pro assumes for individual assets.
For example, if a square-pixel asset generated by a graphic looks distorted in Premiere Pro, you can correct its pixel aspect ratio to make it look right. By ensuring that all files are interpreted correctly, you can combine footage with different ratios in the same project. Then you can generate output that doesn’t distort the resulting images.
Изменение разрешения проекта в Premiere Pro CC
В Настройках проекта есть только выбор между DV и HDV

Это не формат проекта, это формат захвата — нужен, если у вас в компе есть карта видеозахвата, или если вы камеру по 1394 подключаете. С некоторых пор у Premiere нет такого фиксированного параметра как «разрешение проекта», вы можете работать в проекте с секвенциями, а уже они могут быть разного разрешения. Понятия не имею, как это называется у вас в русифицированной версии (зачем люди вообще программы русифицируют?), секвенция — это и есть небольшой проект, последовательность кадров и звуковых клипов в том виде, в котором вы их располагаете на монтажном столе.
К сожалению, менять разрешение секвенции нельзя (это происходит лишь один раз, когда вы выкладываете на монтажный стол материал, отличный от настроек секвенции — Premiere уточняет, изменить ли ей разрешение и частоту кадров секвенции, чтобы они совпадали с экспортируемым материалом).
Решение: создать новую секвенцию с нужными вам настройками, и скопировать в неё материалы из предыдущей.
Change Resolution in Premiere Pro Under 30 Sec (2023)
One of the fundamentals of editing is knowing how to change your video’s resolution – width, and height in Premiere Pro.
You should know the frame size (resolution) before creating a new project (even before shooting).
This is essential for your final delivery – like YouTube, Vimeo, Instagram, Film Festival, Cinema Projection, etc.
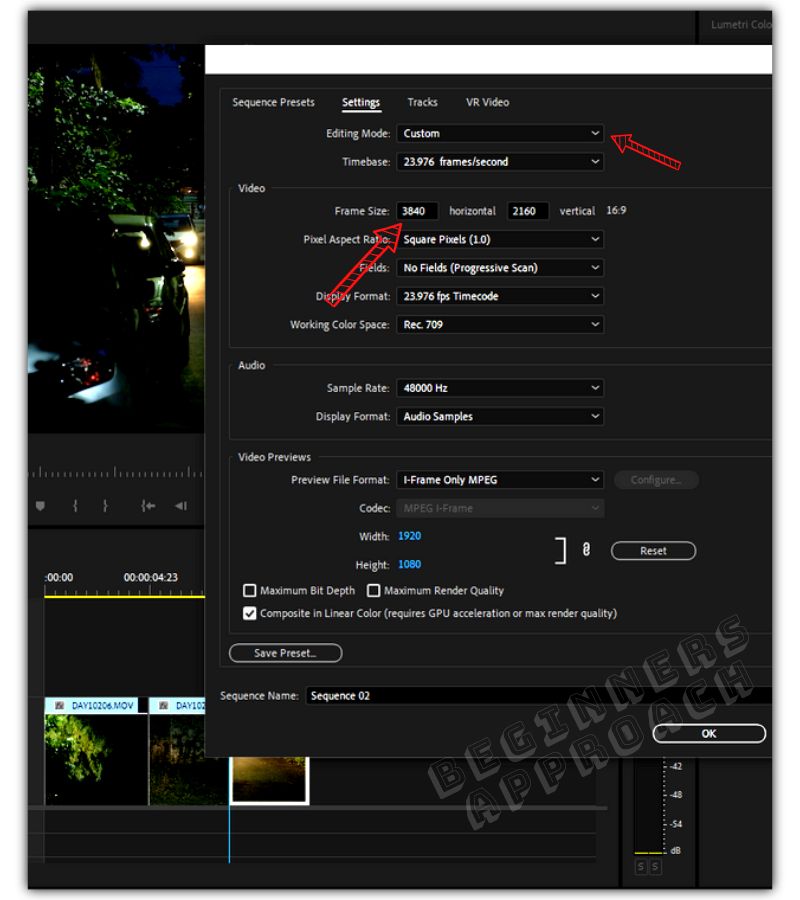
To change the resolution in Premiere Pro, create a new Sequence by going to “File” > “New” > “Sequence”. Click on the “Settings” tab. Select “Editing Mode” to “Custom“. Against “Frame Size“, change the horizontal and vertical resolution to, say, “3840” and “2160” for a 4K UHD project.
Now let’s go through the detailed – step-by-step process.
But before that…
The next thing you should know is the aspect ratio (the shape of your video). Your resolution determines your aspect ratio and vice versa.
You must know what aspect ratio is needed for your final delivery.
How to Change Resolution in Premiere Pro For an Already Existing Sequence?
- In the “Editing” workspace, go to the “Project Panel“.
- Right-click on the sequence that needs to be updated and select “Sequence Settings”.
- The “Sequence Settings” window will be displayed.
- Against “Frame Size“, change the “horizontal” and “vertical” resolution to, say, 1920 and 1080 for a 1080p HD project.
- Click on “Ok“. Done!
To make a 1920 x 1080 video in Premiere, you need to set the “Horizontal” and “Vertical” values to “1920” and “1080” respectively, against “Frame Size” in the “Sequence Settings” window.
(To get the sequence settings, right-click on the existing sequence and click “Sequence Settings” or go to “File” > “New” > “Sequence”, for a new one).
You can update the resolution in the middle of your editing through the above steps.
How to Change the Video or Frame Size in Premiere Pro?
To change the frame or video size, c reate a new Sequence by going to “File” > “New” > “Sequence” . In the “ New Sequence ” window, click the “ Settings ” tab. Set the “ Editing Mode ” to “ Custom “. Against the “ Frame Size “, change the horizontal and vertical resolution to, say, “1920” and “1080” for an HD project.
(Changing the video size or the frame size, or the resolution – all mean the same thing.)
How to Change Project Resolution in Premiere Pro?
A project is a collection of sequences. You can change the resolution of a sequence that you’re editing by going to the “Editing” workspace > “Project Panel”. Right-click on your required sequence, and select “Sequence Settings”. Against “Frame Size”, change the “horizontal” and “vertical” resolution to, say, 3840 and 2160 for a UHD project.