Рисуем игровую консоль Nintendo Switch в Adobe Illustrator

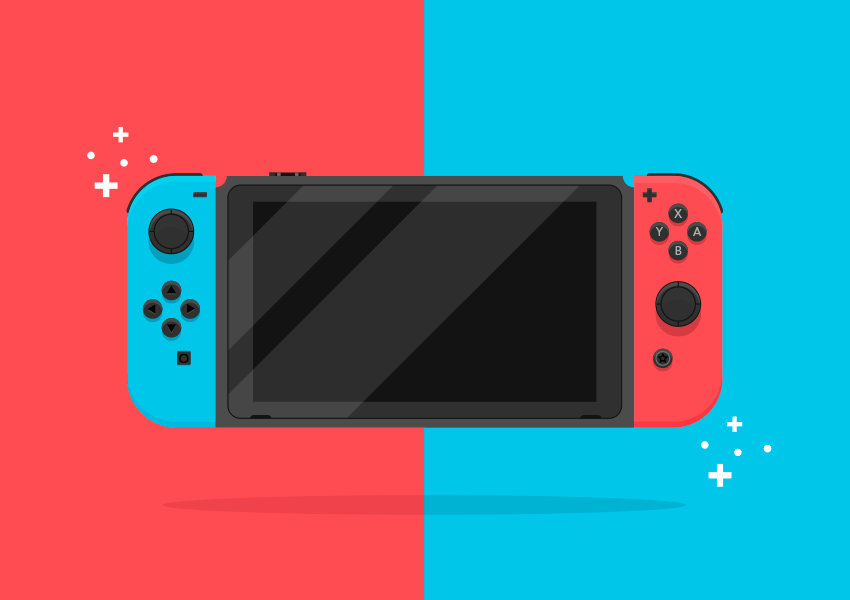
 What You’ll Be Creating
В этом уроке вы нарисуете новую игровую консоль Nintendo Switch, используя основные фигуры и инструменты Adobe Illustrator. Давайте же начнем!
Найти больше вдохновения от видеоигр можно на GraphicRiver.
1. Создаем новый документ
Нажмите Ctrl+N, чтобы создать новый документ. Единицами измерений задайте пиксели и введите размеры 800×600 по ширине и высоте соответственно. На вкладке Advanced укажите цветовое пространство RGB, разрешение Screen (72 ppi) и обязательно снимите галочку с пункта Align New Objects to Pixel Grid, после чего нажмите OK.
В настройках программы (Ctrl+K) задайте для смещения при помощи клавиатуры (Keyboard increment) расстояние в 1 пиксель. Не забудьте нажать OK.
Также включите отображение панели Info (Window> Info), где будут указываться размеры и координаты фигур. Не забудьте, что единицами измерения должны быть выбраны пиксели (Edit> Preferences> Units) — это значительно ускорит и упростит выполнение работы.


2. Создаем Nintendo Switch
В этом разделе мы нарисуем корпус и прочие компоненты консоли.
Шаг 1
Инструментом Rectangle Tool (M) создайте прямоугольник размерами 366×220 пикселей и цветом заливки #4D4D4D . На панели Transform задайте для его верхних опорных точек тип углов Inverted Round с радиусом 10 пикселей.
Игровые контроллеры обозначим двумя прямоугольниками 77×220 пикселей с цветами заливки #4CC6E8 и #E84C53 . Скруглите у них по паре точек с противоположных сторон при помощи инструмента Direct Selection Tool (A) и функции Live Corners.


Шаг 2
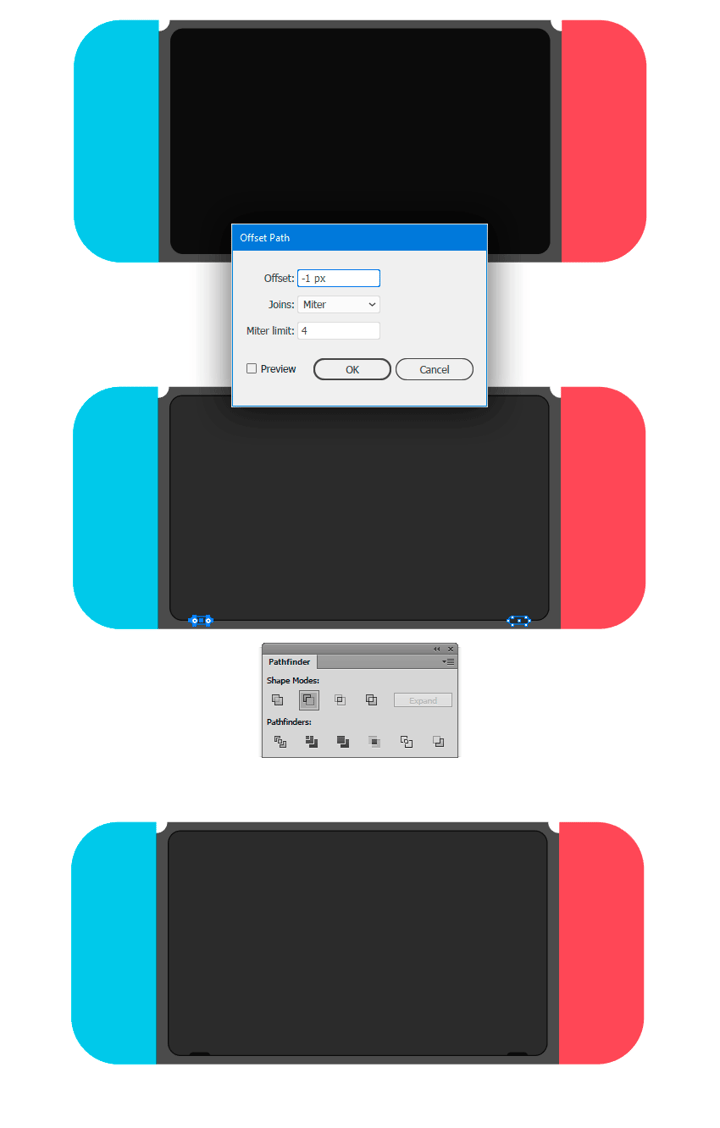
Обозначим дисплей еще одним прямоугольником размерами 345×205 пикселей ( #1A1A1A ), у которого при помощи Direct Selection Tool (A) закруглите все углы.
Сделайте копию (Ctrl+C, Ctrl+F) этой фигуры, к которой примените эффект Effect> Path> Offset Path со смещением -1 пиксель. Измените цвет данной заливки на #333333 . Внизу этой же фигуры добавьте инструментом Rounded Rectangle Tool два маленьких прямоугольника с закругленными углами. Затем выделите их вместе с этим объектом и вычтите командой Minus Front с панели Pathfinder.


Шаг 3
Нарисуйте по центру дисплея прямоугольник размерами 300×175 пикселей ( #1A1A1A ). Далее добавьте два белых ( #FFFFFF ) прямоугольника, которые тут же поверните на 45° инструментом Rotate Tool (R).
Уменьшите непрозрачность белых полос до 10%. Потом выделите их вместе с внешней рамкой экрана и инструментом Shape Builder Tool (Shift+M) удалите их части, выходящие за данные границы.


Шаг 4
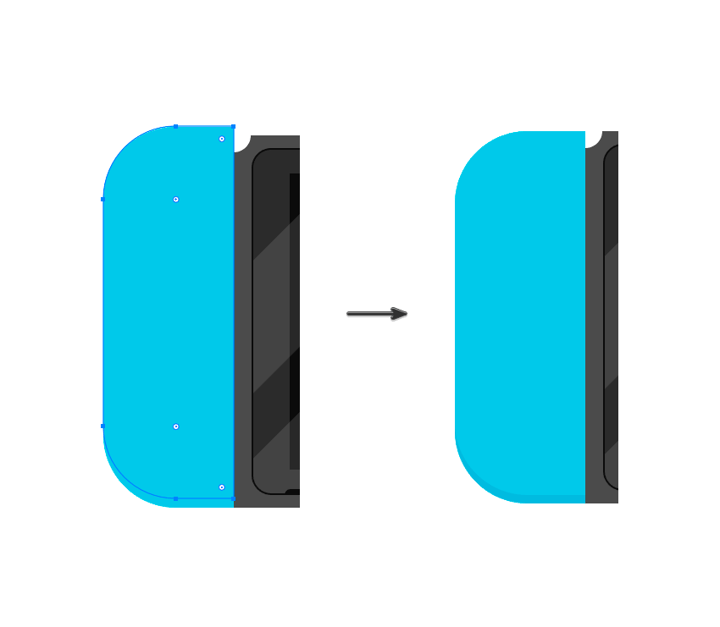
Давайте добавим тени и света на контроллеры (джойконы). Начнем с левого. Дважды продублируйте его фигуру (Ctrl+C, Ctrl+F, Ctrl+F), верхнюю из них вместите на 5 пикселей вверх.
Далее выделите обе копии и примените команду Minus Front с панели Pathfinder. Цвет полученной фигуры измените на #2CB8DE .


Шаг 5
Сделайте еще два дубликата левого джойкона (Ctrl+C, Ctrl+F, Ctrl+F), верхнюю из которых сместите на 5 пикселей вниз.
Затем выделите обе копии и выполните команду Minus Front с панели Pathfinder. Цвет заливки полученной фигуры измените на #2CB8DE .


Шаг 6
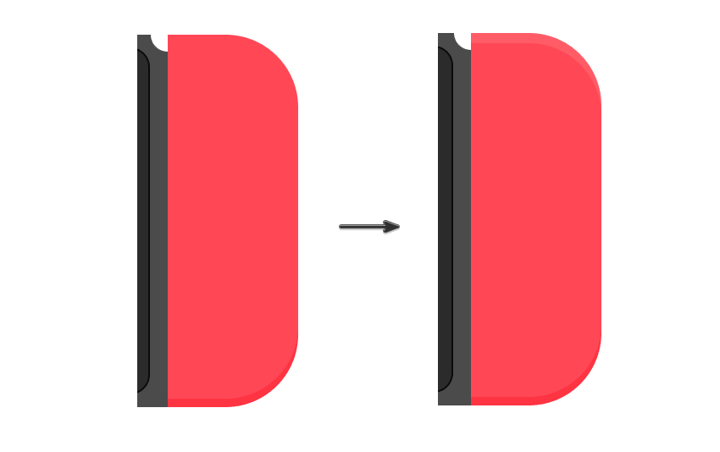
Повторите манипуляции из 4 и 5 шагов для правого джойкона. Для результирующих фигур используйте цвета заливок #D93B42 и #E85D63 соответственно.


Шаг 7
Теперь вновь сделайте копию левого контроллера (Ctrl+C, Ctrl+F). Удалите у нее заливку и добавьте обводку с цветом #333333 и толщиной 5 пикселей.
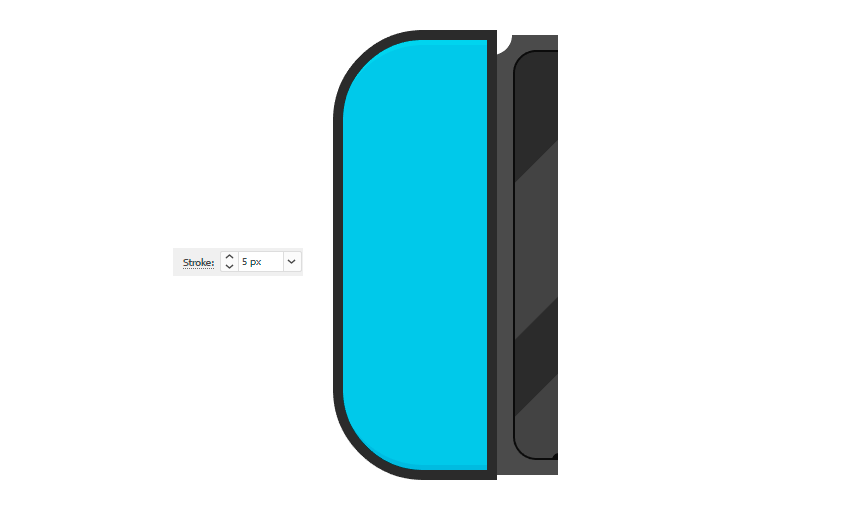


Шаг 8
Войдите в режим изоляции, дважды кликнув по этой же фигуре. Инструментом Pen Tool (P) добавьте две точки в ее верхней части и удалите все прочие, оставив только эдакую арку.
На панели Stroke измените тип кончиков обводки на Round Cap.


Шаг 9
Нажмите Esc для выхода из режима изоляции. Продублируйте оставшуюся часть обводки (Ctrl+C, Ctrl+F) ( #ACD4A3 ) и отразите по вертикали, кликнув правой кнопкой и выбрав там пункт Transform> Reflect. Расположите эту копию на правом джойконе.
Отправьте обе обводки на самый задний план (Object> Arrange> Send to Back; Shift+Ctrl+[).


Шаг 10
Добавим кнопку на консоль. Инструментом Rectangle Tool (M) создайте прямоугольник размерами 32×2 пикселя ( #1A1A1A ) и еще по два небольших прямоугольника с цветами #333333 и #666666 . Расположите все фигуры как показано ниже.
Сгруппируйте (Ctrl+G) все эти объекты и разместите как указано ниже.


Шаг 11
Теперь добавим аналоговые манипуляторы на джойконы. Инструментом Ellipse Tool (L) нарисуйте круг размерами 40×40 пикселей ( #1A1A1A ) и еще один круг 38×38 пикселей ( #333333 ).
Сделайте две копии последнего круга (Ctrl+C, Ctrl+F, Ctrl+F), верхнюю из которых сместите на 4 пикселя вниз. Затем выделите оба дубликата и выполните команду Minus Front с панели Pathfinder. Измените цвет заливки получившейся фигуры на #4D4D4D .


Шаг 12
Сделайте два дубликата внутреннего круга (Ctrl+C, Ctrl+F, Ctrl+F). Верхний из них сместите на 15 пикселей вниз, после выделите обе копии и выполните команду Minus Front с панели Pathfinder. Измените цвет заливки получившейся фигуры на #4D4D4D .
Создайте новый круг 30×30 пикселей с цветом заливки #1A1A1A и обводкой толщиной 1 пиксель. Расположите его по центру кнопки и дорисуйте инструментом Pen Tool (P) линии, разделяющие внешнее кольцо по вертикали.
Наконец, добавьте круг 40×40 пикселей ( #000000 ) с 20% непрозрачностью, разместите ее на самом заднем плане кнопки (Shift+Ctrl+[).


Шаг 13
Сгруппируйте (Ctrl+G) все элементы кнопки, продублируйте ее (Ctrl+C, Ctrl+F). Расположите обе кнопки как показано ниже.


Шаг 14
Переходим к кнопкам направлений. Создайте круг 17×17 пикселей ( #333333 ). Сделайте две его копии (Ctrl+C, Ctrl+F), последнюю из которых сместите на 3 пикселя вниз. Далее выделите ее вместе с предыдущим дубликатом и выполните операцию Minus Front с панели Pathfinder.
Измените цвет заливки получившейся фигуры на #4D4D4D . Добавьте круг 17×17 пикселей ( #000000 ) с 20% непрозрачностью, который отправьте на задний план кнопки (Shift+Ctrl+[).


Шаг 15
Сгруппируйте (Ctrl+G) все элементы кнопки и сделайте три ее копии (Ctrl+C, Ctrl+F). Расположите их в форме прямого креста, который тоже сгруппируйте (Ctrl+G).
Инструментом Polygon Tool нарисуйте теругольник ( #4D4D4D ). Продублируйте его ( #000000 ) (Ctrl+C, Ctrl+F), сместите эту копию на 1 пиксель вверх.


Шаг 16
Нарисуйте треугольники для других направлений, повторите для них манипуляции из предыдущего шага, после чего разместите всю крестовину на левом джойконе.


Шаг 17
Сделайте копию этой крестовины. Удалите треугольники и вместо них добавьте инструментом Type Tool (T) буквы X, Y, A и B с цветом заливки #ABABAB . Эти кнопки расположите на правом джойконе.
Используйте любой шрифт без засечек (Sans Serif).


Шаг 18
Добавим еще две небольшие кнопки. Создайте прямоугольник размерами 12×4 пикселя ( #333333 ), продублируйте его ( #000000 ), уменьшите непрозрачность копии до 20%, отправьте ее на задний план (Ctrl+[) и сместите на 1 пиксель вниз.
В верхней части этой фигуры добавьте прямоугольник 12×1 пиксель ( #4D4D4D ). Сгруппируйте (Ctrl+G) все элементы кнопки и продублируйте их (Ctrl+C, Ctrl+F).
Добавьте прямоугольники 4×12 пикселей ( #333333 ), 4×1 пикселя ( #4D4D4D ) и 4×12 пикселей ( #000000 ). У последнего уменьшите непрозрачность до 20% и отправьте его на задний план (Ctrl+[). Сгруппируйте (Ctrl+G) все элементы второй кнопки и расположите как показано ниже.


Шаг 19
Скопируйте одну из кнопок направлений. По ее центру добавьте круг 12×12 пикселей с обводкой цвета #707070 . Затем инструментом Star Tool нарисуйте пятилучевую звезду с обводкой черного цвета ( #000000 ). Сгруппируйте (Ctrl+G) все элементы этой кнопки и разместите ее на правом джойконе.


Шаг 20
На левый контроллер добавьте прямоугольник 12×12 пикселей с радиусом скругления углов 1 пиксель ( #333333 ). Дважды продублируйте его (Ctrl+C, Ctrl+F). Верхнюю копию сместите на 1 пиксель вниз, затем выделите оба дубликата и выполните команду Minus Front с панели Pathfinder.
Залейте получившуюся фигуру цветом #4D4D4D . Вставьте еще одну копию квадрата (Ctrl+F), сместите ее на 1 пиксель вниз, отправьте на самый задний план (Shift+Ctrl+[), измените цвет заливки на #000000 и уменьшите непрозрачность до 20%.
Наконец, нарисуйте по центру данной конструкции круг 7×7 пикселей с обводкой черного цвета ( #000000 ). Сгруппируйте (Ctrl+G) все элементы этой кнопки и расположите на левом джойконе.


3. Добавляем фон и некоторые детали
Шаг 1
В этом шаге давайте добавим фон, создав два прямоугольника размерами 400×600 пикселей с цветами заливки #E84C53 и #4CC6E8 . Отправьте их на самый задний план (Shift+Ctrl+[) и разместите на левой и правой стороне соответственно.


Шаг 2
Дополним иллюстрацию точками и крестиками белого цвета ( #FFFFFF ), которые нарисуем инструментами Ellipse Tool (L) и Rectangle Tool (M). Последней деталью станет тень от консоли в виде овала 450×17 пикселей черного цвета ( #000000 ) и с непрозрачностью 10%.


Мы закончили, поздравляю!
Вот и готова наша интерпретация Nintendo Switch и мне жаль, что она находится не в моих руках. Надеюсь, урок вам понравился и вы примените что-то из описанного здесь на практике. Буду рад видеть ваши варианты в иллюстрациях.
How To Draw Nintendo Switch
Nintendo Switch is a home video game console developed by Nintendo and was released on March 3, 2017. It is a hybrid console that can be used as both a home console and a portable device.
The Switch has two Joy-Con controllers that can be used interchangeably, either attached to the console itself or handheld, or they can be used as two individual controllers. The Switch also has a kickstand to prop the console up when not in use.
If you’re interested in learning how to draw the Nintendo Switch, follow these step-by-step instructions.
1. Begin by drawing a rectangle that will serve as the console itself.
2. Next, draw two small rectangles above the first rectangle. These will be the Joy-Con controllers.
3. To finish the console, add a kickstand to the back of the rectangle.
4. Finally, color in your drawing and add any other details you’d like.
That’s all there is to it! With a little practice, you’ll be able to draw the Nintendo Switch with ease.
Introduction to Drawing the Nintendo Switch
Hey there! If you’re reading this, then you’re probably interested in learning how to draw the Nintendo Switch. Well, you’ve come to the right place! In this article, we’ll be breaking down the process of drawing the Nintendo Switch step-by-step, so that even if you’re a complete beginner you’ll be able to produce a pretty decent rendition of everyone’s favorite hybrid console. Let’s get started!
The first thing you’ll need to do is draw a basic outline of the Switch. For this, you can either use a pencil or a pen, whichever you feel more comfortable with. Once you’ve got your outline down, it’s time to start filling in the details.
The next step is to add the buttons. The Nintendo Switch has four main buttons: the power button, the volume button, the home button, and the capture button. Start by drawing the power button in the top-left corner of the console. Then, add the volume button just below it. Next, draw the home button in the center of the console, and finally, add the capture button in the bottom-right corner.
Now it’s time to add the joysticks. The Nintendo Switch has two joysticks, one on the left and one on the right. Start by drawing the left joystick in the top-left corner of the console. Then, add the right joystick in the top-right corner.
The next step is to add the speakers. The Nintendo Switch has two speakers, one on the left and one on the right. Start by drawing the left speaker in the bottom-left corner of the console. Then, add the right speaker in the bottom-right corner.
The final step is to add the charging port. The charging port is located in the bottom-center of the console. Simply draw a small circle to represent it.
And that’s it! You’ve now drawn a pretty decent rendition of the Nintendo Switch. Of course, there are some other smaller details that you could add if you want, but this should be enough to get you started.
We hope you found this article helpful. If you did, be sure to share it with your friends who are also interested in learning how to draw the Nintendo Switch. Until next time!
Step 1: Sketching the Main Console Shape
The Nintendo Switch is a gaming console that can be used as both a handheld and a home console. In this article, we’ll show you how to draw the main console of the Nintendo Switch.
To start, sketch out the general shape of the console. The Nintendo Switch has a rectangular shape with rounded corners. Next, draw the two Joy-Con controllers on either side of the console. The Joy-Con controllers are slightly smaller than the console itself and have a more oval shape.
Once you have the basic shapes down, you can start adding in the details. Draw the buttons and analog sticks on the Joy-Con controllers, as well as the buttons on the top of the console. Draw the vents on the back of the console, and the USB ports on the side.
Finally, color in your drawing. The Nintendo Switch console is primarily white, with gray Joy-Con controllers. You can add your own personal touch by adding color to the Joy-Con controllers or the back vents.
With this simple step-by-step guide, you’ll be able to draw your own Nintendo Switch console in no time!
Step 2: Adding the Joy-Con Controllers
In this tutorial, we’ll be learning how to draw the Nintendo Switch, step by step. We’ll start off by drawing the console itself, and then we’ll add the JoyCon controllers. Let’s get started!
First, we’ll need to draw the outline of the Nintendo Switch console. We’ll start with a rectangle for the body of the console, and then we’ll add two small rectangles for the JoyCon controllers. To make things easier, we’ll draw the rectangle for the body of the console first, and then we’ll draw the rectangles for the JoyCon controllers on top of it.
Once you have the basic outline of the console, you can start adding some details. First, draw a line down the middle of the rectangle for the body of the console. This line will represent the seam where the two halves of the console come together. Next, draw a small circle in the center of the console. This circle will represent the power button.
Now we can start adding some color to our drawing. The body of the console is black, so we’ll start with that. Color in the entire rectangle for the body of the console, and then color in the small circle for the power button. The JoyCon controllers are gray, so we’ll color in the two small rectangles for those next.
And that’s it! You now know how to draw the Nintendo Switch console, complete with JoyCon controllers. Thanks for following along, and be sure to check out our other tutorials for more drawing fun.
Step 3: Drawing the Screen and Buttons
In this step, we’ll be drawing the Switch’s screen and buttons. First, let’s start with the screen. Draw a rectangle in the center of the Switch. This will be the screen. Next, draw two small rectangles on the top and bottom of the screen. These will be the buttons. Finally, draw a small rectangle on the left side of the screen. This will be the Joy-Con.
Now let’s move on to the buttons. Draw a small circle in the center of the top rectangle. This will be the A button. Next, draw a small circle in the center of the bottom rectangle. This will be the B button. Finally, draw a small rectangle on the left side of the bottom rectangle. This will be the Home button.
That’s it for this step! In the next step, we’ll be adding the Joy-Con grip and the Joy-Con straps.
Step 4: Adding Details and Textures
In this step, we’ll add some details and textures to our Nintendo Switch illustration. We’ll start by adding some shadows to give the impression that the Switch is sitting on a surface. Then we’ll add some highlights to make the Switch look shiny. Finally, we’ll add some text to finish off the illustration.
To add the shadows, we’ll use a dark grey color. First, we’ll add a shadow under the Switch itself. Then we’ll add a shadow under the Joy-Con controllers. To add the highlights, we’ll use a light grey color. We’ll add highlights to the top of the Switch, the Joy-Con controllers, and the buttons.
To add the text, we’ll use the Nintendo font. First, we’ll add the word “Nintendo” in white. Then we’ll add the words “Switch” and “Joy-Con” in grey.
Step 5: Enhancing the Drawing with Colors and Shading
Now that you have the basic outline of your Nintendo Switch drawing complete, it’s time to add some color and shading to make it look more realistic.
To start, choose the colors you want to use for your drawing. You can use any colors you like, but for this example we will use a light blue for the console and controllers, a dark blue for the buttons, and a gray for the Joy-Con straps.
Once you have your colors selected, it’s time to start adding some shading. To do this, you will need to use a darker shade of each color for the areas that are in shadow. For example, for the light blue console color, you would use a darker blue for the shadows.
To create the illusion of depth, you will also need to use a lighter shade of each color for the areas that are closest to the light source. For this drawing, we will pretend that the light is coming from the top left, so the areas closest to the light will be lighter than the areas in shadow.
Now that you have your colors and shading sorted out, it’s time to start drawing! Begin by adding the darker shade of each color to the areas that are in shadow. Then, add the lighter shade of each color to the areas that are closest to the light source.
Once you have the basic colors and shading in place, you can start adding some details. For example, you can use a dark blue to add shadows around the buttons, or a light blue to highlight the edges of the console.
Finally, once you’re happy with your drawing, you can add some highlights by using a white pencil or marker to add dots or lines in the areas that are closest to the light source.
And that’s it! With a little bit of practice, you’ll be drawing Nintendo Switches like a pro in no time!
Tips for Achieving Realistic Proportions and Perspective
Nintendo Switch is a hybrid video game console released by Nintendo in 2017. As a hybrid console, the Switch can be used as both a home console and a portable device. The Switch is the successor to the Wii U, and was released in North America on March 3, 2017.
The Nintendo Switch has two main controllers: the Joy-Con controllers. The Joy-Con controllers can be used as a single controller, or they can be divided into two separate controllers that can be used by two different people. The Joy-Con controllers can also be used to play games on the Switch’s portable screen, or they can be connected to the Switch’s docking station to play games on a television.
The Switch’s portable screen is a 6.2-inch LCD display with a resolution of 1280×720 pixels. The Switch can be played in three different modes: TV mode, tabletop mode, and handheld mode. In TV mode, the Switch is placed in the included docking station and connected to a television. In tabletop mode, the Switch is placed on a table or other flat surface, and two players can use the Joy-Con controllers to play games. In handheld mode, the Switch is held like a traditional handheld video game console, and one or two players can use the Joy-Con controllers to play games.
The Switch has a variety of games available for it, including first-party games like The Legend of Zelda: Breath of the Wild, Super Mario Odyssey, and Mario Kart 8 Deluxe; third-party games like Skyrim, Doom, and NBA 2K18; and indie games like Stardew Valley, Celeste, and Overcooked.
When drawing the Nintendo Switch, it’s important to get the proportions and perspective correct. The Switch is a rectangular device, so the length and width should be drawn in correct proportion to each other. The Switch’s screen is 6.2 inches wide, so that should be used as a reference point when drawing the device. The Switch is also a bit thicker than it is wide, so keep that in mind when drawing it.
When drawing the Switch in perspective, it’s important to keep in mind that the device is meant to be viewed from the top down. This means that the top of the Switch should be drawn closer to the viewer than the bottom. The sides of the Switch should also converge towards the top, creating a sense of depth.
With these tips in mind, drawing the Nintendo Switch should be a breeze!
Exploring Different Nintendo Switch Accessories and Features
Nintendo Switch is a hybrid video game console released by Nintendo in 2017. It is a successor to the Wii U, and was released in North America, Europe, and Japan on March 3, 2017. The console is a hybrid device that can be used as a home console and portable device. The Switch has two detachable controllers called the Joy-Con, which can be used as a single controller or two separate controllers. The console can be played in three different modes: TV mode, handheld mode, and tabletop mode.
There are several accessories available for the Nintendo Switch, including the Joy-Con Grip, Joy-Con Wheel, and Switch Pro Controller. The Joy-Con Grip is a controller that allows the Joy-Con to be attached to it, making it easier to hold. The Joy-Con Wheel is a steering wheel attachment for the Joy-Con that can be used in racing games. The Switch Pro Controller is a more traditional controller that can be used with the Switch in TV mode.
The Nintendo Switch has several features that make it unique. One feature is the ability to play games with friends online. The Switch also has a feature called the Nintendo eShop, which is an online store where you can buy and download games. The Switch also has a built-in camera that can be used to take pictures and videos.
If you’re looking for a new and exciting gaming console, then the Nintendo Switch is a great option. With its unique features and accessories, the Switch is a must-have for any gaming fan.
Author

Meet Sophia Williams, a 25-year-old blogger who is passionate about sharing her life tips and experiences to help others lead happier and more fulfilling life. With a degree in psychology and a love for personal development, Sophia Williams is constantly exploring ways to improve her own life and is dedicated to sharing her findings with her readers. When she’s not writing, you can find her practicing yoga, exploring new cities, and spending time with her cat, Luna.
Как нарисовать нинтендо свитч

РИСУЕМ 3D NINTENDO SWITCH (ИГРОВУЮ КОНСОЛЬ) ЗА СЕКУНДЫ | УРОК В ADOBE ILLUSTRATOR
Сегодня мы нарисуем одну из самых популярных игровых консолей Nintendo в 3D в Adobe Illustrator.
Спасибо за вдохновение https://www.nintendo.com/switch/system/
_ _ _ _ _ _ _ _ _ _ _ _ _ _ _ _ _ _ _ _ _ _ _ _ _
. Если вы уже чувствует себя уверенно в Adobe Illustrator и хотите составить профессиональное коммерческое портфолио,
то добро пожаловать на мой авторский курс “Коммерческое портфолио: Шаг вперёд”.
Сайт курса здесь https://stepup.design/ru/
_ _ _ _ _ _ _ _ _ _ _ _ _ _ _ _ _ _ _ _ _ _ _ _ _
! Моя книга на русском языке тут https://stepup.design/ru/50-prostyh-idej/
! Моя книга на английском языке тут https://book.stepup.design/
_ _ _ _ _ _ _ _ _ _ _ _ _ _ _ _ _ _ _ _ _ _ _ _ _
Если вы только начинаете свой путь в графический дизайн, то советую вам пройти мой БЕСПЛАТНЫЙ 30-й план.
Ссылка на план под этим видео https://youtu.be/vMvvYgz8UJE
_ _ _ _ _ _ _ _ _ _ _ _ _ _ _ _ _ _ _ _ _ _ _ _ _
*** МОЙ ПАТРЕОН – это не только ваша поддержка и моё большое спасибо, но и ДИЗАЙНЫ и ЦВЕТА УРОКОВ.
Ссылка на мой Patreon: https://www.patreon.com/elena_baryshkina
_ _ _ _ _ _ _ _ _ _ _ _ _ _ _ _ _ _ _ _ _ _ _ _ _
* АВТОРСКИЕ ПРАВА * При полном или частичном использовании/копировании материалов видео прямая активная ссылка на это видео ОБЯЗАТЕЛЬНА!
_ _ _ _ _ _ _ _ _ _ _ _ _ _ _ _ _ _ _ _ _ _ _ _ _
_ _ _ _ _ _ _ _ _ _ _ _ _ _ _ _ _ _ _ _ _ _ _ _ _
Мой английский канал с уроками в программе Adobe Illustrator
https://www.youtube.com/channel/UCNHpp-PPCb8Il11AMaAhvPQ
_ _ _ _ _ _ _ _ _ _ _ _ _ _ _ _ _ _ _ _ _ _ _ _ _
⭐ Мой INSTAGRAM – https://www.instagram.com/elena_baryshkina/ – моя жизнь в Черногории и мои работы
_ _ _ _ _ _ _ _ _ _ _ _ _ _ _ _ _ _ _ _ _ _ _ _ _ _
Мой TELEGRAM на русском языке и выкладываю туда интересные вещи про графический дизайн, свои работы и оповещения о выходе видео + вас на моём Телеграм больше 4500 тысяч и там вы сможете пообщаться друг с другом и найти ответы на свои вопросы https://t.me/elena_baryshkina
_ _ _ _ _ _ _ _ _ _ _ _ _ _ _ _ _ _ _ _ _ _ _ _ _
_ _ _ _ _ _ _ _ _ _ _ _ _ _ _ _ _ _ _ _ _ _ _ _ _
Меня зовут Елена. Я графический дизайнер и векторный художник с 12-летним опытом в области дизайна и сейчас живу в небольшом городке Херцег-Нови в Черногории.
Моя цель – помочь вам сделать первые шаги в Adobe Illustrator и вдохновить вас стать графическим дизайнером. На этом канале я рассказываю про графический дизайн и создаю уроки в программе Adobe Illustrator для начинающих ребят.
Как нарисовать Nintendo Switch в 2023?

Как Хагги Вагги превратился в монстра «Правда в том, что Хагги Вагги — реальный персонаж — но не тот, который исходит из извращенного ума троллей, пытающихся травмировать маленьких детей. «.
Как нарисовать Коди?
Как нарисовать Боузера младшего.
Как нарисовать Валуиджи легко?
Как нарисовать Йоши из Марио.
Как нарисовать девушку из Friday night Funkin?
Как нарисовать поцелуйчик Мисси.
Все права защищены. Несанкционированное копирование, полностью или частично, строго запрещено.
По статусу в обществе
По месту работы
Новые бизнес-идеи 2023

Можете ли вы отличить модем от маршрутизатора?
Вы когда-нибудь спрашивали: «Нужен ли мне модем и маршрутизатор?» Проще говоря, модем подключает ваш дом к Интернету, а маршрутизатор создает сеть внутри вашего дома. «. Содержание как подключить 3 маршрутизатора wifi Как настроить широкополосный доступ? Что такое режим моста? Вы когда-нибудь спрашивали, нужны .
Можно ли увидеть, кто владеет несколькими аккаунтами Instagram
Пусть кто-то управляет вашим аккаунтом Instagram «Да, взглянув на профиль аккаунта Instagram, вы можете определить, кому он принадлежит. Зайдите в профиль аккаунта и выберите «»Followers»», чтобы увидеть, кому он принадлежит. В строке поиска введите имя пользователя аккаунта, который вы хотите увидеть. » «. Содержание .
Как быстрее нырнуть в воду
Как быстрее нырять в Minecraft. Содержание Как быстрее плавать в зачаровании в Minecraft Как быстрее нырять в Minecraft Как выполнить трюк «водная лава» Можно ли плавать в лаве Что такое скорость плавания Как быстрее погрузиться под воду Как быстро плавать в лаве в Minecraft Что такое эффект .
Как перезагрузить OnePlus 3 без кнопки питания и кнопки регулировки громкости
Как выключить OnePlus 3 без кнопки питания «Удерживая кнопку громкости нажатой, подключите OnePlus 3 к компьютеру с помощью кабеля USB. Подождите, пока телефон загрузится в режим загрузки. После этого нажмите вниз на кнопку регулировки громкости, чтобы отменить операцию. После отмены операции OnePlus 3 перезагрузится и .
Что произойдет, если кто-то узнает ваш адрес
Запрещено ли кому-либо узнавать ваш адрес «Тот, кто знает ваш адрес, может получить доступ к вашей почте или даже изменить ваш почтовый адрес. Это может привести к получению разнообразной личной информации о вас, включая медицинские данные и финансовые записи». Номер телефона. » «. Как найти чей-то адрес по имени и .
Сколько платит Amazon storefront
Бесплатна ли витрина Amazon «Комиссионные варьируются от 1% за продажу до 20% в зависимости от категории. Чем больше усилий вы приложите к созданию своей витрины и чем больше трафика вы направите на рекомендуемые вами товары, тем больше денег вы сможете заработать. Инфлюенсеры могут зарабатывать от нескольких сотен в месяц до .
Что делать, если наушники не подключаются к телефону
Можно ли подключить Galaxy Buds Pro к двум телефонам «Убедитесь, что Bluetooth-аксессуар и устройство iOS или iPadOS находятся рядом друг с другом. Выключите и снова включите Bluetooth-аксессуар. Убедитесь, что Bluetooth-аксессуар включен, полностью заряжен или подключен к сети. Если в аксессуаре используются батарейки, .
Что означает белая футболка в окне автомобиля
Зачем люди вешают полотенца на дверь «»Это просто сигнал для правоохранительных органов, что машина не брошена и что водитель скоро вернется за ней. Некоторые используют метод «полотенце/рубашка в окно», другие привязывают что-нибудь к антенне. Этот сигнал не позволит отбуксировать или конфисковать автомобиль. � » «. .
Как получить 3 месяца Peacock Premium бесплатно
Как получить премиум Peacock бесплатно «Подпишитесь на мониторинг кредитных баллов и получите 3 месяца Peacock Premium* без дополнительной платы. Предложение действительно до 29.11.2023. Предложение доступно только для новых пользователей SoFi без существующих счетов SoFi. Предложение не подлежит передаче. » «. Почему .
Как проверить, находится ли линия BT под напряжением
Как проверить линию bt «Попробуйте набрать 150 из квартиры, это будет единственный номер, который вы наберете. Звонок пройдет через отдел обслуживания клиентов, с которым линия была последней. Содержание Как проверить, находится ли линия под напряжением Почему мой сигнал BT не работает Как проверить домашнюю .
Сколько времени требуется ламинатору Scotch для нагрева
Как настроить ламинатор Сколько времени требуется термомашине для разогрева Ламинатор Scotchв «ў Thermal Laminator TL901 занимает 5-7 минут. Термоламинатору Scotchв «ў Thermal Laminator TL902A требуется 5-6 минут. Усовершенствованный термоламинатор Scotchв «ў TL1302 занимает 1 минуту. . Содержание Как узнать, когда .
Каково самое первичное желание мужчины
Чего больше всего жаждут мужчины в отношениях Инстинкт героя — это желание мужчины защищать своих близких и чувствовать себя нужным. Специалист по отношениям Джеймс Бауэр ввел этот термин в своей книге «Его тайная одержимость». Бауэр утверждает, что у всех мужчин есть биологическое стремление заслужить вашу любовь, чтобы .
Что нельзя делать при написании стихов
Легко ли написать стихотворение «В этой заметке мы рассмотрим 6 распространенных ошибок, которые обычно допускают начинающие поэты. Клише Если вы не знаете, клише — это слишком часто используемые фразы. Мелодрама. Злоупотребление такими фигурами речи, как метафора и симиле, чтобы звучать «поэтично». Ваш свободный стих — это .
Могу ли я начать карьеру в ИТ в 30 лет
Как попасть в мир технологий «Итак, вопрос «Действительно ли 30 лет слишком много для начала карьеры разработчика» не имеет особого смысла. Не существует абсолютно никакого возрастного барьера для начала карьеры в сфере технологий. Более того, никогда не поздно научиться кодить. «. Содержание Как сделать радужного .