The API Console
MuleSoft’s API Console is an enterprise grade API Documentation tool. This is an open source version of the console used in Anypoint Platform.
Usage
For best developer experience use one of our tools to use the console in your project depending on your use case:
- As a stand-alone application use CLI tool, Docker image, or manual build
- As a web component use manual build
Version compatibility
As of version 6.0.0, API Console only works with AMF model version 2 (AMF parser >= 4.0.0). For compatibility use any previous version. Note that support for previous versions has been dropped and this is the only version with active development.
Preview and development
- Clone the element.
- Install dependencies.
- Start local server.
Documentation
Full documentation is available at https://docs.api-console.io.
Use cases
Two basic use cases for API Console is:
- standalone application — enables application, full window view
- web component — lighter version, does not offer general layout and routing support
Stand-alone application
To use API Console as a stand-alone application use api-console-app element provided by api-console-app.js file. The stand-alone application supports routing and layout elements (compared to API Console as an element).
In this mode the console has title bar, drawer that holds the navigation, and main element that holds main scrolling region (the body is not a scrolling region in this case). It also enables mobile view when viewport width threshold is reached (740px). Wide view is enabled for viewport >= 1500px and includes request panel (try it) on the right hand side of currently rendered method.
Additionally the console application includes xhr-simple-request , oauth1-authorization , and oauth2-authorization components.
See demo/standalone/index.html for an example.
Web component
A web component offers rendering documentation view as a default view, on user request the request panel (when try it button is pressed), and contains an always hidden navigation that cannot be triggered from element’s UI. The application that hosts the element must provide some kind of an UI for the user to trigger the navigation. Navigation can be opened by setting the navigationOpened property/attribute to true .
Because API console as a web component has no layout element you may want to control the height of the console. It should be set as specific value to properly support navigation drawer. Specific value can also be flex: 1 when flex layout is used.
The API Console element does not include xhr-simple-request , oauth1-authorization , or oauth2-authorization components. This components has to be added to the DOM separately. You can ignore this step when authorization and request events are handled by the hosting application. See full documentation for handling API Console events.
See demo/element/index.html for an example.
Working with AMF model
API console does not offer parsing API file(s) to the data model. This is done by the AMF parser provided by MuleSoft.
For both stand-alone application and the web component version of API console you must set AMF generated model on amf property of the console. The source can be direct result of parsing API spec file by the AMF parser or a JSON+ld model stored in a file. For a performance reasons the later is preferred.
Styling API Console
Styles can be manipulated by creating a style sheet with CSS variables definition. Each component that has been used to build the console exposes own styling API.
API components ecosystem does not provide detailed documentation for styling API. Because of that when styling the console use Chrome DevTools to read name of a variable with default value to set in the style sheet.
See demo/themed/anypoint-theme.css and demo/themed/dark-theme.css files for an example of styled API Console.
Anypoint compatibility
API Console offers a compatibility property that enables (some) components to switch theme to Anypoint. All form controls in request panel, buttons, icon buttons, and lists are switched to compatibility view automatically when compatibility is set.
Note, that not all components support this property and therefore some styling adjustment may be needed. See demo/themed/anypoint-theme.css for an example of such style sheet.
Required dependencies
Note, the request panel won’t run without this dependencies.
API Console bundler and the CLI tool bundles all dependencies into a vendor.js file and adds it to the final application.
Code mirror is not ES6 ready. Their build contains AMD exports which is incompatible with native modules. Therefore the dependencies cannot be imported with the element but outside of it. The component requires the following scripts to be ready before it’s initialized (especially body and headers editors):
CodeMirror’s modes location. May be skipped if all possible modes are already included into the app.
You may want to add this dependencies to your build configuration to include it into the bundle.
Dependencies for OAuth1 and Digest authorization methods
For the same reasons as for CodeMirror this dependencies are required for OAuth1 and Digest authorization panels to work.
We’re Hiring!
Have you ever wondered how to debug or play with your cloud code in a comfortable and fast way … without any coding? Because I think it can be a huge pain.
Most probably you already know that Parse Server works very well with the REST API. If you feel the need to interact with the REST easily, you have come to the right place. Let me introduce you to the SashiDo’s API Console, part of our Dashboard. In brief think of the API Console as a simpler version of Postman and so easy to use that you will feel like a magician.
Now I will shed some light on how to use our API Console and shed some more light on:
What is an API
The ability to link with other programs and devices is an amazing thing. We are all connected to the world and each other like never before. But how does data come from one point to another — from here to there. How does different applications and devices connect with each other to allow us to do different jobs with just a few clicks?
The little-known warrior of our connected world is the Аpplication Programming Interface or API.
It is the engine behind the scenes that we take for granted but it is what makes possible all the interactivity we have come to expect and rely upon. In our context the API is a set of functions that allow the creation of applications which access the features or data of other applications or services.

What is a REST API
One of the most popular types of APIs is REST or, as they’re sometimes known, RESTful APIs. REST or RESTful APIs were designed to take advantage of existing protocols. While REST — or Representational State Transfer — can be used over nearly any protocol, when used for web APIs it typically takes advantage of the HTTP protocol.
Parse Server uses the REST API so basically you can interact with the Parse Server from anything that can send an HTTP request. There are many things you can do with the Parse REST API. For example:
- A mobile website can access Parse Server data from JavaScript.
- A web server can show data from Parse Server on a website.
- You can upload large amounts of data that will later be consumed in a mobile app.
- You can download recent data to run your own custom analytics.
In depth knowledge of how to work with the Parse REST API is available on the official Parse Server REST API Guide.
Now, after you have an understanding of how the Parse Server communicates with the outside world you might want to try some actual requests, be it to get a hands on experience, do a quick proof of concept, or just quickly test something out. You have a few options on how to do it — write client-side code, use a REST client, or simple cURL commands. But that can be a laborious process which takes away valuable time that you could be putting toward designing great experiences for your users. That’s why we made this part of your job easier by providing the API Console.
The API Console in SashiDo’s Dashboard
The API Console provides a graphical UI for exploring your Parse Server API’s resources and interacting with it. It has a beautiful interface and is pretty easy to use. You can compose requests, inspect server response, generate client cloud code calls and export cURLs painlessly
You will find SashiDo’s API Console when you enter the Dashboard, choose the app you want to work on, navigate to Core and then you will see the API Console.
Here are a few things you can do with the API Console:
- Create, read, update, and delete objects
- Run requests as a specific user of your app (to test your ACLs and CLPs)
- Call your Cloud Code functions and start background jobs
- Export the calls to cURL to test them in your Terminal or Shell
So, let’s go directly to our API Console and have a look there. You can try out some queries and take a look at what the server returns.
When you open the API Console you will find a toggle on the upper right corner, — that is where you can choose whether or not to use the Master Key when you perform sensitive API calls. Talking about sensitive API calls you will find some additional info about the use of Master Key in the Parse official REST API guide in the Security section. 
Using the Master Key will give you access to data ignoring all the ACLs and CLPs. If this isn’t a requirement for your use case, you can switch off the Use Master Key toggle
Request types
Have you ever asked yourself what is the difference between GET and POST requests, or when to use the PUT request? Having a basic information of how to execute HTTP methods with an API Console is a useful knowledge while exploring and trying out APIs. Let’s look through the different request types.
GET requests
GET requests are the most widely used methods in APIs. You can use the GET method to retrieve data from a server at the specified resource. For example, say you have an API with a classes/Users endpoint. Making a GET request to that endpoint should return a list of all available users.
Having in mind that a GET request is simplest, inquiring for statistics and no longer modifying any assets, it is considered a safe and idempotent method.
Whilst you’re developing tests for an API, the GET method will likely be the most common type of request made, so it’s essential to test every acknowledged endpoint with a GET request.
POST requests
POST requests are used to send data to the server’s API to create а resource. The data sent to the server is stored inside the request body of the HTTP request.
The simplest example is a “hello message” on a website. When you fill out the inputs in a form and hit Send, that data is put in the response body of the request and sent to the server.
It’s worth noting that a POST request is non-idempotent. It mutates data on the backend server (by creating or updating a resource), as opposed to a GET request which does not change any data. Here is a great explanation of idempotency.
Here are some tips for testing POST requests:
- Create a resource with a POST request and ensure a 200 status code is returned.
- Next, make a GET request for that resource, and ensure the data was saved correctly.
- Add tests that ensure POST requests fail with incorrect or ill-formatted data.
PUT requests
Just like POST, the PUT requests are used to send data to the API to update a resource. The difference is that PUT requests are idempotent. That is, calling the same PUT request multiple times will usually produce the identical result. In comparison, calling a POST request many times can have side effects of creating the same resource more than one time.
Testing an APIs PUT request is very much like testing POST requests. But now that we recognise the difference between the two, we are able to create API tests to affirm this behaviour.
Check for the following things when you test the PUT requests:
- Repeatedly calling the PUT request always returns the same result.
- After updating a useful resource with a PUT request, a GET request for that useful resource should retrieve the new data.
- PUT requests will fail if invalid data is sent in the request body, hence the specified resource will not be updated.
DELETE requests
The DELETE method is precisely as it sounds: delete the resource of the desired URL. This method is one of the most frequent in RESTful APIs so it is top priority to recognize the way it works.
If a brand new user is created with a POST request at the classes/User endpoint, and it can be retrieved with a GET request to classes/Users/UserID, then creating a DELETE request to classes/Users/UserID will completely remove that user.
DELETE requests must be heavily tested on the grounds that they normally dispose of information from a database. Be careful when testing DELETE methods. Ensure you are using the precise credentials and no longer checking out with actual user records.
In a normal test case, a DELETE request should look like this:
- Create a brand new user with a POSТ request to classes/_Users
- After the POST request was successful, make a DELETE request to the endpoint classes/Users/UserID
- Next, a GET request to classes/Users/UserID will return a 101 status code, with an error Object not found, in the Results, if the DELETE request was successful.
Test your ACLs and CLPs by running requests as a specific user of your app
You can call a function as a specific user and check if the user has access to the resources you are calling. This is a very easy and simple way to verify if you have correctly implemented the ACLs and CLPs for a certain user of yours. Just enter the username or user ID in the Run as.. field and perform the command you want to receive results for.
Call your Cloud Code functions
Calling your Cloud Code functions has never been so effortless as it is with our API Console. By default there is a simple cloud code function sample in the functions.js file in your Cloud Code and in your Github Repo in the cloud folder so we can use it and show you how you can call a function through the API Console.
You will simply need to go to the API Console, choose the type of request, which will be POST, and choose the endpoint. Select the POST request and the endpoint functions/hello, click on the Send query button and see if the Dashboard shows you “Hello from SashiDo’s simple cloud code” message.
Export calls to cURL
cURL is the most used command line tool for making API calls. It is great for complex operations since it is scriptable and versatile. It combines the command, the credentials, like application ID, REST API key, your desired API endpoint, query parameters and more in a single command.
There is a very easy way to create cURL commands. You can construct a request in our API Console and convert it to cURL using the Export to cURL button. It is that easy. I am sure this will save a lot of your time if you have to write it on your own. For example, if you experience an error with your Cloud Code and you are contacting our Help Desk it is a good idea to run the same request or query through the API Console, export it to cURL and then include it in the steps to reproduce. Our Dev and Engineering team will be happy to resolve your issue in a faster and more adequate manner.
Useful links:
For easing you even more we have also made a video about the API Console.
There you go! Now you have some ideas on how you can play around with the API Console or debug issues without writing a single line of code. Now it is your turn to explore it and enjoy the easiness of coding!
How to Create a Google API Console Project
The Google API Console is part of Google Cloud, a web-based coding and development platform maintained by Google.
The API console provides access to dozens of Google APIs, including popular services like Google Maps, Gmail, YouTube, and Google Translate.
Although the Google API Console may seem a bit complicated at first, it can be a powerful tool for API development. Developers who familiarize themselves with how to create a Google API console project can use its robust services and diverse interface to implement API calls more quickly and efficiently in their code.
What is Google API Console?
The Google API console is a cloud-based tool that allows API developers to manage coding projects that use Google APIs.
There are several tasks that can be managed in the console, including generating credentials for APIs and managing access to APIs and their documentation. The console also provides developers with a central location to observe traffic, errors, and latency for each project, verify the domain and manage their applications’ OAuth consent authorization.
How Do You Use the Google API Console?
To access the Google API console, you will first need a free Google account. If you don’t have one of these already, go to http://accounts.google.com/ to sign up.
After you’re logged in with your Google account, you can access the Google API console at https://console.cloud.google.com/apis/dashboard
On this screen, you will see the API console “dashboard,” a page that gives you a basic overview of all your current Google Cloud API projects. If you don’t have any projects yet, the console will show you a message saying that you need to select or create a project.
If this is your first time using the Google Cloud API console, click “create project” to get started. Otherwise, you can select an existing project on this screen.
To create a project, all you need to do is create a name for your project and select a parent organization or folder, if applicable. If you do not wish to name your project, the Google Cloud platform will randomly create a unique ID not held by any other project in all of Google Cloud. Project IDs cannot be changed after your project has been created.
Once you click the “create” button at the bottom of this page, you have successfully created a Google API console project and will be redirected to the API console dashboard, where you can now enable APIs and services to use with your project.
Who is the Google API Console For?
API developers at any level of expertise can benefit from the API console’s robust set of tools.
Beginning developers will benefit especially from the ease of access to API documentation that the console provides, while more advanced developers can benefit from Google Cloud’s automation services with many APIs and client libraries.
Why Should You Create a Google API Console Project?
Developers don’t need to use the Google Cloud console to gain access to Google’s cloud APIs. Any server application can make a call to a Cloud API using Google API client libraries for Java, Python, PHP, Dart, and many other popular API development languages. Sufficiently advanced developers can also access the APIs with their own code, rather than using a Google-provided library of the interface.
However, the API console does provide significant benefits. First, its web-based interface is intuitive and easy to use. Additionally, the fact that the platform is cloud-based means that teams of developers can more easily collaborate on a project from anywhere around the world.
The connection between the APIs and their documentation provided by Google Cloud is also a nice benefit, especially for newer developers or those who are new to the Google APIs specifically. The first step to accessing all the benefits of using Google Cloud is to create a project in the Google API console.
What Can You Expect When Creating a Google API Console project?
When creating a Google API console project, you will need to be familiar with the suite of APIs available in Google Cloud. Fortunately, these are easy to find from the API console itself.
Also keep in mind that you need a unique name for your project and a good understanding of how APIs work in general.
Use Cases and Examples of Creating a Google API Console Project
The Google Cloud platform has an enormous number of components, and the API console is no different. As a result of the dozens of APIs and services that can be accessed through the console, there are many use cases for it.
A developer creating an application that allows users to translate any website they’re reading into any language could create a Google API console project and then connect the Cloud Translation API to it. Google Cloud SQL could also be implemented in the same project to allow users to create and easily access their accounts and any stored translations, making the app much more usable.
The console also connects to the Google Analytics API. If a developer were creating a plugin that shows website analytics data, creating a Google API console project could simplify the process by providing access to the Analytics API, documentation and error reports in a single cloud-based location.
How Does the Google API Console Compare to Competitors?
All three options offer powerful cloud-based tools that connect developers with a robust suite of APIs. However, there are some differences between the three.
Chief among these is pricing. Amazon API Gateway is a monthly charge, while Microsoft Azure and the Google API console tend to charge based on usage. In Google’s case, the pricing varies widely by the API used and, in some cases, what you’re doing with that API or service. Be sure to check the cost for each API you connect to your project in the API console before you get started.
Google Cloud does offer new users a $300 credit for their services, which can make it slightly cheaper to get started with the more expensive APIs and services it uses. Of course, the Google API console is also the only service that directly connects to popular Google services like YouTube.
How to Shut Down a Google API Console Project
Google provides 11 free projects in the Google API console by default. If you need to create more projects, you can either request a quota increase or delete one of your existing projects.
Google calls deleting a project “shutting down” a project. To do this, click on the name of your project in the Google Cloud platform top menu and then select the “manage resources” icon, which looks like a folder with a gear on it. Alternatively, you can access the manage resources page directly at https://console.cloud.google.com/cloud-resource-manager
The manage resources page shows all your Google Cloud platform projects, not just those in the API console. To shut one down, select it in the menu and click the “shut down” button. Once you type in your unique project ID, you will receive a confirmation notice telling you that your project will be deleted within 30 days.
If you shut down a project by mistake, you can retrieve it at any point before the deletion date by returning to the management resources page.
Summary
The Google Cloud API console is a powerful tool in any developer’s arsenal. For developers who want to hook their applications into the Google ecosystem’s robust suite of services, it can significantly reduce development time and cost. In this brief tutorial, we covered how to create and shut down a project in the console, as well as looking at some of the benefits to developers, use cases and examples, and Google Cloud API console’s main competitors.
Introducing the Google API Console
Every day, hundreds of thousands of developers send millions of requests to Google APIs, from Maps to YouTube. Thousands of developers visit the console for credentials, quota, and more — and we want to give them a better and more streamlined experience.
Starting today, we’ll gradually roll out the API Console at console.developers.google.com focusing entirely on your Google API experience. There, you’ll find a significantly cleaner, simpler interface: instead of 20+ sections in the navigation bar, you’ll see API Manager, Billing and Permissions only:
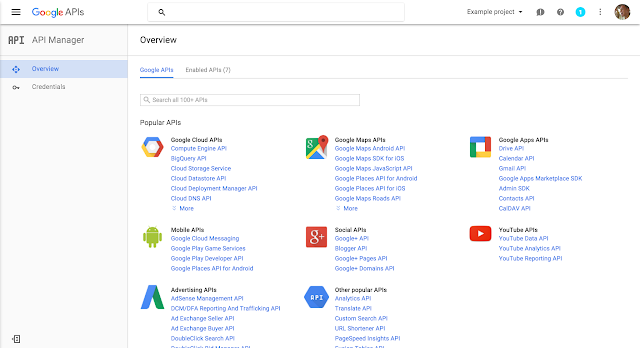
Figure 1: API Console home page

Figure 2: Navigation section for API Console
console.cloud.google.com will remain unchanged. It’ll point to Cloud console, which includes the entire suite of Google Cloud Platform services, just like before. And while the two are different destinations, your underlying resources remain the same: projects created on Cloud Console will still be accessible on API Console, and vice versa.
The purpose of the new API Console is to let you complete common API-related tasks quickly. For instance, we know that once you enable an API in a new project, the next step is usually to create credentials. That’s why we’ve built the credentials wizard: a quick and convenient way for you to figure out what kind of credentials you need, and add them right after enabling an API:
Figure 3: After enabling an API, you’re prompted to go to Credentials

Figure 4: Credentials wizard
Over time, we will continue to tailor the API Console experience for the many developers out there who use Google’s APIs. So if you’re one of these users, we encourage you to try out API Console and use the feedback button to let us know what you think!