Solved: SSD Read Only Mode in Windows 11, 10, 8, 7 (4 Methods Included)
SSD in read only mode and inaccessible? Here we will teach you how to get rid of “Read Only” error and make the SSD accessible again in your computer.
By Emily  / Last Updated May 12, 2023
Help, my Samsung SSD stuck in «read only»!
“Recently I bought a Samsung 850EVO 250GB SSD drive to store all my games. It runs great for maybe 2-5 days and then the SSD drive seems to be stuck in a read only mode. I can see it in Windows Explorer and Disk Management, but I cannot download any games on it and the disk itself says that it is ready only in Disk Management! I have tried to change it in the properties, but no luck. Any ides on what else I can do? Please help!”
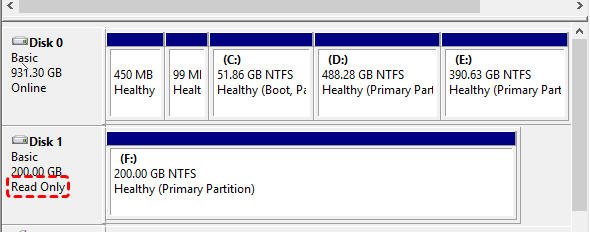
How to remove read-only attribute from SSD drive?
Generally speaking, when SSD read only mode occurs, you will be unable to modify contents on a file or save new files to it. If you want to add/write new data to a read-only SSD drive, you have to first remove read-only attribute on it and make SSD writable. Next we would tell how to clear read-only status on SSD drives on Windows computer.
Method 1. Clear read only on SSD drive via Diskpart
DiskPart is a disk partitioning utility which uses command lines to manage partitions of hard disks including creating partitions, deleting partitions, formatting partitions and so on. Below is how to remove write protection from SSD drive in Diskpart.
Step 1 . Open cmd and start Diskpart service: Press “Win+R” button at the same time and type in “cmd”, press Enter. And in the cmd window, type “diskpart” and press Enter.
Step 2 . Type “list disk” and press Enter: to get specific information about every disk on your Windows computer.
Step 3 . Type “select disk #” and press Enter: # is your drive number (0,1,2,3. ), here we select disk 1.
Step 4 . Type “attributes disk clear readonly” and press Enter: to remove the write protection on the SSD drive.
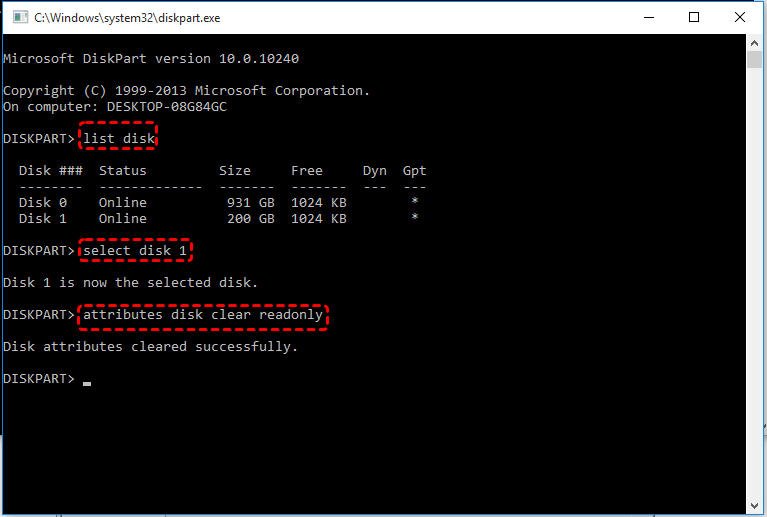
Then, the readonly attributes will be cleared successfully. After that, you can input «clean»>»create partition primary»>»format fs=ntfs» to format the read only SSD to a compatible file system, then you will be able to access data inside it.
Method 2. Edit the registry key
Editing the Registry key is another effective way to disable the write protection on the Solid State Drive.
Step 1. Press “Win+R” button to open Run dialogue and type “regedit”.
Step 2. Navigate to the path below:
Computer\HKEY_LOCAL_MACHINE\SYSTEM\CurrentControlSet\Control\StorageDevicePolicies
Step 3. Double click the WriteProtect option and modify the value from 1 to 0.
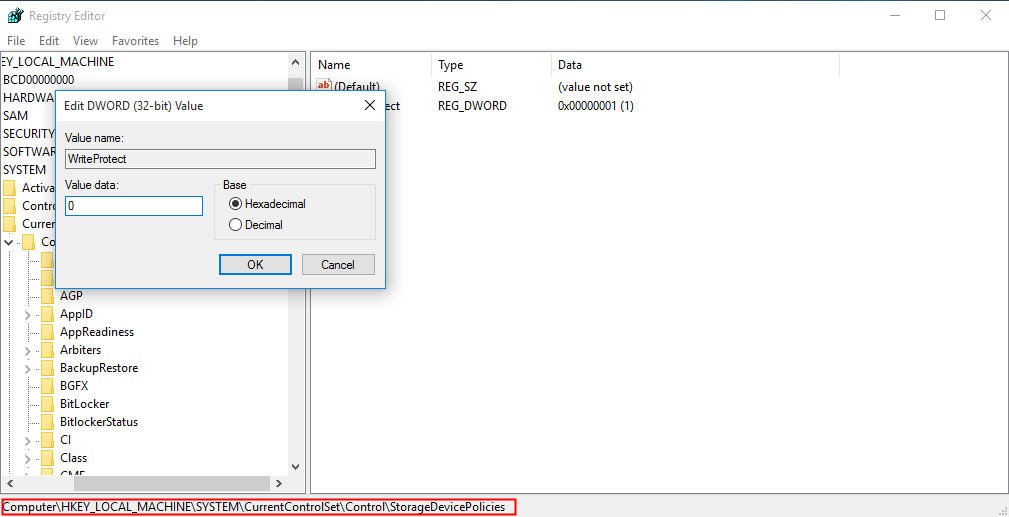
Note: if you don’t find StorageDevicePolicies under Control, do as below:
Step 1. Right click “Control” and select “New”> “Key”. Then name it with StorageDevicePolicies.
Step 2. Right click on the right blank space and go to “New”> “DWORD (32-bit) value”. Name it with Write Protect, then right click on it and select “Modify…”to change the Value data to 0.
Method 3. Run CHDSK to fix read only SSD
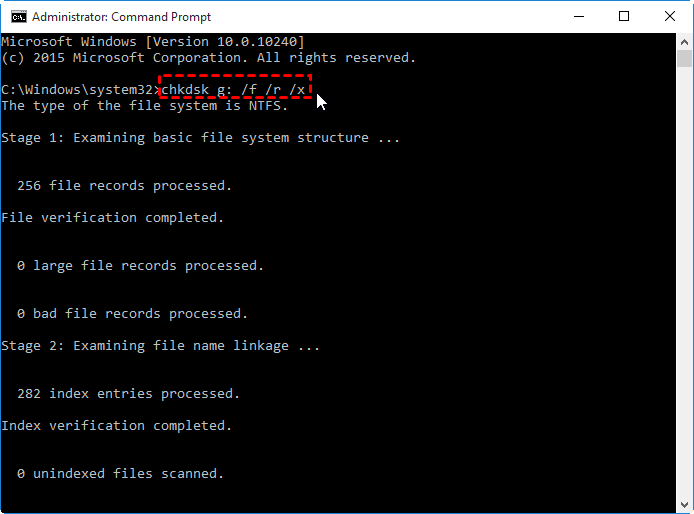
Chkdsk is a built-in Check Disk utility for Windows PC to help you fix disk errors. To correct read-only disk error, you just need to type “chkdsk f: /f” in the cmd window (the first f is the drive letter of the read only disk). But in some cases, you might meet error message saying “Windows cannot run disk checking on this volume because it is write protected”. If so, you can try another command “chkdsk g: /f /r /x” to remove write protection on the SSD drive.
Method 4. Remove read-only attribute by formatting
If all the methods don’t resolve the “SSD read only mode” issue, you can try to format it directly. You might have tried that in Disk Management and File Explorer. But failed, right? In Disk Management, the “Format…” option is greyed out for write-protected disk while in File Explorer you will meet the format error “The disk is write protected”.
So here we will highly recommend a powerful disk formatting tool- AOMEI Partition Assistant Standard . It is a freeware for you to manage disk/partition in 32-bit or 64-bit version of Windows 11, Windows 10, Windows 8.1/8, Windows 7, Vista and XP. With it, you can format write-protected SSD to FAT32, NTFS, exFAT, Ext2/3/4 successfully.
Note: formatting operation will delete everything on the SSD drive, so recover and backup important data first.
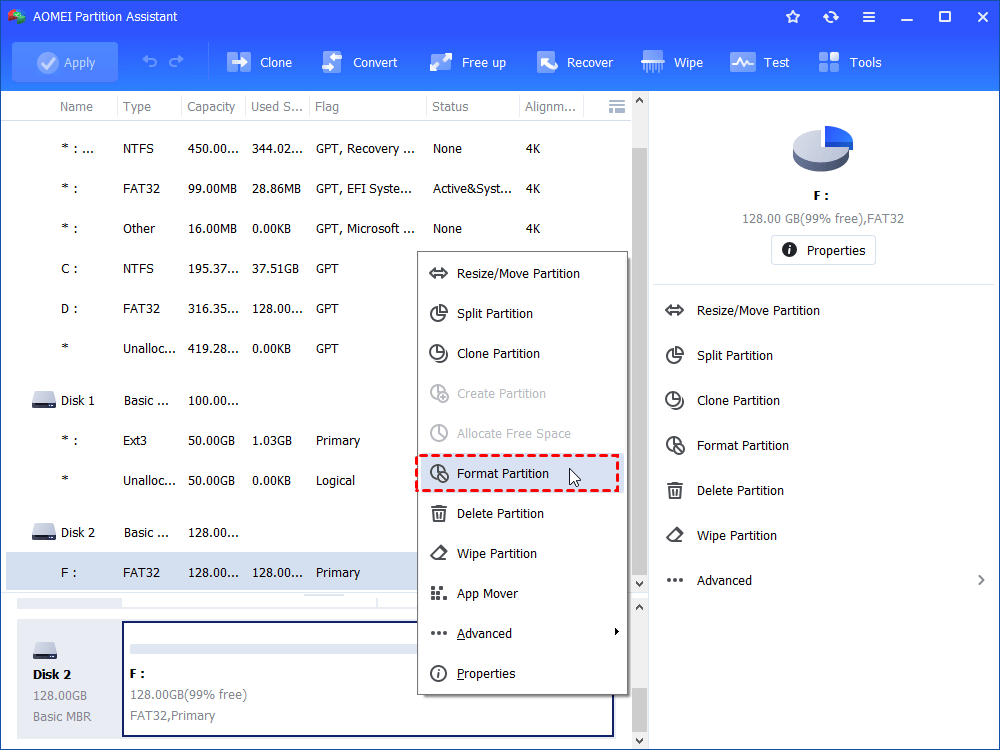
Step 1 . Download the freeware , install and launch it in your Windows computer. Right click the read only SSD drive partition and select “Format Partition”.
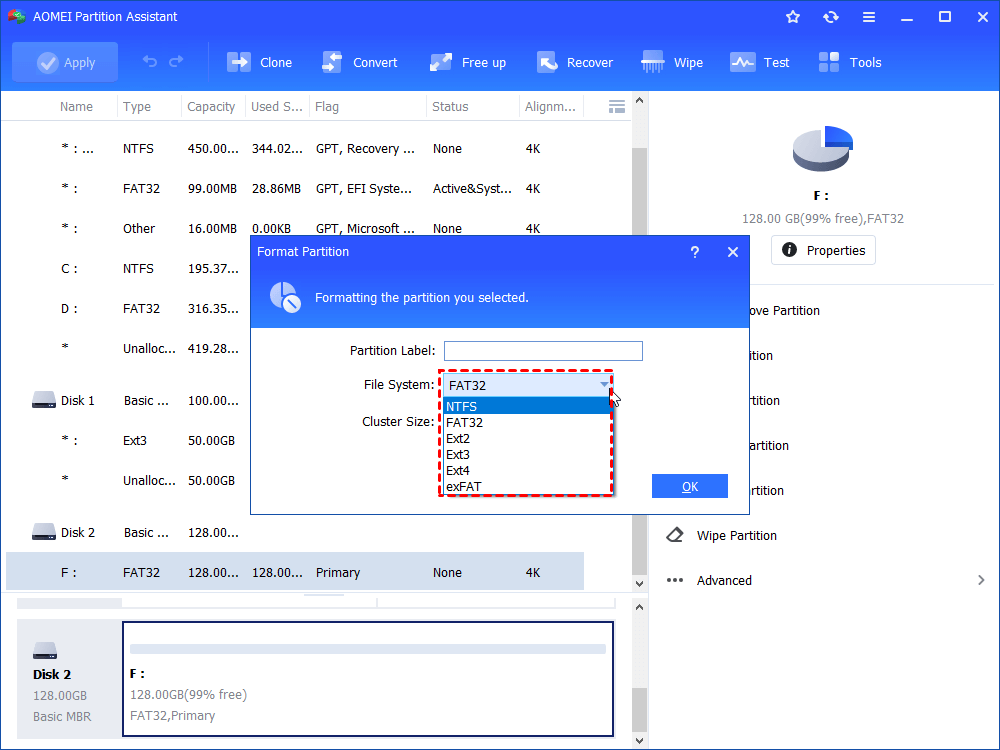
Step 2. In the mini window, you can select a compatible file system from the given options, here we select NTFS.
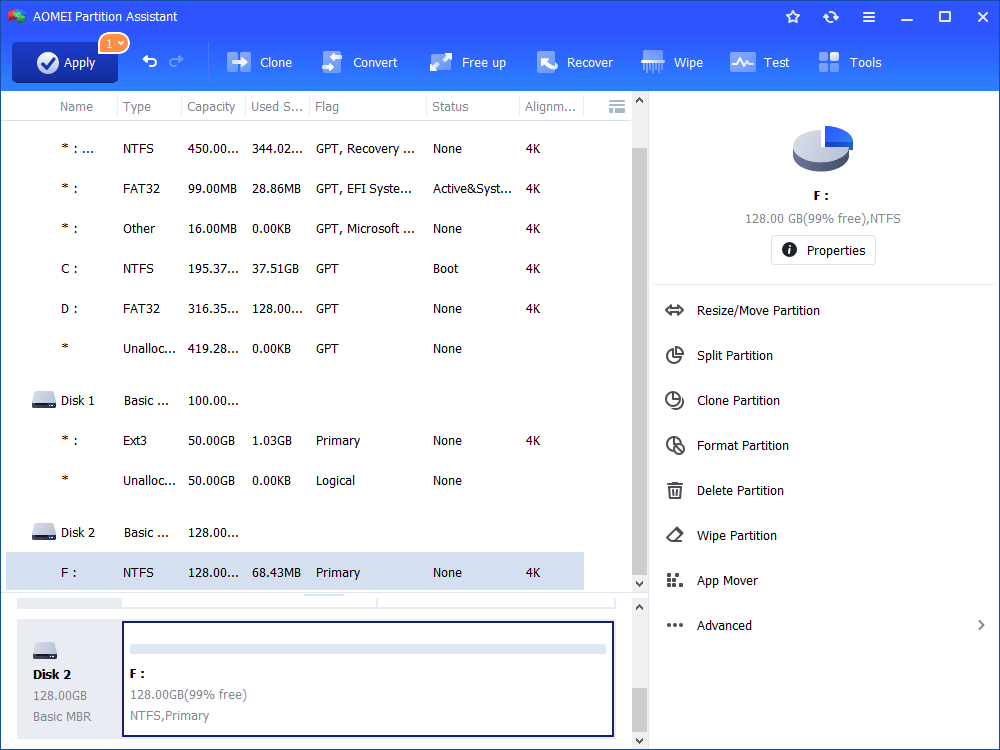
Step 3 . In the main interface of AOMEI Partition Assistant, click “Apply”> “Proceed” to execute the pending operation.
Summing up
This is all about how to fix “SSD read only mode” issue in Windows. AOMEI Partition Assistant offers the easiest and most effective way to remove write protection from SSD drive. Besides, it can perform other difficult disk/partition management tasks like repairing RAW drive , converting data disk between MBR and GPT styles without data loss, formatting large hard drive (over 32GB) to FAT32.
And you can upgrade to Professional version to experience more advanced functions such as migrating OS , allocating free space from one partition to another, spliting a large partition into smaller partitions and recovering lost partitions .
How to Fix SSD Is Locked to Read Only [Solved]
Nowadays, most of us use an SSD for it’s high read and write speed. But you may have faced an issue where you can’t use your SSD as you want. More clearly, it goes in read only mode. The question arises,
What is read only mode?
It is super common to be eager to fix this problem. As a full-time video editor, I have faced the same fate and luckily can help you come out of this nightmare. I will show you every possible way to fix this issue in this article, so stay tuned.
- Why is SSD Write Protected?
- How to Fix SSD Read Only Mode
- Method 1. Manually Unlock Write-Protected SSD with Password
- Method 2. Modify Registry Key
- Method 3. Remove SSD Read Only Issue Via Diskpart
- Method 4. Run CHDSK to fix read only SSD
- Method 5. Remove read-only attribute by formatting
Why is SSD Write Protected?
Write protected is a feature that enables users to protect their important data from being deleted, formatted, or moved. Some people use it for their hard disk, SSD, or USB drives to not get modified.
Nevertheless, write protection may give some users a hard time as they cannot copy new files in the drive or delete any data.
You will know your SSD is write-protected by facing these issues:
- You cannot open your SSD and Windows shows, “The disk is write-protected. Remove the write-protection or use another disk.”
- Your SSD is stuck in read-only mode in Disk Management.
You can manually make it write-protected, but sometimes it may be caused by various other reasons. Here I’m enlisting some reasons:
- Because of virus or malware, your SSD may get into Read Only mode.
- You may have added the write protection yourself.
- Bad sectors sometimes cause the SSD to go into Read only mode.
- Sometimes third-party softwares add write protection on your SSD.
Don’t worry; no matter what caused the problem, I will be guiding you to all the solutions.
Follow our guide to know can SSD Overheat.
How to Fix SSD Read Only Mode
In most cases, SSDs tend to be in read only mode when their lifetime write exceeds it’s limit or sometimes new SSDs tend to be read only as they are formatted as NTFS as a large number of people are PC users rather than Mac users, which causes Read Only mode.
Here I will be sharing some different ways to fix your SSD from read only mode. Here are the ways:
Method 1. Manually Unlock Write-Protected SSD with Password
If you have set the write protection on your own by setting up a password then you can simply remove it all by yourself.
If your SSD is locked through third party software then simply open up the software to unlock it with your password.
- Launch the write protection software.
- Select to remove the write protection from the SSD.
- If necessary put your password.
Method 2. Modify Registry Key
Editing the registry key is a good way to remove the read only mode. Here I will be explaining the process step by step:
- Press Windows key and search for Registry Editor and open it.
- Nevigate to Computer\HKEY_LOCAL_MACHINE\SYSTEM\CurrentControlSet\Control\StorageDevicePolicies
Note: If you dont find StorageDevicePolicies then you have to create one. Right-click Control folder and select New > Key and then name the key with StorageDevicePolicies. Now right-click in black spaces and click New > DWORD (32-bit) value and name it as WriteProtect.
- Double-click the WriteProtect key to open its properties.
- Modify the value from 1 to 0
- Click on OK to save the changes.
Now restarting your computer should ix up the issue. If not then you may proceed to the next method.
Check out our separate post: is SSD good for gaming.
Method 3. Remove SSD Read Only Issue Via Diskpart
Diskpart is a disk partitioning feature by which we can perform disk partitioning, partition formatting, partition creation, and so on. In this case, you should be careful as messing up here may cause permanent damage to the drive.
Without further ado, let’s move to the steps:
- Press the Windows key and search for Command Prompt.
- In Command Prompt, type diskpart and press enter.
- Type “list disk” and press Enter to get specific information about every disk on your Windows computer.
- Type “select disk #” and press enter. Here # is the number of the SSD drive.
- Type “attributes disk clear readonly” and press Enter: to remove the write protection on the SSD drive.
Then, the readonly attributes will be cleared successfully. After that, you can input “clean“>”create partition primary“>”format fs=ntfs” to format the read only SSD to a compatible file system, then you will be able to access data inside it.
This should fix the read only issue on your SSD.
Method 4. Run CHDSK to fix read only SSD
Having bad sectors on the drive may also cause to show “SSD is read only”. In this case, you can use CHDSK, a built-in utility that Windows PC provides, and it automatically searches for any kind of irregularities in the disk and fixes the problem.
To use CHDSK, follow these steps:
- Press the Windows key and search for Command prompt.
- In Command Prompt type “chkdsk #: /f” where # will be your SSD drive letter.
In some cases, you may encounter an error message saying, “Windows cannot run disk checking on this volume because it is write protected”. In this case, try another command “chkdsk g: /f /r /x” for removing write protection on the SSD.
Quickly check out my new post on What are the fastest PCIE 4.0 SSDs.
Method 5. Remove read-only attribute by formatting
After checking all the methods, you can try formatting the drive if you are still facing Read only issue. And you may have tried to format it from Disk Management or File Explorer but failed. As in Disk Management, the Format option is greyed out, so you cannot use that to format and in the File Explorer, an error shows “The Disk is write protected”.
So you can still format your disk by simply using a tool called AOMEI Partition Assistant Standard. You don’t need to worry as it a free-to-use software and can run in Windows 11/10/8/8.1/7 and even in Vista or XP.
Note: Formatting will erase every data or file you have on the drive. So remember to back up important data first.
For formating the drive using the tool follow these steps:
- Download AOMEI Partition Assistant Standard on your PC and install it.
- Open up the software and find the SSD that you need to fix. Right-click on the drive and select the “Format Partition”.
- In the pop-up window, you can choose a compatible file system. For Windows, select NTFS and hit OK.
- In the main interface, hit Apply and then Proceed to start the operation.
Hopefully, this should resolve the read only SSD issue. Now you can check if your SSD read only issue disappears or if the message “current read-only state: Yes” is changed to “current read-only state: No”.
Summary
By checking all the methods given above, you should be good to go. Let me know if the article helped you in any way. If you have further queries, then feel free to ask me. I’ll be more than happy to help!
SSD защищен от записи — почему и что делать?
Если при попытке редактирования или записи новых данных на SSD или любой другой тип носителя возникает ошибка типа «SSD-диск защищен от записи», это может значить либо активацию соответствующей функции, либо наличие неполадок (причем, как программных, так и аппаратных) в работе устройства. Функция защита от записи (или режим «Только для чтения») используется для защиты важных данных и файлов от случайного удаления или изменения. Т.е. в этом случае возникновение ошибки записи стоит рассматривать как нормальное явление. Другое дело, если та возникает по каким-то иным причинам.
Вот некоторые частые причины возникновения ошибки записи:
- В конструкции SSD-диска имеется механический переключатель, который был переведен в режим защиты от записи.
- Изменение настроек в самой операционной системе, вследствие чего она обеспечивает защиту данных на диске.
- Логические ошибки и/или нарушение целостности служебных данных, хранящихся на диске, вследствие чего операционная система ошибочно воспринимает диск как защищенный от записи.
- Возникновение на SSD-диске битых секторов (блоков), приведших к тому, что те были заблокированы от редактирования прошивкой (встроенным программным обеспечением) устройства.
Теперь рассмотрим, как все эти причины устранить.
Деактивация режима «Только запись» при помощи переключателя
Устранение первой проблемы из списка выше не должно вызвать никаких сложностей. Достаточно просто взять в руки SSD-диск, найти на корпусе или непосредственно на плате переключатель и перевести его в положение, которое отключит режим «Только чтение». Также возможно, что сам SSD-диск подобной функции не имеет (вообще, это редкость), но она присутствует в конструкции переходника, если таковой использовался для подключения накопителя к компьютеру. Впрочем, разницы здесь никакой.
Вот пара примеров:
- Ниже показан SSD-диск, использующий интерфейс «mini PCI-E» для подключения к компьютеру, в конструкции которого (левый нижний угол) предусмотрен искомый переключатель.

- А так выглядит переходник «M.2 — USB Type-C», что используется для подключения SSD-дисков в форм-факторе «MS» к интерфейсу «USB Type-C». Как можно видеть ниже, рядом с портом для подключения USB-кабеля присутствует переключатель с характерными значками:

Здесь больше нечего добавить, идем дальше.
Изменение настроек операционной системы
К такой ситуации могут привести самые различные причины — от неосторожных действий пользователя при попытке, например, сменить основную загрузочную запись MBR на GPT, до действий вредоносных программ. Нельзя исключать и ошибки, вызванные встроенной в SSD-накопитель микропрограммы или вовсе самой операционной системой. В решении этой проблемы может помочь системная Windows-программа Diskpart или редактор реестра.
Снятие защиты от записи при помощи Diskpart
Первое, что нужно сделать — запустить командную строку Windows от имени администратора: запустите «Диспетчер задач» клавишами «Ctrl + Shift + Esc», откройте в нем меню «Файл» и выберите пункт «Запустить новую задачу», затем — в отобразившемся окне — введите без кавычек «cmd», установите галочку «Создать задачу с правами администратора» и нажмите «ОК»:

- Введите в командную строку без кавычек команду «diskpart» и нажмите Enter.
- Введите «list disk» и нажмите Enter. В отобразившемся списке нужно получить номер диска, который соответствует заблокированному SSD-накопителю (если к компьютеру подключен только он один, то в списке будет всего один элемент — «Disk 0»).
- Далее введите команду «select disk N», заменив букву «N» на полученный ранее номер диска (например, «select disk 0»), после чего нажмите Enter.
- И последнее — введите команду «attributes disk clear readonly» и также нажмите Enter. Если все прошло успешно, на экране отобразится сообщение о том, что «Атрибуты диска успешно очищены»:

Снятие защиты от записи при помощи Редактора реестра
Для начала запустите Редактор реестра из меню «Пуск» или системной программы «Выполнить»: нажмите клавиши «Win + R», впишите в текстовую строку без кавычек команду «regedit» и нажмите «ОК»:

- В Редакторе реестра перейдите по следующему адресу:
Компьютер\HKEY_LOCAL_MACHINE\SYSTEM\CurrentControlSet\Control
- Проверьте, существует ли в разделе «Control» подраздел «StorageDevicePolicies». Если да, откройте его, иначе — создайте вручную. Для этого кликните правой кнопкой мыши по разделу «Control», выберите пункт меню «Создать», затем — «Раздел». Переименуйте созданный «Новый раздел #1» в «StorageDevicePolicies» и откройте его:

- Если подраздел «StorageDevicePolicies» уже имелся в реестре, то внутри него должен присутствовать параметр «WriteProtect». Если нет, создайте его вручную: кликните по пустой области в левой части окна, выберите пункт «Создать», затем «Параметр DWORD (32 бита)». Переименуйте созданный «Новый параметр #1» в «WriteProtect» и сразу кликните по нему два раза мышкой, чтобы открыть:

- Открыв параметр «WriteProtect», впишите в поле «Значение» цифру «0» и нажмите «ОК», чтобы сохранить изменение.

Возможно, придется перезагрузить компьютер, чтобы изменения вступили в силу.
Логические ошибки и/или нарушение целостности служебных данных
В большинстве случаев обозначенные причины устраняются путем удаления с диска всех имеющихся разделов и последующего создания новой разметки. Т.е. эта операция приведет к уничтожению всех хранящихся на SSD-накопителе данных. Т.к. наша проблема — это ошибка записи, значит, мы можем спокойно скопировать все файлы на другой диск. Можно, конечно, попробовать восстановить эти данные после создания новой разметки (физически они все еще будут храниться на диске), используя соответствующие программы, но 100%-й гарантии успешности операции никто не даст.
Первое, что нам нужно сделать — полностью очистить SSD-диск от созданных на нем разделов, т.е. удалить разметку. Воспользуемся все той же консольной утилитой Diskpart:
- По инструкции выше запустите командную строку от имени администратора, а затем выполните в ней команду «diskpart».
- Находясь в консоли «Diskpart», выполните команду «select disk N», заменив «N» на номер диска (как его определить, тоже рассмотрено выше).
- Для удаления разметки выполните команду «clean».

- Дождитесь надписи «Очистка диска выполнена успешно», после чего консоль можно закрыть.
Теперь SSD-диск вернется к тому состоянию, в котором он пребывал на полке в магазине. Чтобы работать с ним, потребуется создать хотя бы один раздел. Это, конечно, можно было бы сделать и через Diskpart, но удобней использовать другую системную программу — «Управление дисками»:
- Откройте окно «Выполнить» (Win + R) и выполните команду «msc».

- В нижней части отобразившегося нового окна «Управление дисками» найдите диск, напротив которого виднеется надпись «Не распределена». Кликните по области с этой надписью и выберите в меню пункт «Создать простой том»:

- В еще одном новом окне нажмите «Далее», затем введите размер для создаваемого раздела (тома). Если нужно, чтобы их было несколько, указываемый размер не должен превышать общий объем памяти SSD-накопителя.

- На следующем шаге нужно будет выбрать букву для раздела — выберите любую и нажмите «Далее».

- Дальше будет предложен выбор файловой системы. Выберите «NTFS» (при необходимости файловую систему потом можно будет изменить без полной очистки диска, но обычно этого не требуется). Можно также задать имя для тома в соответствующем поле.

- Нажмите «Готово» в следующем окне, чтобы завершить процедуру.

Теперь созданный только что раздел (или несколько) должны будут появиться в «Проводнике» с указанной буквой и под указанным именем.

Ошибка записи на SSD, вызванная битыми блоками
Касательно битых секторов (в случае с SSD их правильней называть битыми или нечитаемыми блоками памяти), то тут, если честно, эффективного решения проблемы с ошибками записи не существует. Все дело в устройстве твердотельных накопителей. Как известно, элементы памяти в любых современных SSD-дисках подвержены износу. Их рабочий ресурс привязан к количеству циклов перезаписи в них данных.
Как только это количество приближается к критическому значению, микропрограмма (прошивка), которая отвечает за управление контроллером и чипами памяти, автоматически помечает изношенные блоки атрибутом «Read only», т.е. «Только чтение». С этого момента запись данных в них становится невозможной. Если SSD-диск новый, то битые блоки как бы подменяются блоками из резервного хранилища — так же, как и в случае с жесткими дисками. Но резервная память не бесконечна. Со временем из строя начнут выходить все остальные элементы памяти. Они будут помечаться прошивкой атрибутом «Только чтение» и, в конце концов, на SSD-диск невозможно будет что-либо записать вообще.
Т.к. восстанавливать израсходовавшие свой ресурс ячейки памяти еще не научились (ну или производители SSD просто не афишируют, как это делать, ведь тогда диски перестанут массово покупать), пользователям остается только побеспокоиться о сохранности своих данных. В отличие от жестких дисков, у которых битые сектора могут возникать из-за механических повреждений, информация с SSD-накопителя можно скопировать на другой носитель. Но тянуть с этим не стоит, т.к. элементы памяти с атрибутом «Read only» вскоре совсем выйдут из строя.
Отслеживание состояния SSD-диска
Чтобы не упустить возможность скопировать данные с SSD-диска до того, как все его ячейки памяти перестанут функционировать, производители этих устройств настойчиво рекомендуют мониторить состояние (здоровье) накопителя. Это несложно — достаточно установить на компьютер фирменную программу, поставляемую самими производителями SSD-накопителей. Вот список некоторых из них:
Ниже показано главное окно программы Samsung Magician, в котором приведен статус для текущего технического состояния SSD-накопителя (в данном случае — «Good»):

Обратите внимание, что над статусом указан общий объем данных, записанный на диск с момента его первого включения. Во многих интернет-магазинах в характеристиках SSD-накопителей указывается значение для параметра «Максимальный ресурс записи» или «Total Bytes Written» (сокращенно «TBW»), выражаемое в терабайтах. Т.е. при приближении значения «Written» в программе «Samsung Magician» к максимальному значению TBW можно начинать беспокоиться о переносе данных с SSD.
Stay Tuned!
Subscribe to our newsletter to get our newest articles instantly!
Follow Us
Tech. Creative. eBusiness.

The Key Applications of AI and

AI-Driven Retail: Enhancing Customer Experience

Secure Your Future: The Vitality of

Unleashing Zero Trust: Cybersecurity’s Game-Changer!
82-92 Campbell Street, Surry Hills, NSW, 2018, Australia
How to Fix a Solid State Drive (SSD) Read-Only
- BY Dewacorp Support
- 8 October 2022
- 0 Comments
- 600 Views
The Challenge
We had a Samsung Solid State Drive (SSD) disk that has bad sectors scattered across the disk. We found these bad sectors through the application called Samsung Magician.
We bought this disk about a year ago and we contacted the vendor and they said the disk has 5 years warranty. Technically, we can return this faulty disk and get a new one from the vendor that we bought from.
Due to we have data that needs to get it back (just in case), we have to clone the disk using a tool called Ease Partition Master. Prior to doing the disk clone, we bought a Samsung SSD SATA 3 similar size and we did the clone successfully.
Next before returning, we need to wipe the data. However, when we try to fix the disk and reformat the data, we are not able to do that due to Read Only.
A read-only mode is when you can only view, copy, or read files from the SSD but can’t modify or write to any of them.
What We Have
Samsung EVO 970 M.2 1 TB
Why SSD Write Protected
Write protection is a feature that is activated on external devices such as hard disks, SSDs, and USB drives to keep data safe. People sometimes go this route when they want to stop their data from getting deleted, reformatted, or moved accidentally.
- In Disk Management on Windows, the SSD is marked as a read-only mode
- Can not open the SSD and Windows shows “The disk is write-protected. Remove the write-protection or another disk”.
What causing these:
- You may add the write protection yourself
- The bad sector can cause this
- Third-party software can add a write protection
The Solution
We researched this issue and found some methods. We then tested each method and we found some did not work and some worked. Then we documented this.
Method 1 – Remove SSD Read only via Diskpart command
Diskpart is a utility that we can use to manage partitions and format disks. You should be careful though or you might mess something up and get rid of all the data currently stored on that drive.
Press the Windows key and search for Command Prompt
In the command prompt, type in “diskpart”:
Then, type in the list disk:
Type “select disk #“.
Type “attributes disk clear readonly“:
Quit from the diskpart utility.
A tool like Disk Management is often useful for troubleshooting issues. Check again.
Method 2 – Run CHKDSK to fix bad sector
Sometimes, bad sectors on the drive can cause Windows to show that you are using a read-only SSD. For example, if this is happening on your PC, CHDSK might be able to repair it. This program is built into most versions of Windows and automatically searches for any kind of irregularities in the disk and fixes them.
Press the Windows key and search for Command Prompt
In the command prompt, type in “chkdsk #: /f /r /x” where # is your SSD
Exit from the command prompt.
On Windows, check again the disk status via Disk Management.
Method 3 – Format via AOMEI Partition Assistant Standard
After testing all the methods above and still facing Read Only issue, we tried to format the drive from Disk Management or File Explorer and still failed. In Disk Management, the Format option is greyed out. In the File Explorer, an error shows “The disk is write protected”.
We found this tool called AOMEI Partition Assistant Standard.
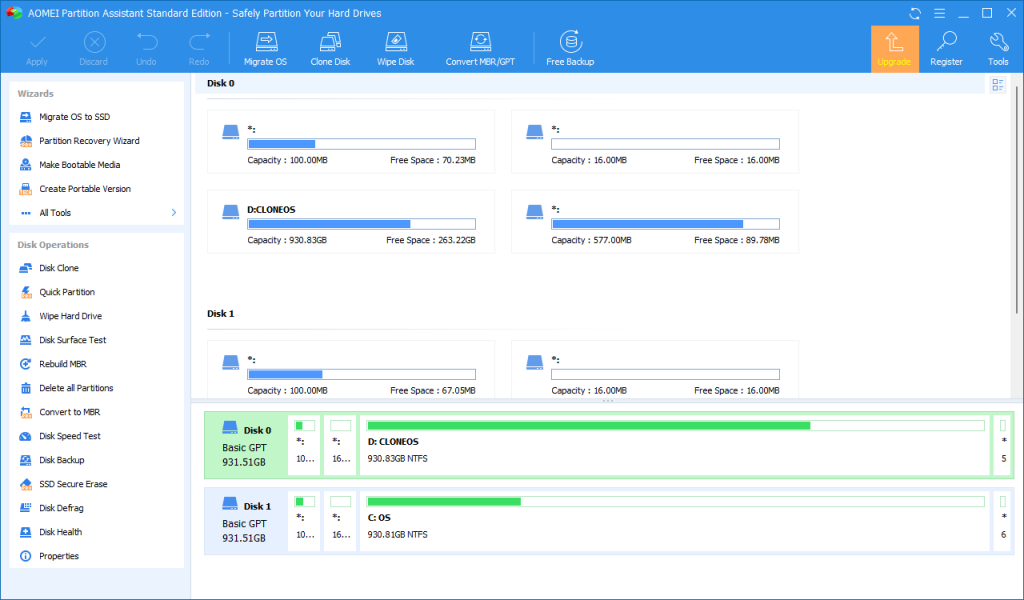 AOMEI Partition Assistant Standard
Follow this step below:
Download AOMEI Partition Assistant Standard on your PC.
Install the software.
Open up the software and find the SSD that you need to fix.
Right-click on the drive and select “Format Partition”.
In the pop-up window, you can choose a compatible file system. For Windows, select NTFS and hit OK.
In the main, click Apply and then Proceed to start the operation.
Check again the disk status via Disk Management on Windows.
The End
Congratulation on reaching the end of this article. We hope we have shed some light on outlining how to fix SSD read-only.
We write this so that this is not a fixed article. Like in this journey, we learn as we go and re-write some parts, so please keep pinging with this article.
We also would love to hear about how you deal with the situation and what problems you might be facing. Please feel free to comment below this article or jump into our Dewachat and let us know if you have any questions we can answer!
To boost your product and service to the broader web community, you can visit our Dewalist classified website – home to 33,000+ active users and 40,000+ one year of active advertising so far. Check it out!
If you love this article or any tech posts and you would like to receive an update of this article or our latest post, please sign up for the form below: